Production Tracking
Loupe Factory's production tracking module lets you model and monitor multi-stage manufacturing processes from start to finish. This guide covers how to define production stages, track inputs and outputs at each stage, and record waste, rejection, and scrap.
Production List Page
The Production List page gives your team one central place to manage every production job. Instead of checking separate records one by one, teams can review the full production pipeline, spot active work quickly, and move from planning to execution with better visibility.
This page is especially useful for production managers, operations teams, and shop-floor coordinators who need to understand what is in progress, what is completed, and what still needs attention.
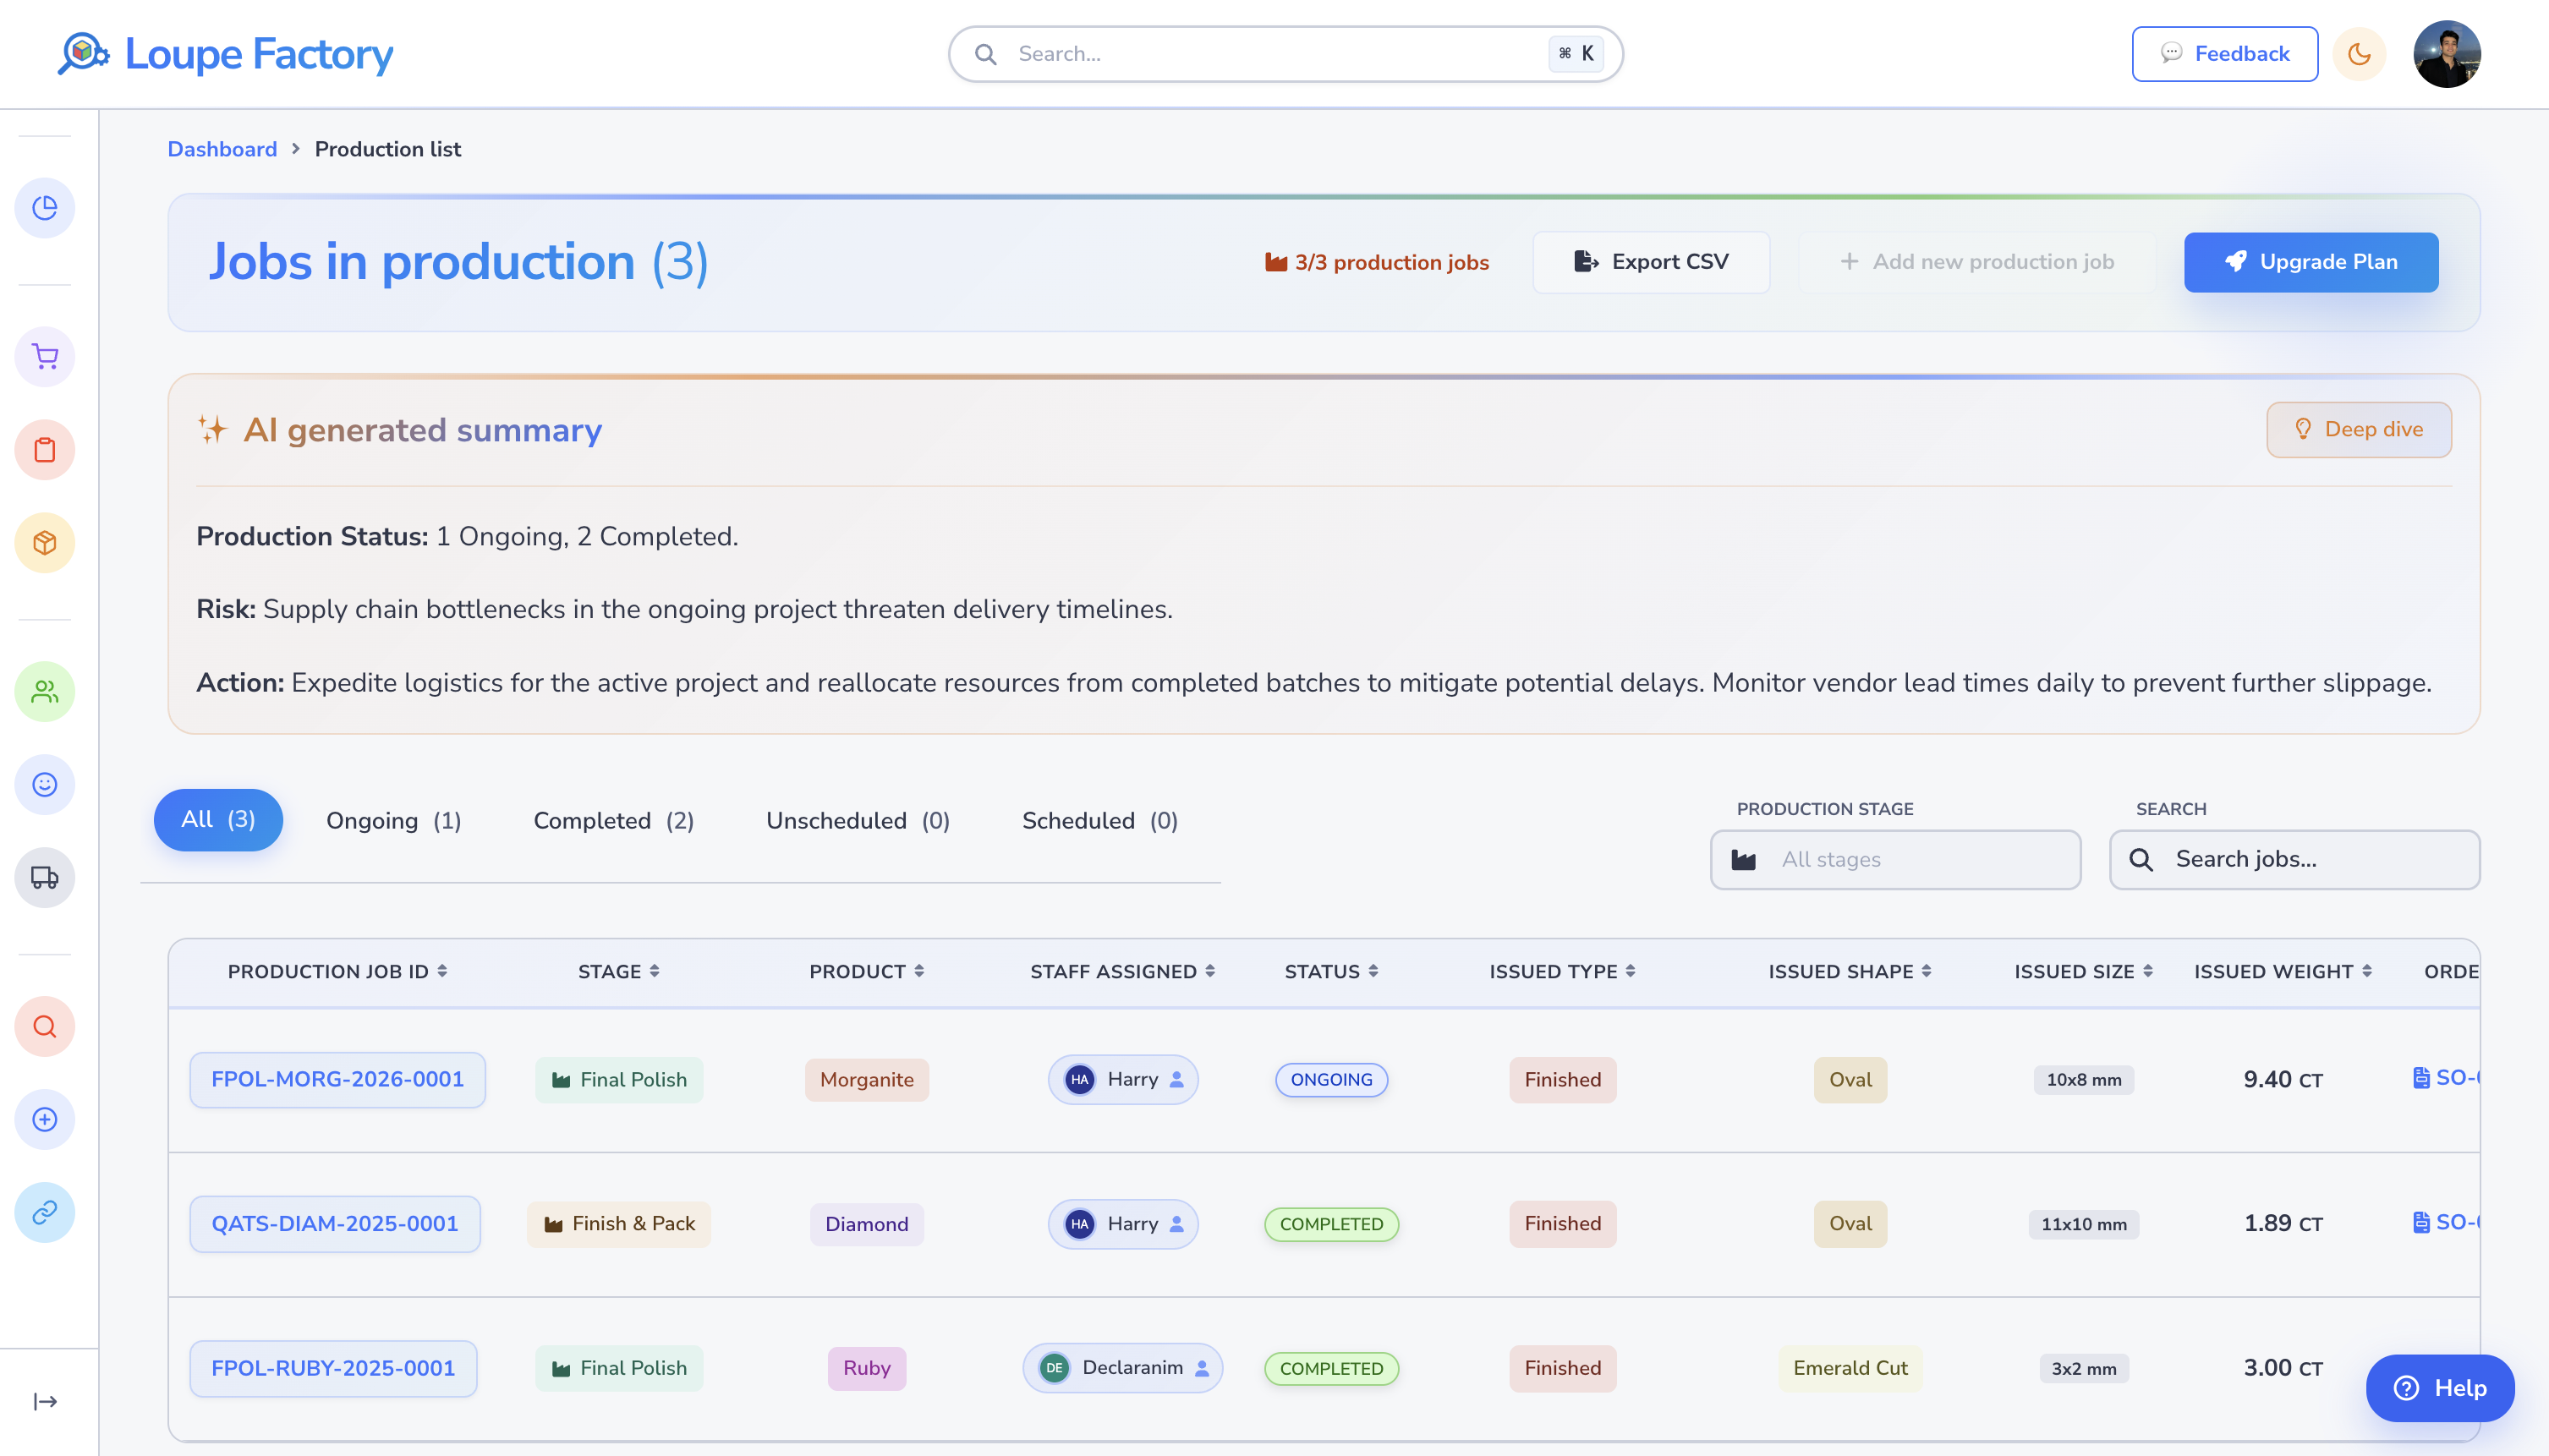
From this page, users can:
- review all production jobs from one list
- switch between All, Ongoing, Completed, Unscheduled, and Scheduled job views
- scan key job details such as the production job ID, stage, product, staff assigned, status, issued type, shape, size, and issued weight
- filter jobs by production stage
- use the search field to find jobs faster
- open a job directly from the list for deeper tracking and updates
The built-in summary at the top also helps teams understand the current production picture at a glance, so it is easier to identify risk, monitor progress, and keep work moving.
Admins can export the jobs already loaded on this list to CSV. The download uses the same in-app one-time email code as the other protected lists. See Verified list exports.
Overview of Multi-Stage Production
A production job in Loupe Factory is made up of one or more sequential stages. Each stage represents a distinct step in your workflow: for example, receiving, fabrication or assembly, finishing, and quality inspection. Tracking each stage separately gives you full visibility into where materials are at any point in time and where losses occur.
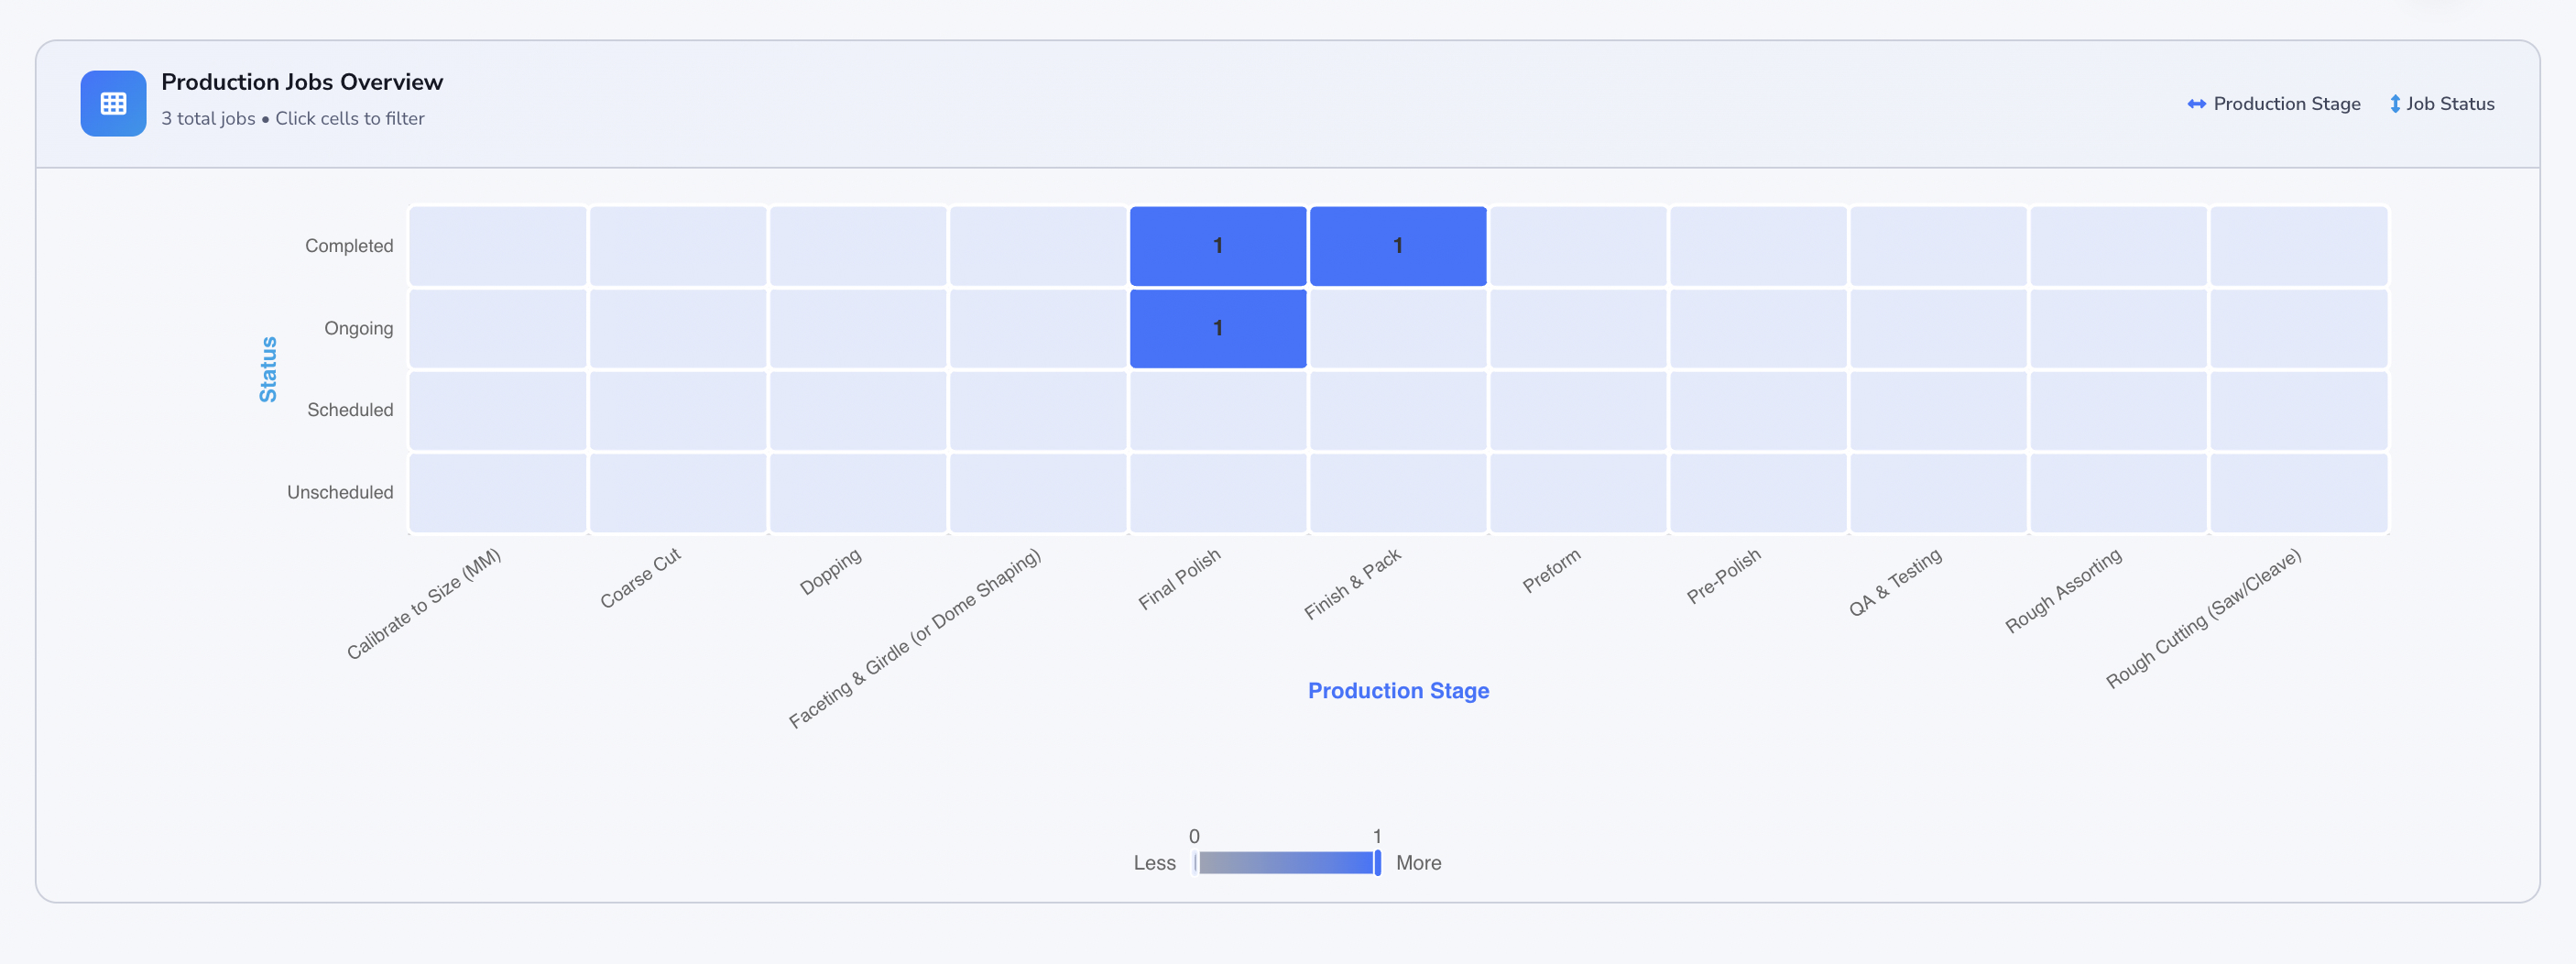
The multi-stage production overview makes this even easier to understand by showing how jobs are distributed across production stages and job statuses in a single visual view. This helps teams see where work is flowing well, where jobs are building up, and which stages may need attention first.
Defining Production Stages
Before recording any production activity, you need to set up the stages that make up your process.
Create a Production Job
Loupe Factory's production module lets you create production jobs from real order demand, issue source inventory into those jobs, and receive finished, rejected, scrapped, and wasted output in a structured way.
To create a new production job:
- Go to the Production List page.
- Click Add new production job.
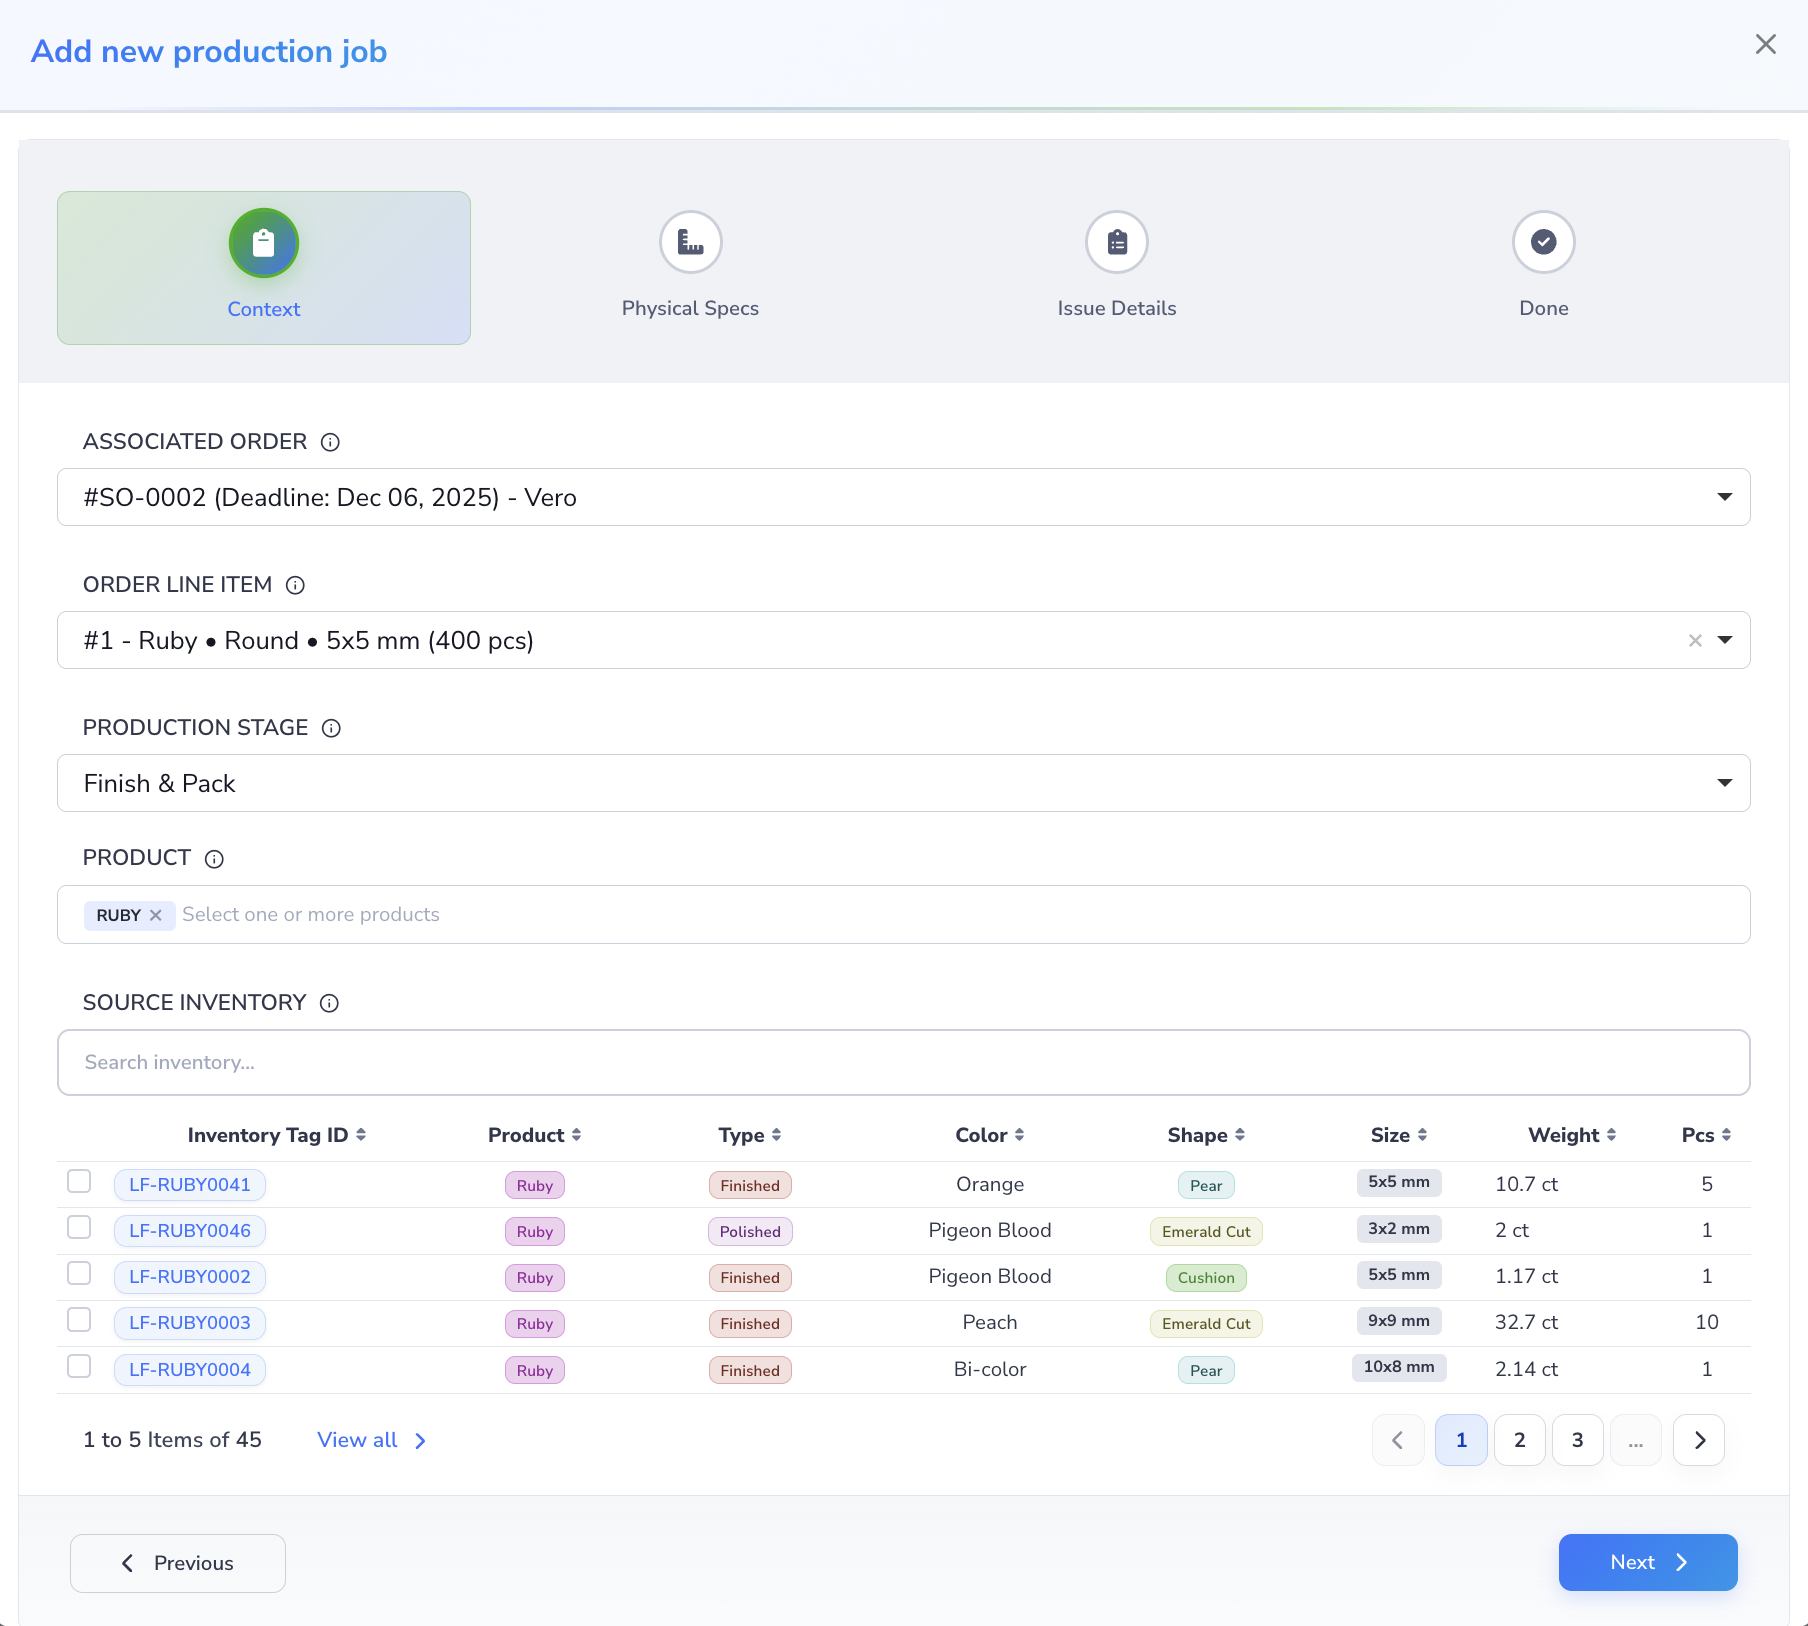
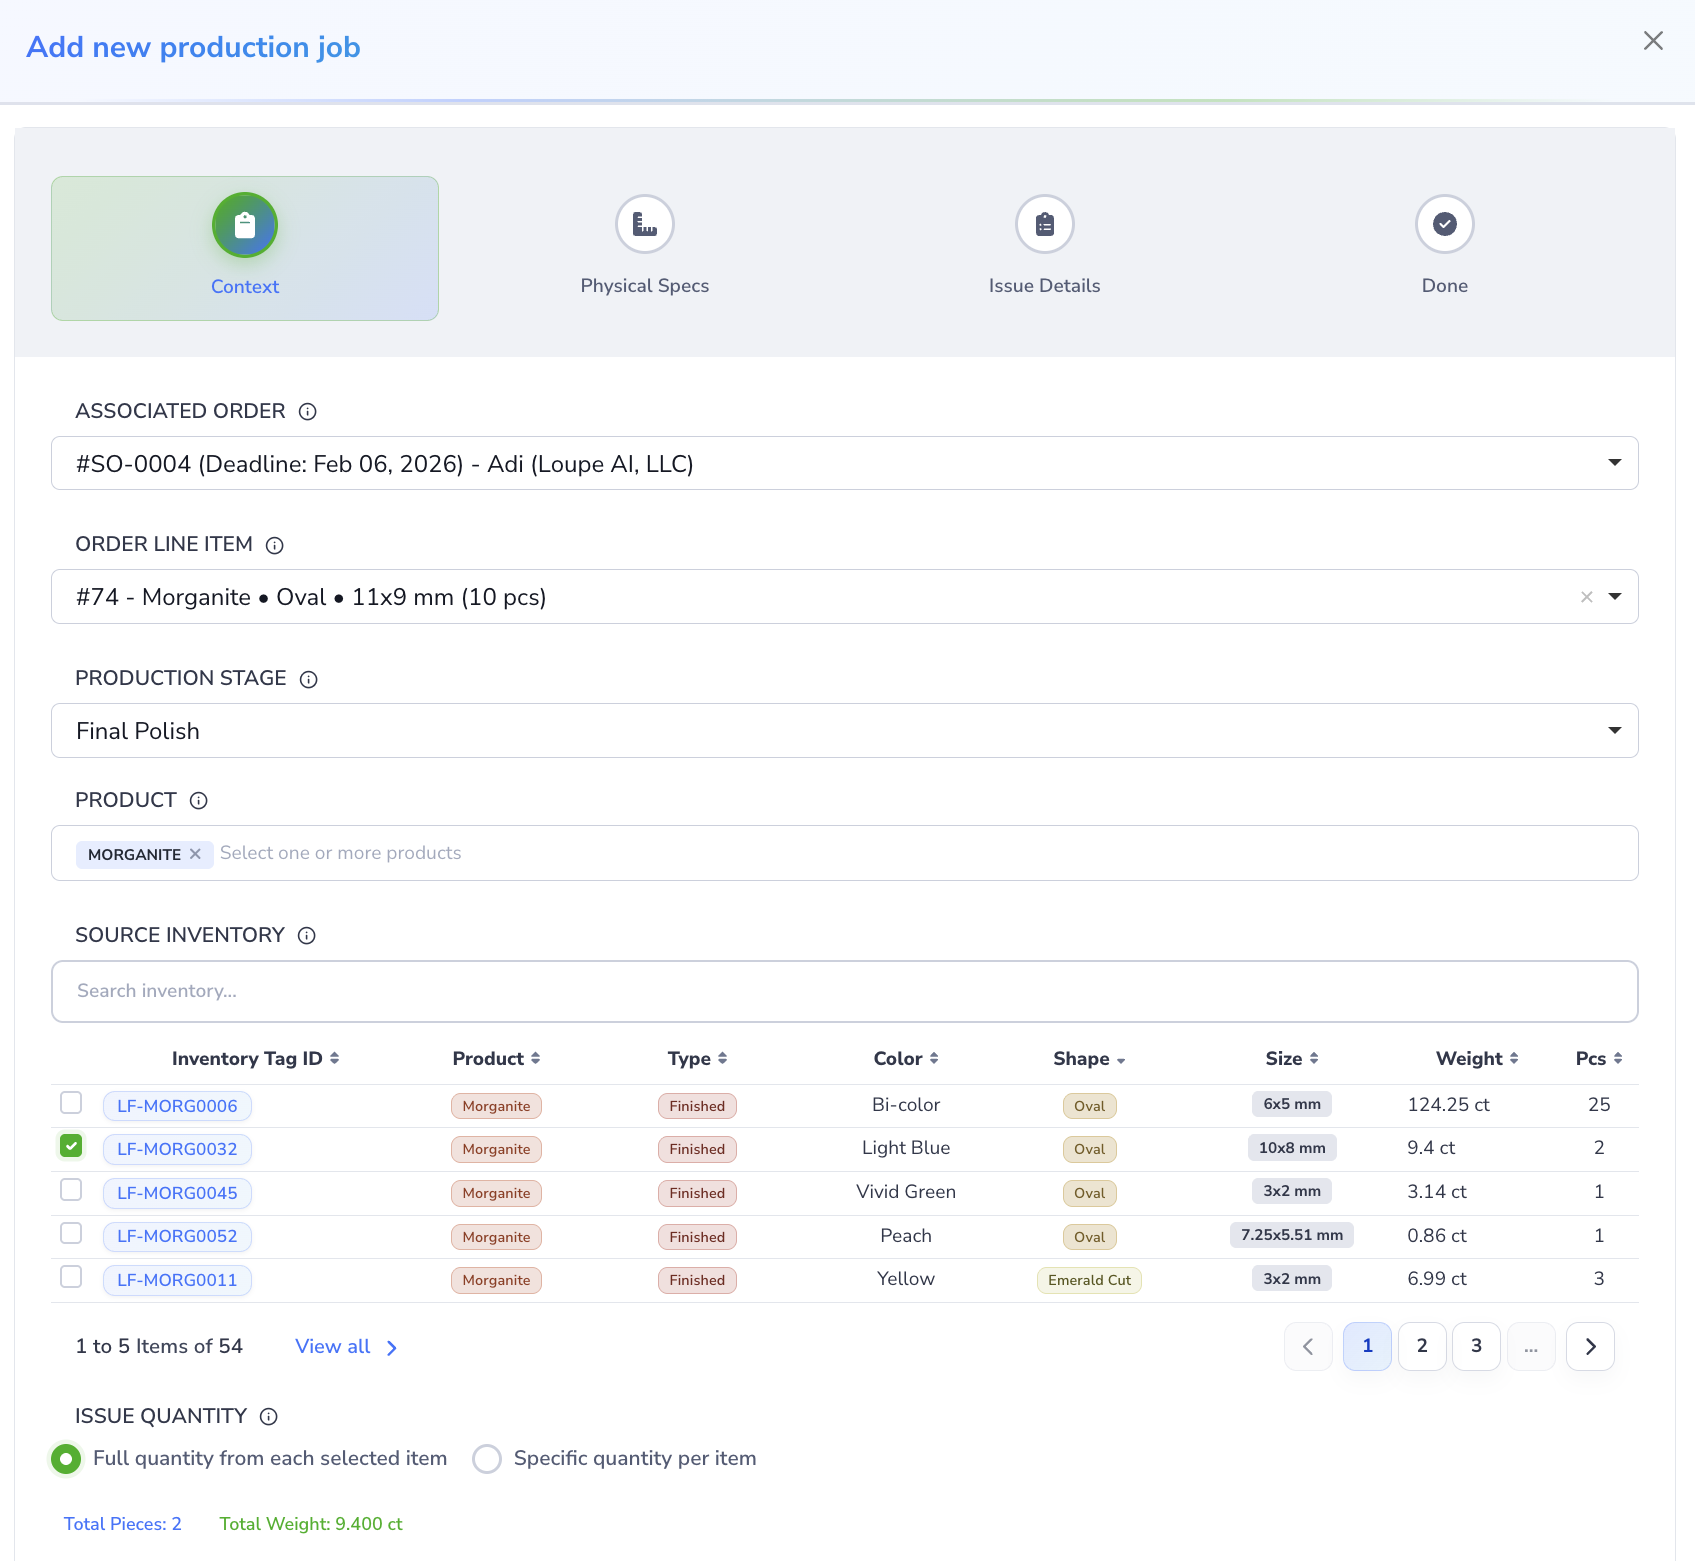
Step 1: Context
In the Context step, complete the operational setup for the job:
- Select the associated order.
- Select the order line item the job belongs to.
- Select the correct production stage.
- Select one or more products to look up matching source inventory.
- Review the source inventory list and choose the inventory items that should feed this job.
- Decide how inventory should be issued:
- Full quantity from each selected item
- Specific quantity per item
Loupe Factory uses the selected stage and product context to help narrow the inventory that should be issued into the job.
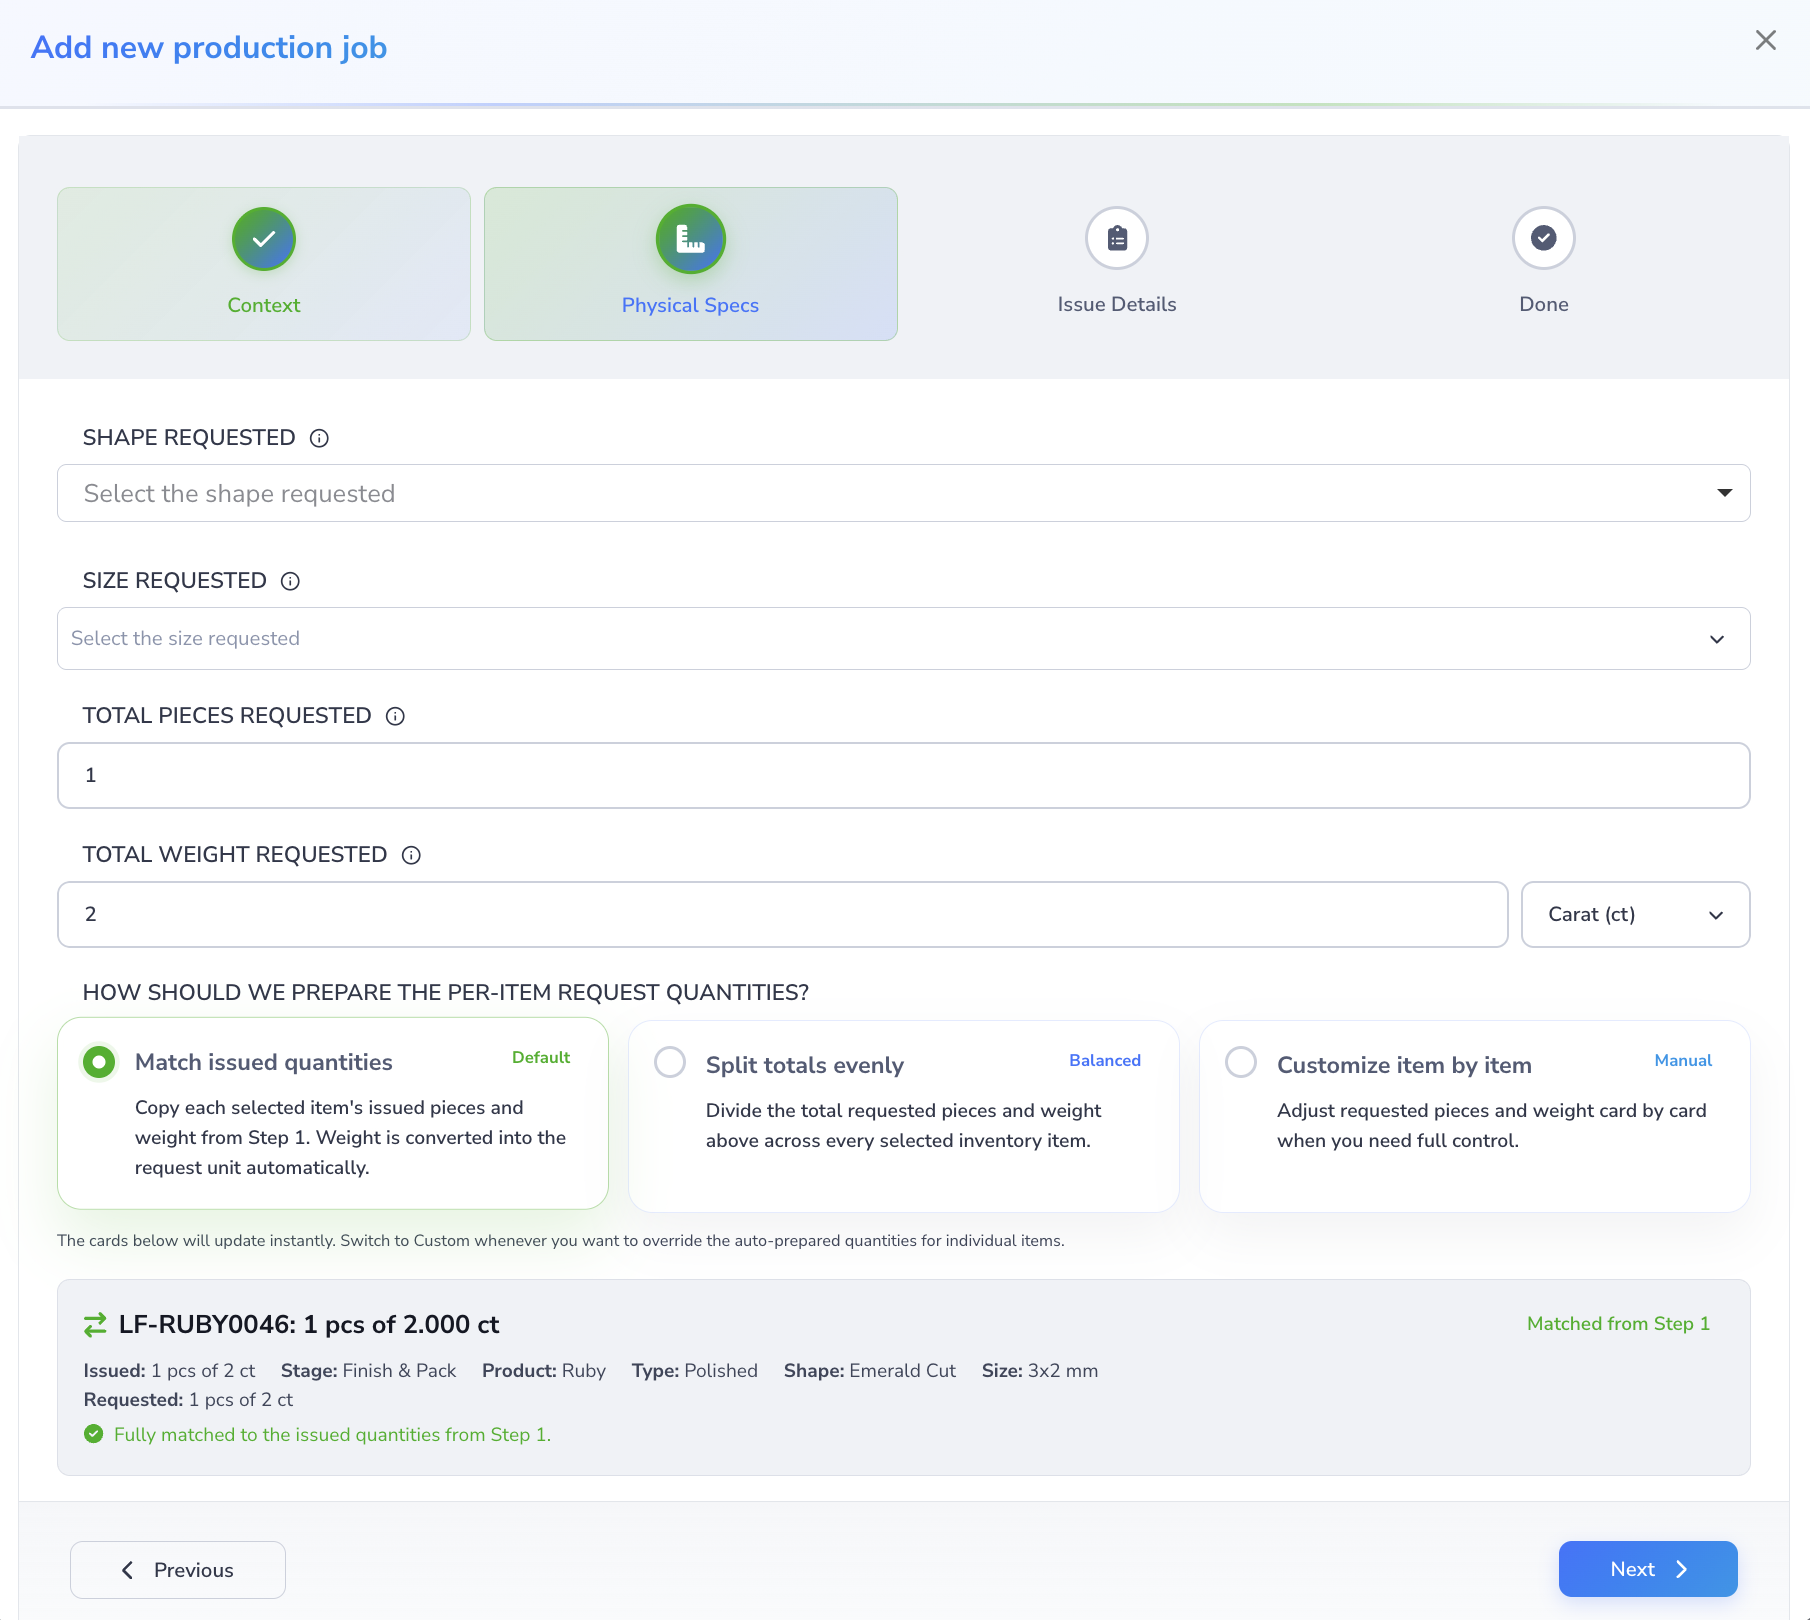
Step 2: Physical Specs
In Physical Specs, define what the job is expected to produce:
- Select the shape requested. The field takes as many shapes as the work calls for. Pick Round and Oval and the size list offers your Round sizes and your Oval sizes together.
- Select the size requested.
- Enter the total pieces requested.
- Enter the total weight requested and choose the weight unit.
- Choose how per-item requested quantities should be prepared:
- Match issued quantities
- Split totals evenly
- Customize item by item
If you issue several parcels to one job, turn on Set shape & size per source. Every parcel then gets its own requested shapes and sizes. The job list shows each requested shape and size across the whole job, listed once.
Single-shape jobs work as they always have. Existing jobs are unchanged until someone edits them. There is nothing to configure.
This step is useful when one production job is fed by several inventory items but your team still needs a clear requested output target.
Step 3: Issue Details
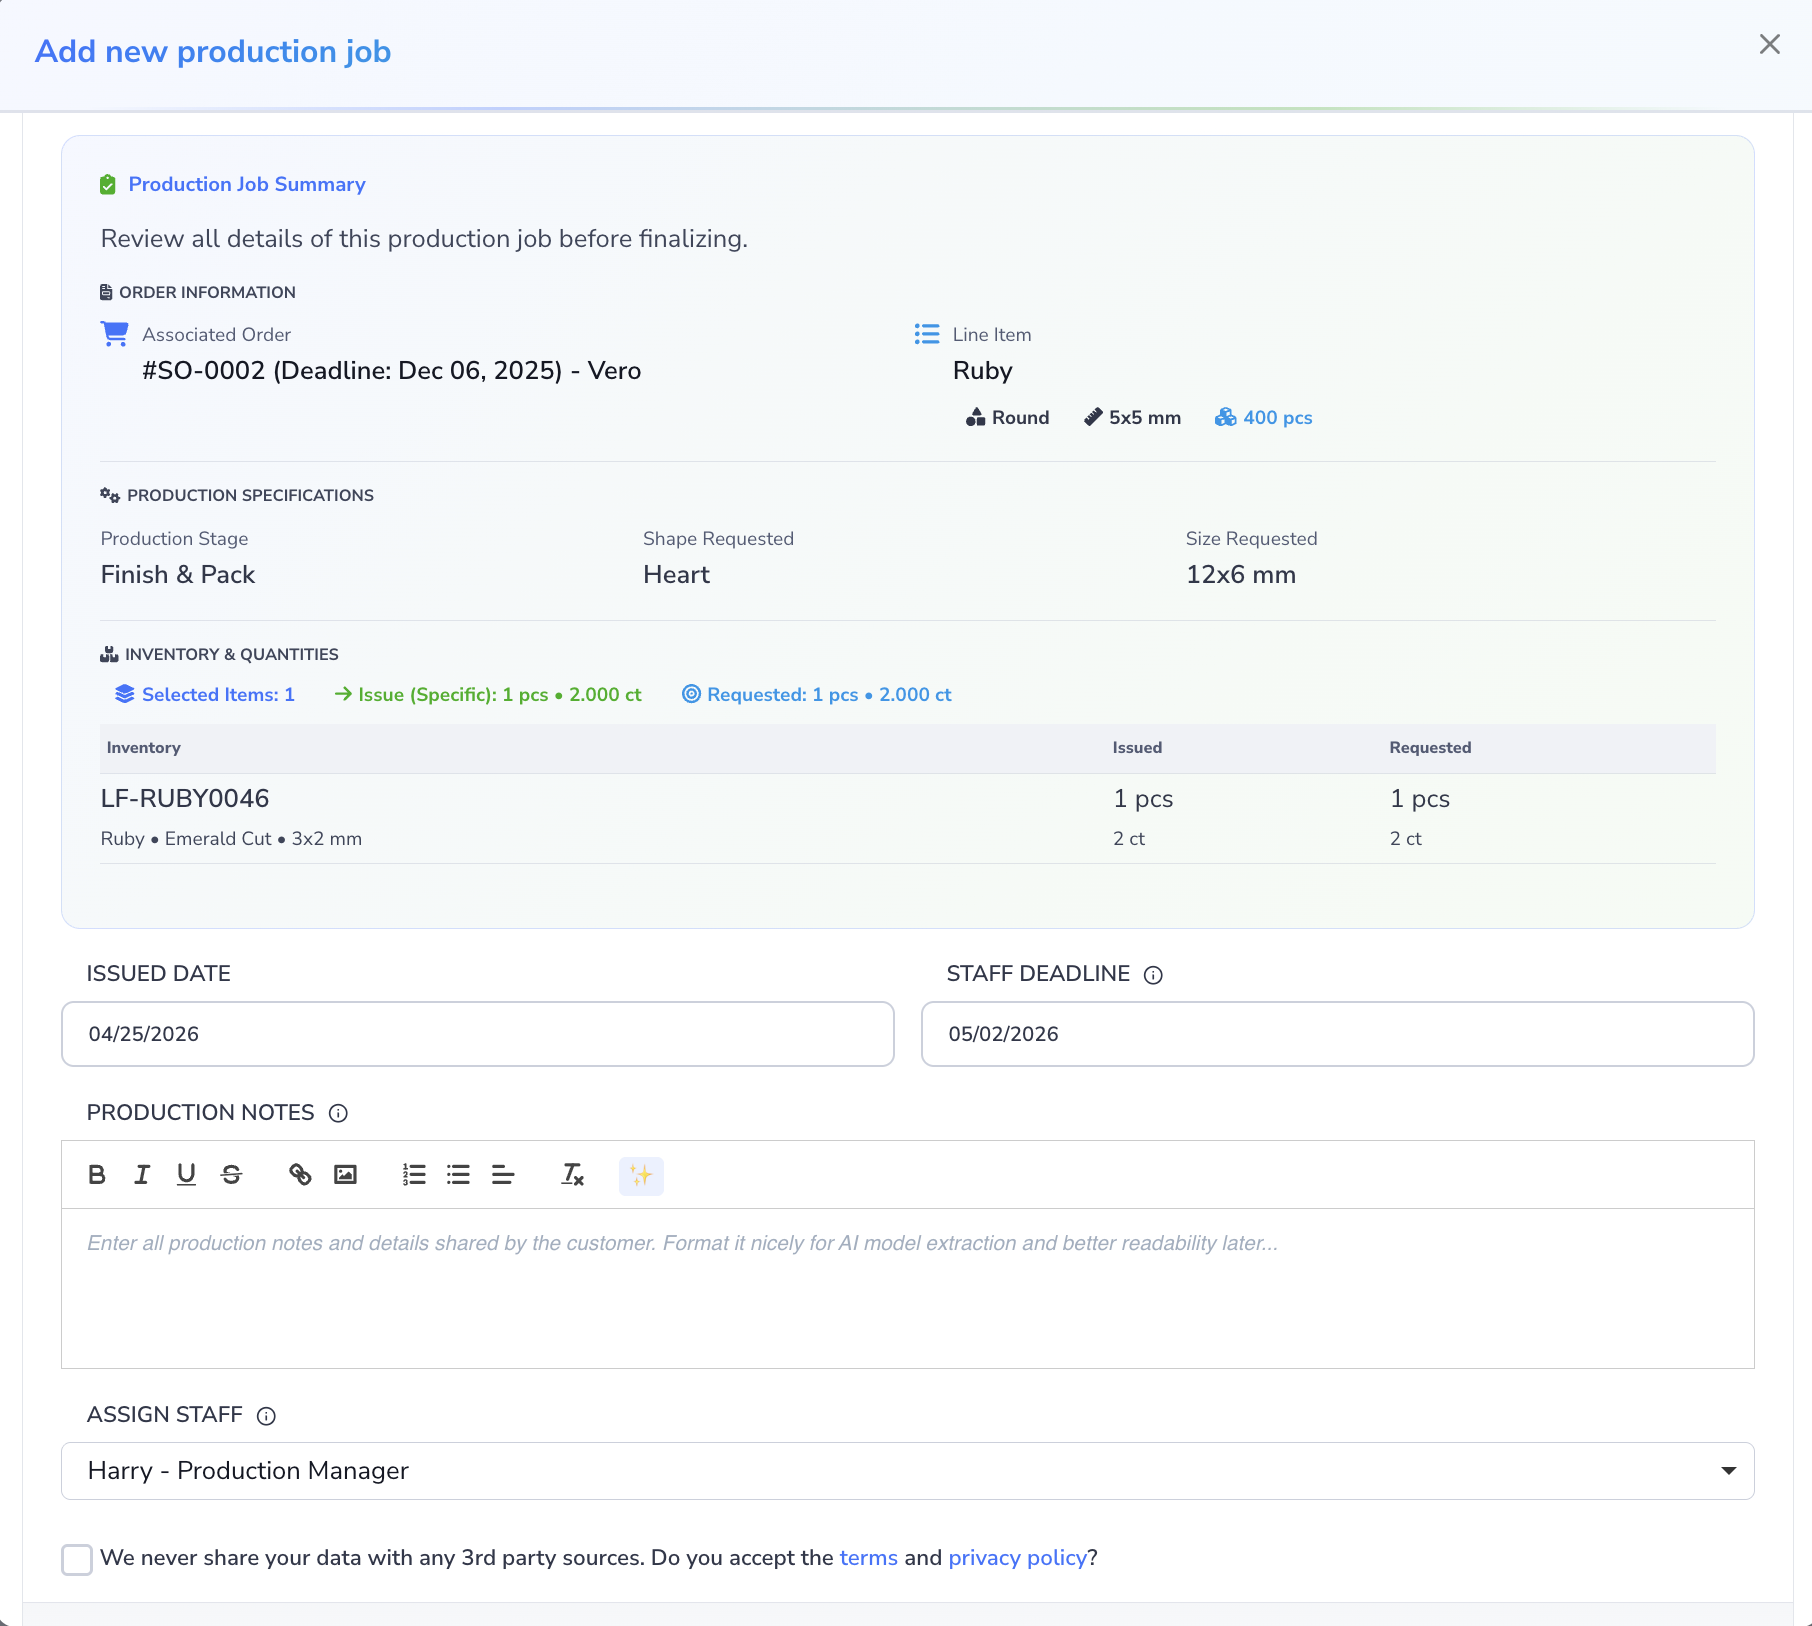
In Issue Details, finalize the job setup:
- Review the summary card.
- Set the issued date.
- Set the staff deadline.
- Add operational notes if needed.
- Choose the staff member responsible for the job.
- Accept the terms and privacy confirmation.
- Submit the job.
Step 4: Done
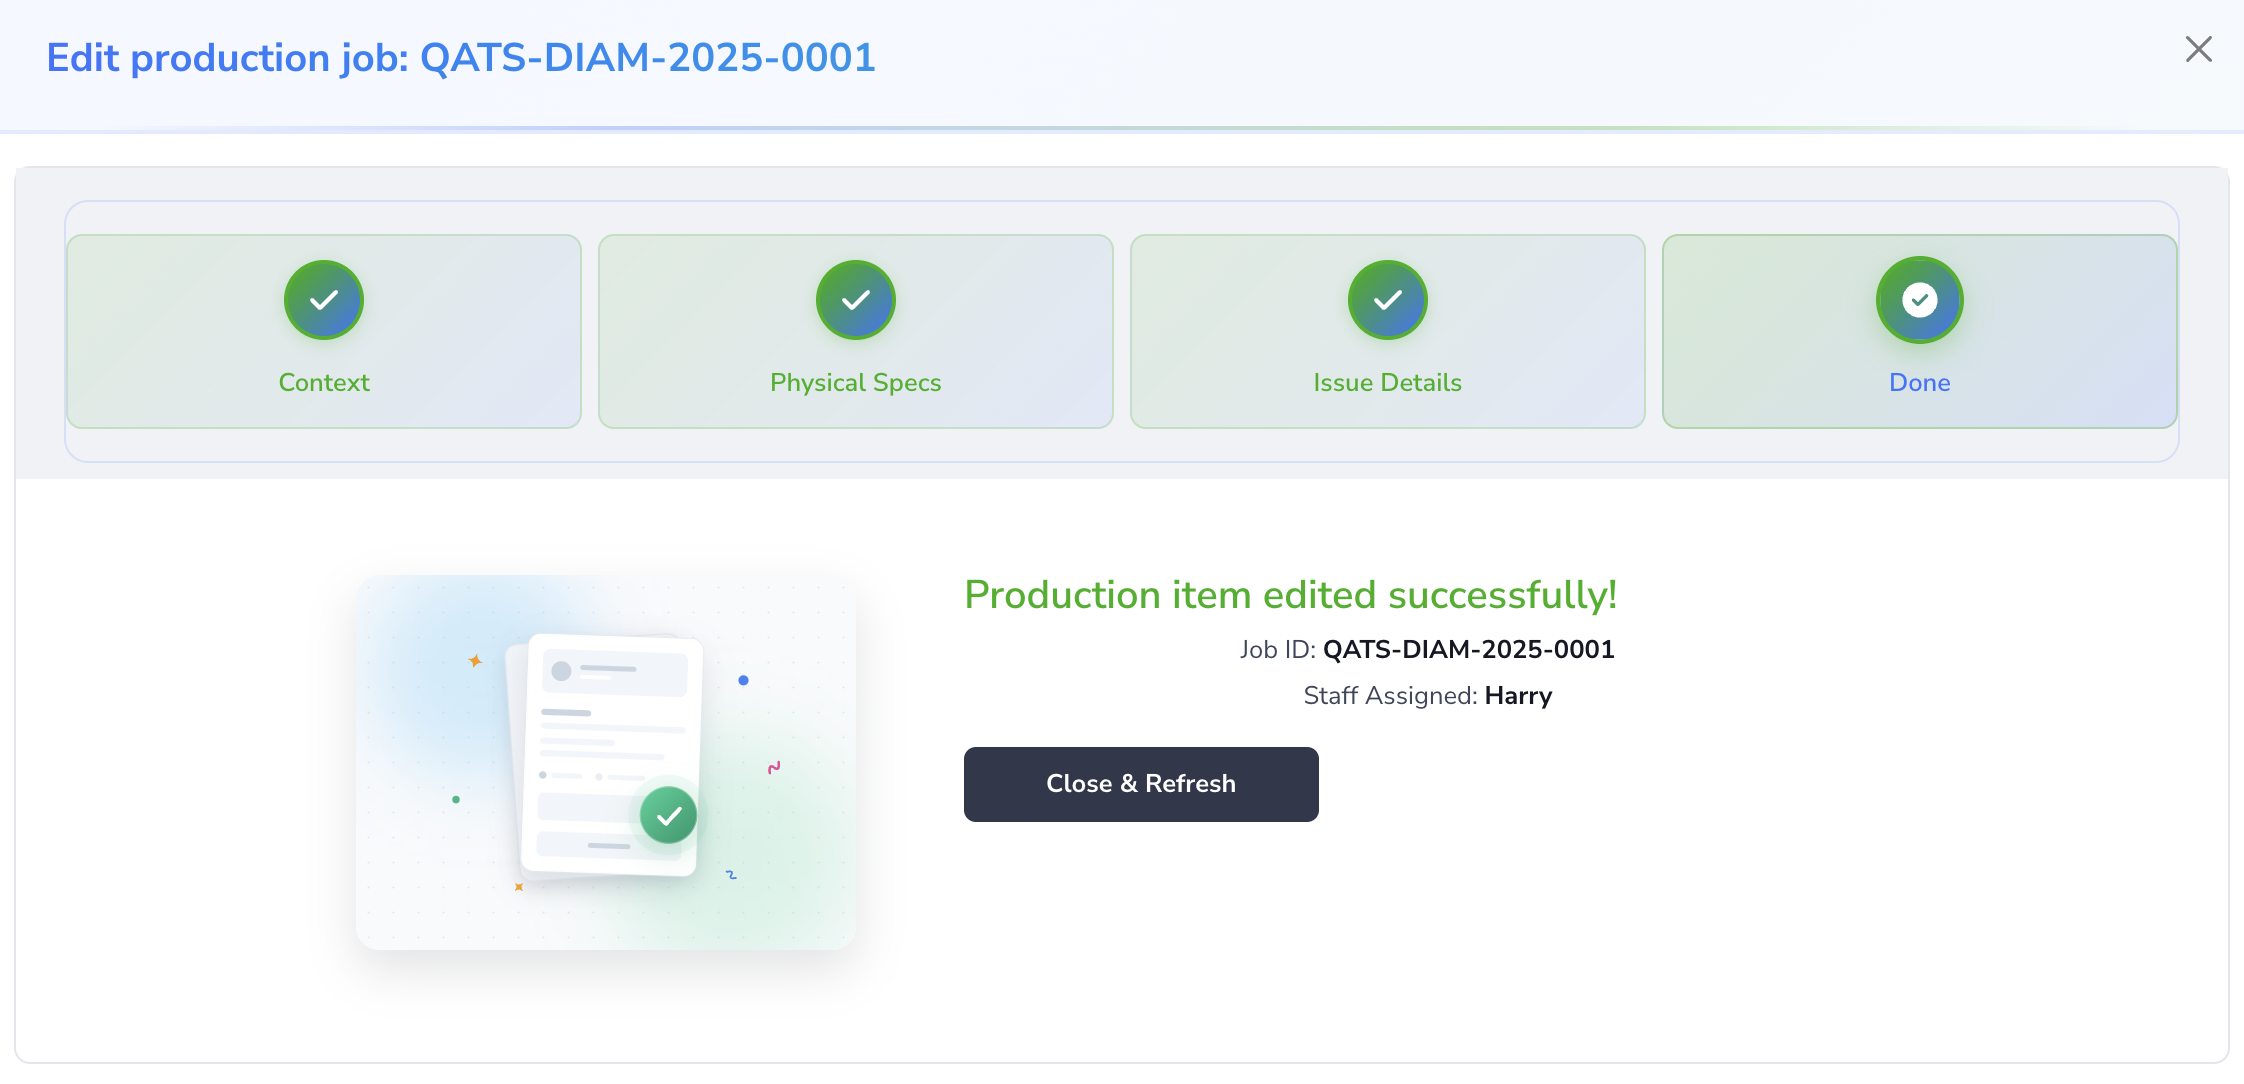
After submission, Loupe Factory shows a result screen where you can:
- add another production job
- fix errors
- close the modal
Edit a Production Job
Use the edit flow when an existing production job needs updated planning, inventory, quantity, or assignment details. Loupe Factory saves changes to the job itself. It does not use a separate process editor on this screen.
To update a production job:
- Go to the Production List page and open the job you want to update.
- Click Edit production job.
- In Context, review the associated order, line item, production stage, selected products, source inventory, and issued quantities.
- In Physical Specs, update the requested shapes, sizes, total pieces, total weight, or per-item requested quantities as needed. A job whose parcels carry different saved specs opens with those specs already split out per parcel, so adjusting a quantity cannot overwrite what each parcel was asked to become.
- In Issue Details, review the summary card, then update the issued date, staff deadline, notes, or assigned staff member.
- Click Save Changes.
After you save, Loupe Factory updates the production job and shows a confirmation message.
Warning
Review edits carefully if work has already started on the job. Changing the selected inventory, requested quantities, stage, or staff assignment can affect downstream planning, receiving, and job reporting.
Viewing Production Run History
All completed and in-progress production runs are accessible from the Production List page. Click any run to see a full timeline of stages, inputs, outputs, and recorded losses.
Screenshot: Production Job Run History
A screenshot will be added here showing the production job detail page with a stage-by-stage timeline, input/output quantities, and loss entries for each stage.
Suggested image: assets/production-run-history.png
Tracking Inputs and Outputs
Each production stage consumes inputs (raw materials or semi-finished goods) and produces outputs (processed goods ready for the next stage or for sale). Loupe Factory links these directly to your inventory.
Use the inventory-flow diagram below as the operating model for every production job. Issued weight starts the job. Requested weight becomes the bucket used to track received, rejected, scrapped, waste, and pending weight.
Production job flow
Inventory Flow in a Production Job
Every unit of issued weight should be accounted for inside requested weight as received, rejected, scrapped, waste, or pending.
Receive a Production Job
When work is completed, open the production job and click Receive.
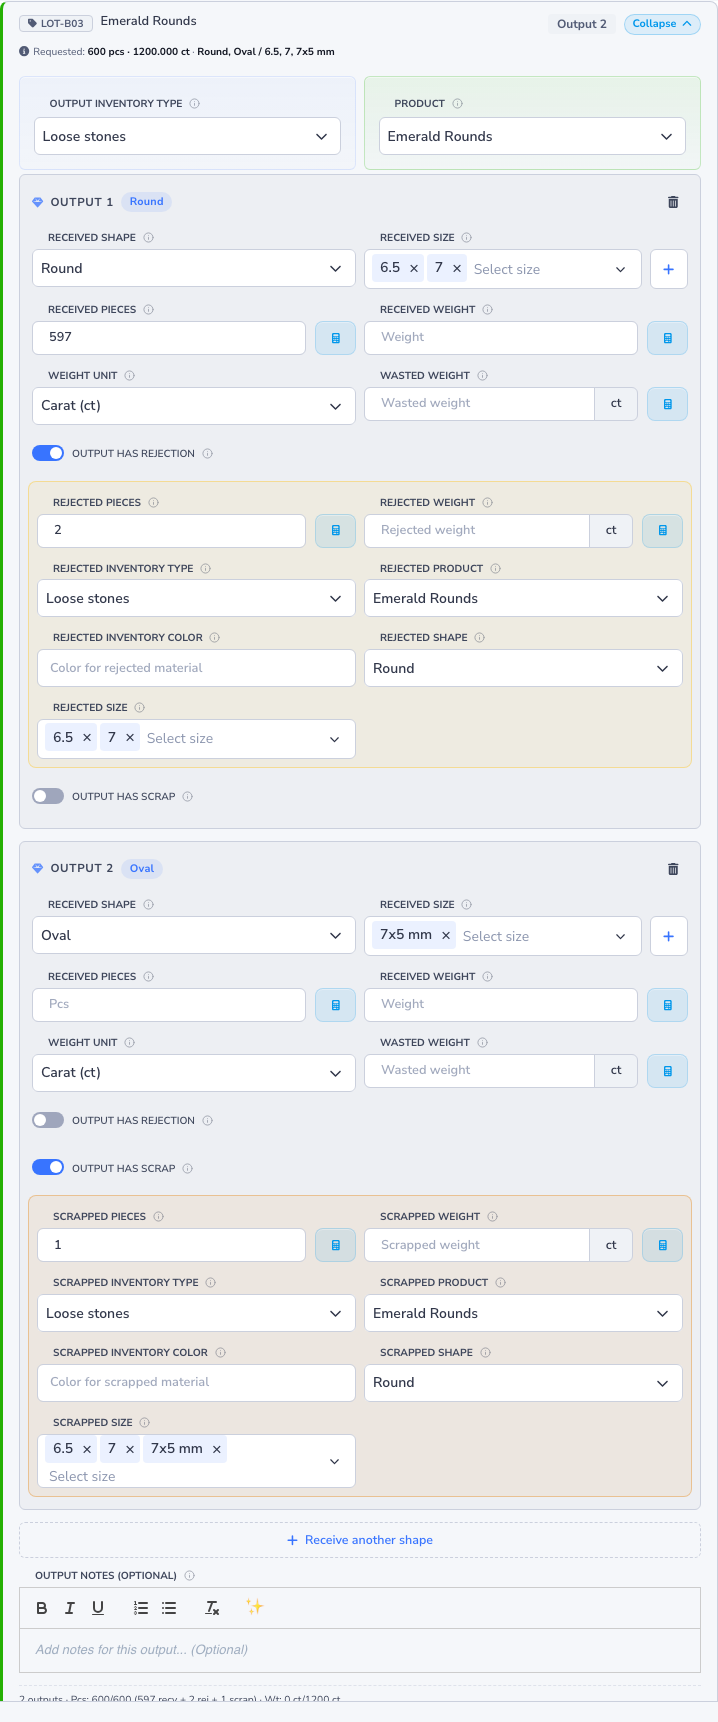
The receive form starts with one output per requested shape. Rounds land as one lot and Ovals as another, each with its own count, weight, sizes, and tag derived from the parcel it came from. A shape you did not plan for gets its own line too, through Receive another shape.
Receive header details
At the top of the receive form, confirm:
- the received date
- the received quality
- the location for new inventory
- the rack / bin if your organization uses rack tracking
Receive each output row
For each receive row, Loupe Factory lets you record the physical result of that job output:
- Review or update the output type.
- Confirm the output product.
- If relevant, confirm the finished type or materials & supplies type.
- Record the output shape and size.
- Enter the received pieces.
- Enter the received weight and weight unit.
- Enter any wasted weight.
Each output saved creates its own inventory record with its own tag. The auto-fill calculators read everything already booked against the same request: received, wasted, rejected, and scrapped across every shape. The lots cannot add up to more than the parcel was asked to produce.
Removing a saved output asks first, because saving then deletes that inventory record. The last output cannot be removed.
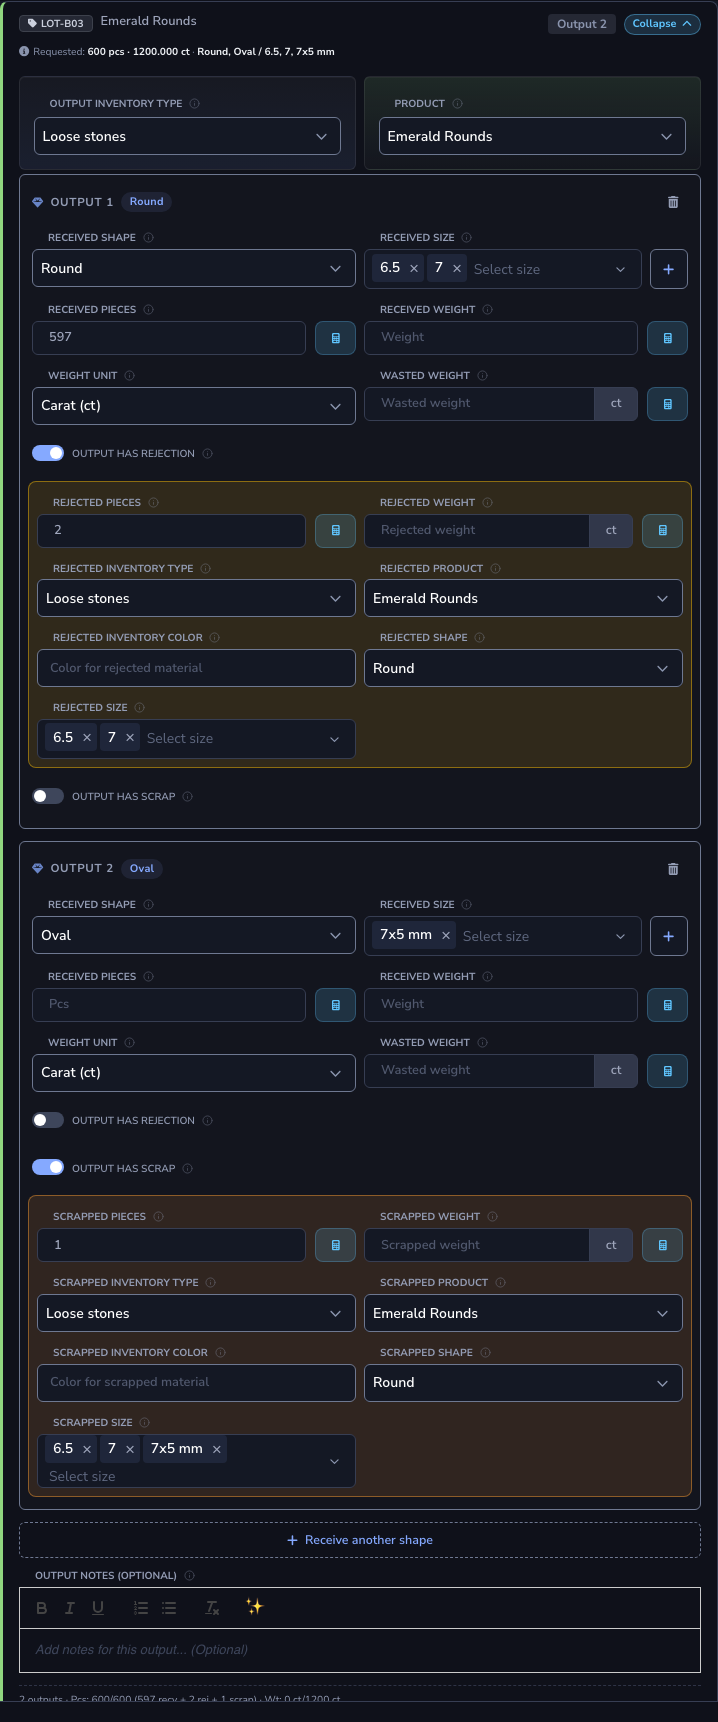
Record rejection or scrap when needed
If part of the output should be tracked separately, turn on the relevant toggle:
- Output has rejection
- Output has scrap
Each output can record its own rejected and scrapped material, and each becomes its own record with its own tag. When someone asks how many of the Ovals failed inspection, that number exists.
Then record the rejected or scrapped values as needed, including:
- pieces
- weight
- shape
- size
- color
- inventory type
- product
- finished type or materials/supplies type
Finish the receive entry
Add notes if needed, then click Save.
When you save:
- good output is received back into inventory
- rejected material can be tracked separately
- scrap can be tracked separately
- waste remains recorded as process loss
- production progress and efficiency metrics update automatically
Why Loupe Factory Separates Output, Rejection, Scrap, and Waste
Loupe Factory treats each bucket differently because they mean different things to operations:
| Bucket | Meaning |
|---|---|
| Received | Good output that can continue to the next operational step |
| Rejected | Produced output that failed quality checks and should stay separate |
| Scrapped | Recoverable loss material that still has value (e.g., metal scrap, low-grade stones) |
| Waste | Irrecoverable material consumed or lost during processing (e.g., dust, offcuts) |
Screenshot: Record Loss Form
A screenshot will be added here showing the Record Loss form with the loss type selector (Waste / Rejection / Scrap), item selector, quantity field, and notes field.
Suggested image: assets/production-record-loss.png
Scrap items are added back to inventory at a separate SKU or category so their recoverable value can be tracked and sold or reused.
Screenshot: Stage Summary with Loss Breakdown
A screenshot will be added here showing a completed stage summary card displaying total inputs, total outputs, and a breakdown of waste, rejection, and scrap quantities.
Suggested image: assets/production-stage-summary.png
Next Steps
- Production Job Progress: Understand progress buckets and efficiency metrics.
- Inventory Management: Understand how inventory items are linked to production inputs and outputs.
- Order Management: See how finished production outputs are allocated to customer orders.
- Reporting & Analytics: View production efficiency reports and export loss data.