Media Gallery
Every inventory item and product type in Loupe Factory has one main image. The Media Gallery holds everything else that belongs on that record: extra photo angles, videos, certificates, spec sheets, and 3D CAD files.
Upload files directly or paste web links, add captions, put files in the order you want, and preview them without leaving the item. The Media Gallery is included on every plan at no extra charge, and adding files never uses AI credits.
On Professional, Business, and Enterprise, the gallery can also turn the main image into 10 product shots with AI, each in a different setting.
Users with the Admin or Manager role can open the gallery from any inventory item or product type.
Why Put Proof on the Item
In custom manufacturing and wholesale trade, proof of an item often lives everywhere except on the inventory record itself:
- A buyer asks for a video of the piece under daylight before committing.
- A customer asks for the certificate or test report from a previous order.
- The shop floor needs the approved CAD revision or dimensional drawing before starting work.
- An inspector needs a close-up of a hallmark, serial plate, or finish to confirm the item.
When those files stay in phone chat groups, email chains, and shared drive folders, team members waste time hunting down files or risk sharing outdated revisions.
The Media Gallery keeps all supporting media attached directly to the item or product type. Anyone opening the record finds the exact files, captions, and order.
Key Principles
- The main image keeps its job. It remains the photo shown in inventory tables, search cards, and AI background editing, and the variant image on Shopify. Product shots with AI copy the product from it too. Extra photos in the item gallery can sync as additional images for that variant. To change the main image, choose More Actions > Update Image.
- Unlimited files. An item or product type can hold as many files as you need. There is no cap on file count.
- Credits only for product shots. Uploading, linking, captioning, ordering, and previewing files never use AI credits. Only Generate product shots with AI does.
- Immediate auto-save. Changes save as you go. Captions, tile reordering, and file removals take effect immediately without a separate save button.
- Immediate file removal. Removing a file takes effect right away and updates the file count. Removing an uploaded photo or video deletes the stored file in Loupe Factory. Removing a link deletes the link entry. Removals cannot be undone.
- Direct web addresses for uploads. Uploaded files receive a direct web address. Do not upload sensitive internal documents you would not share with a customer or supplier.
- Item deletion deletes the gallery. Deleting an inventory item or product type deletes its attached gallery and files.
Requirements and File Limits
| Requirement | Specification |
|---|---|
| Plans | Starter, Professional, Business, and Enterprise (all plans) |
| Roles | Admin or Manager |
| Photo uploads | JPG, PNG, GIF, or WEBP, up to 4 MB per file |
| Video uploads | MP4, MOV, WEBM, M4V, MKV, or AVI, up to 1,024 MB (1 GB) per file |
| Web links | Valid web address starting with http:// or https://, up to 2,048 characters |
| Supported link types | Web images, YouTube and Vimeo videos, PDF documents, and 3D CAD models (STL, STEP, OBJ, GLB, DWG, DXF) |
| Captions | Up to 255 characters per tile |
| File quantity | No limit. Attach as many files as needed |
| Product shots with AI | Professional, Business, or Enterprise, a main image on the item or product type, and AI credits |
Open the Media Gallery
You can open the Media Gallery from four locations:
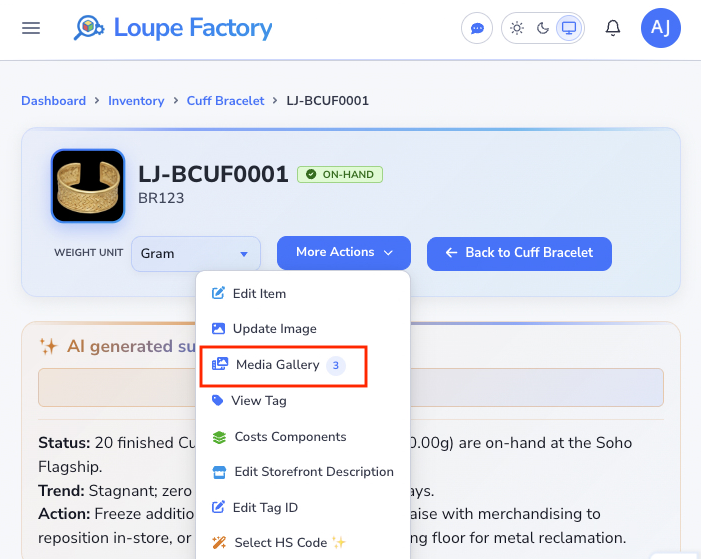
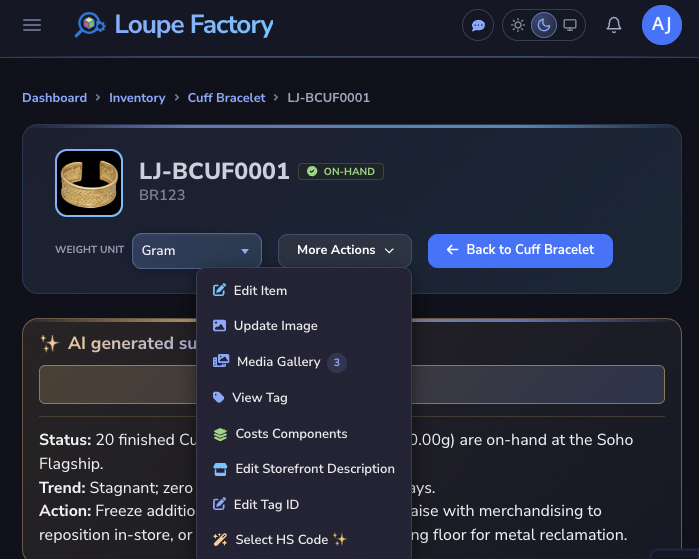
- From an inventory item details page: Open More Actions, then select Media Gallery. The blue badge next to the option shows the count of attached files.
- From the inventory items table: In Inventory > All Inventory (or any inventory table), open the three-dot row menu on any item and select Media Gallery.
- From a product type details page: Click Media Gallery in the page header.
- From Product Settings (Admins only): Go to Settings > Products, open the three-dot row menu on any product type, and select Media Gallery.
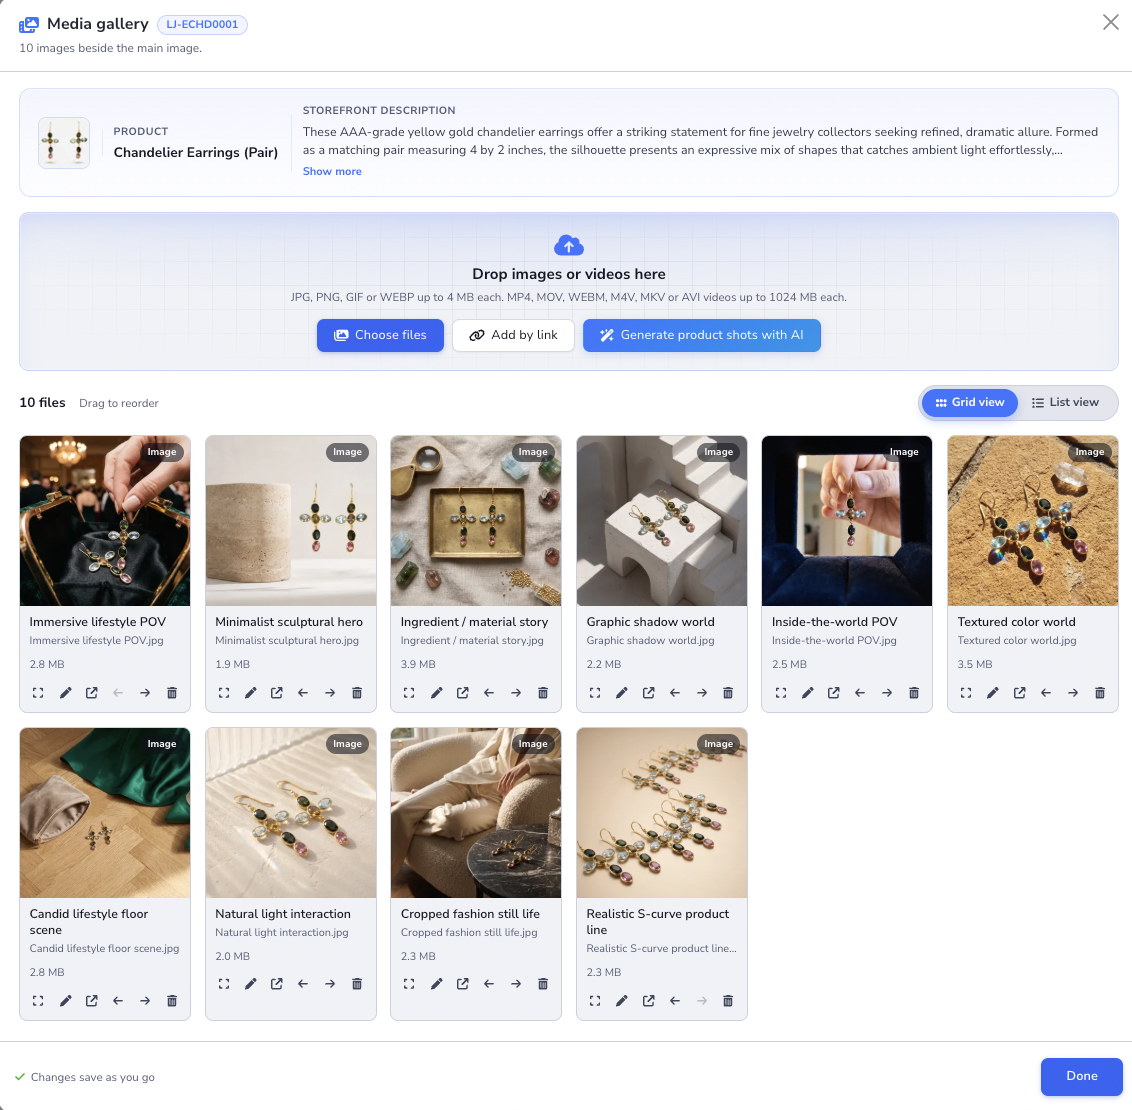
The gallery opens over the page you are on. Its header shows the main image, the product name, and an item's product label, so you can confirm you are on the right record. Hover over the main image to see a larger copy, or select it to open it full size in a new tab.
The header also shows the storefront description. An item without its own description shows its product type's, and that is the description product shots with AI read. Choose Show more to read a long description in full. When there is no description to show, the header says No storefront description yet.
When you finish, click Done or close the gallery. Your changes are already saved. A notification then lists what changed, such as files added or removed, captions edited, or files reordered. It also stays under the bell icon.
Add Files to the Gallery
Upload photos and videos
- Open the Media Gallery on the item or product type.
- Drag and drop files onto the upload zone, or click Choose files to browse your local device.
- You can select multiple files at once. Each uploading file shows a progress bar and a cancel button.
Photos appear in the gallery as soon as the upload finishes.
Videos show a processing indicator while Loupe Factory prepares them for in-app playback. Long clips from a mobile device or camera may take a few minutes to process. Keep your browser tab open until the upload finishes. Once the upload completes, you can close the gallery while processing finishes in the background.
If a photo exceeds the 4 MB limit, Loupe Factory rejects the file and displays the detected file size. Compress or resize the image and upload it again, or add it as a web link.
Add files by link
Use Add by link for assets already hosted in external systems, such as certificates in a cloud drive, YouTube or Vimeo walkthroughs, or CAD drawings from a supplier portal.
- Click Add by link in the upload area.
- Paste the URL into the Web address field.
- Leave Type on Detect from the link, or manually choose Image, Video, PDF document, or 3D CAD model. Loupe Factory detects the file format from the URL when possible.
- Enter an optional Caption to describe the file.
- Click Add.
YouTube and Vimeo links play directly inside the gallery previewer. Direct links to image and video files also preview inside the gallery. PDF documents and CAD files display in the list and open in a new browser tab.
If you paste an address that is already in the item gallery, Loupe Factory shows a notice stating that the link is already present.
Generate Product Shots with AI
Generate product shots with AI turns the main image into 10 polished product photos, each in a different setting. Use them on your storefront, in catalogs and line sheets, or in social posts. It works on inventory items and product types on the Professional, Business, and Enterprise plans.
- Give the item or product type a sharp, well-lit main image. On an item, use More Actions > Update Image. Every shot copies the product from this photo, so a blurry or cluttered photo carries into all 10.
- Add a storefront description if there is none. The AI reads it, along with the product name, to choose scenes and props that suit the product.
- Open Media Gallery and choose Generate product shots with AI.
- Look over the 10 shot styles in the panel, then choose Generate 10 shots.
Loupe Factory plans the 10 shots first, which takes about 30 seconds. It then creates three at a time, about 20 seconds each, so a full set is usually ready in about two minutes. Each finished shot joins the gallery with its style name as the caption. Your main image stays as it is.
The gallery stays open while shots are being created. To leave sooner, choose Stop and wait for the shots already in progress.
When the set is done, each frame in the panel shows its shot, marked Added to the gallery, and the same shots appear in the file list below.
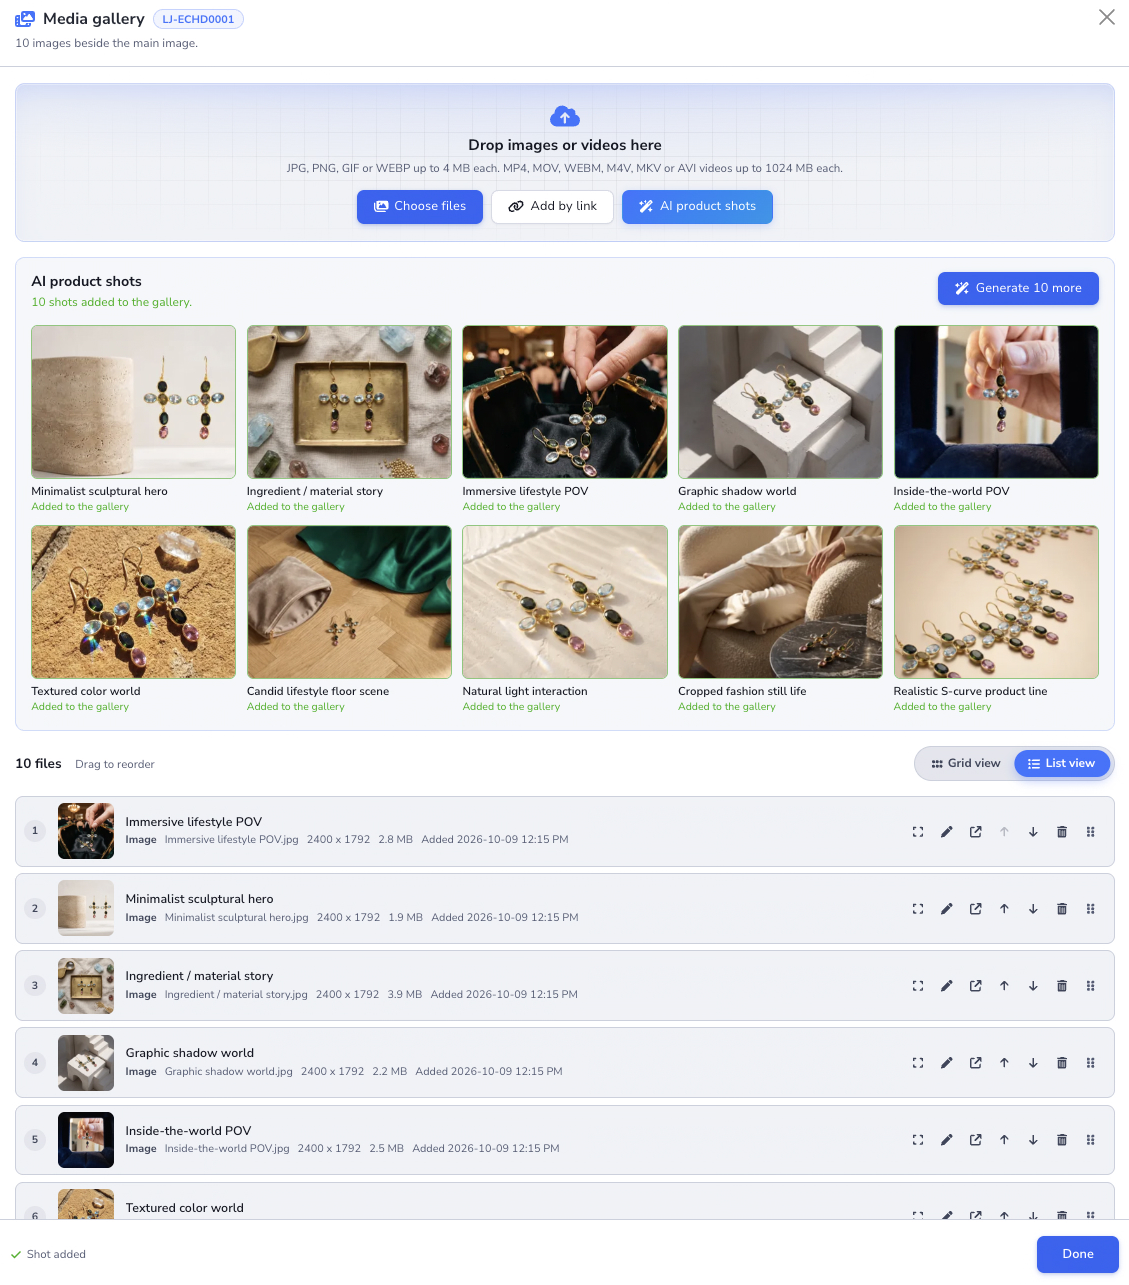
The 10 shot styles
- Minimalist sculptural hero The product as a sculptural centerpiece on a simple stand, in soft studio light.
- Ingredient / material story A top-down layout of the product with the materials, components, or tools that suit it.
- Immersive lifestyle POV A view from inside the drawer, bag, or case where the product gets used.
- Graphic shadow world Geometric props and hard light that throw crisp shadows around the product.
- Inside-the-world POV The camera inside a bag or case while a hand lifts the product out.
- Textured color world An overhead shot on a tactile surface, in colors drawn from the product.
- Candid lifestyle floor scene A casual overhead scene on the floor, with a bag or case and everyday objects.
- Natural light interaction Sunlight through glass, foliage, or fabric, casting soft patterns around the product.
- Cropped fashion still life An editorial moment, with cropped hands, feet, or clothing beside the product.
- Realistic S-curve product line Identical copies of the product standing in a gentle S-shaped line.
The AI adapts each style to the product, so a ring, a lipstick, and a chandelier each get props that suit them. The styles keep faces out of frame. When people appear, they are cropped to hands, arms, legs, or clothing.
What you get
- 2K photos of about 2400 by 1800 pixels in a 4:3 frame, with room around the product to crop square or wider.
- Files under 4 MB, the same limit as uploads.
- A caption on each shot naming its style. Shopify uses the caption as the image's alt text when the shot is first pushed, so edit it before that push if you want different wording.
- Ordinary gallery photos. You can caption, reorder, preview, and remove them like any other file, and they sync to Shopify and JewelCloud the same way.
AI credits
A full set of 10 uses about 400 AI credits, which is about $4 at the $0.01 top-up price. Planning the set uses about 6 credits, and each shot about 40. Image generation uses 10 credits per started 1,000 tokens, so the exact count follows the tokens each shot uses.
Each shot starts only when at least 40 credits are available. If your credits run out partway, Loupe Factory skips the remaining shots and keeps the finished ones in the gallery. See AI Credits & Billing for allowances and top-ups.
Stop, retry, and review
- Stop skips the shots that have not started. Shots already in progress finish and join the gallery.
- A shot that fails shows Retry. A retry uses credits for that shot only.
- Choose a finished shot in the panel to open it full size.
- After a run, Generate 10 more plans and creates a new set. Each set uses credits again.
Check every shot before you publish
AI can change small details. Compare each shot with the real product before you use it, especially stones, engravings, stitching, labels, logos, and printed text. Remove any shot you do not want with the trash icon on its tile.
Manage Captions, Order, and Layout
Add or edit captions
Click the pencil icon or the caption text area on any tile, type up to 255 characters, and confirm. Captions help team members identify specific assets:
- "Under daylight lamp"
- "GIA certificate #21458921"
- "Rev C approved engineering drawing"
- "Fabric dye-lot comparison"
- "First-article bench inspection"
Reorder files
Arrange files into the sequence you want colleagues, buyers, or shop floor operators to see:
- Drag and drop tiles into your preferred position.
- Click the left or right arrow buttons on any tile to move it earlier or later.
- On a keyboard, hold Alt and press the left or right arrow key.
The new order saves automatically when you drop or move a tile.
Switch layout view
Use the view toggle in the top right of the file list:
- Grid view: Displays larger visual cards. Best for visual inspection of photos and videos.
- List view: Displays a compact row layout. Best for managing captions, checking file sizes, and reordering large sets of files.
Loupe Factory remembers your view preference in your browser.
Preview Files
To inspect files inside the gallery:
- Click the expand icon on any tile, or select a tile and press Enter.
- Use the left and right navigation arrows, or your keyboard arrow keys, to step through the files.
- Press Escape or click outside the preview to return to the gallery.
Photos, uploaded videos, and YouTube or Vimeo links play directly inside the previewer. PDF documents and CAD files display an informational screen and provide a button to open the file in a new browser tab.
Each tile also includes an Open in a new tab button, which opens the direct file URL so you can copy and paste the link into an email or message.
Remove Files
To remove a file from the gallery:
- Click the trash icon on the tile.
- The file leaves the gallery immediately, and the item badge count updates.
There is no confirmation prompt or undo option. Verify the file before clicking the trash icon.
Item Gallery vs. Product Gallery
Loupe Factory provides an independent Media Gallery for every inventory item and for every product type. Use each gallery according to scope:
Item gallery
Use the item gallery for proof that belongs to one specific lot, tag, or piece:
- Jewelry and gemstones: A grading certificate for that exact stone, a video of the stone under daylight, side-stone macro shots, or a hallmark photo.
- Made-to-order furniture: A video of the fabric sample or finish for that run, upholstery inspection photos, or lot packaging shots.
- Specialty auto parts: Fitment inspection photos, serial number plate shots, or batch testing records.
- Job shops and contract manufacturing: First-article inspection photos, customer approval sign-off sheets, or packaging verification pictures.
Product gallery
Use the product gallery for reference material that applies to every lot of that product type:
- Master 3D CAD files (STL, STEP, OBJ, GLB).
- Dimensional engineering blueprints, schematics, and drawings (PDF, DWG, DXF).
- Standard assembly, installation, or maintenance walkthrough videos.
- Master specification sheets and compliance documentation.
Open the product gallery from the product type page header or from Settings > Products.
Product shots with AI work in both galleries. Generate them on the inventory item when you want them on Shopify or JewelCloud, because product type galleries stay in Loupe Factory.
Where Gallery Files Go Across Channels
| Destination | Behavior |
|---|---|
| Inventory tables and thumbnails | Displays the main image only. |
| AI background image editing | Operates on the main image only. Gallery files are not sent to AI editing. |
| Product shots with AI | Uses the main image as the reference for every shot. Finished shots are ordinary gallery photos and sync like any other photo. |
| Shopify integration | On Professional, Business, or Enterprise, a Products and stock push sends the main image as the variant image and up to 128 extra item-gallery photos as additional images. A pull can import those images into the item gallery. Videos, PDFs, 3D CAD files, and the product type gallery stay in Loupe Factory. |
| JewelCloud feed | In Jewelry and Gemstones workspaces on Professional, Business, or Enterprise, jewelry styles include the main photo, up to four additional photos from the item's gallery in saved order, and its first gallery video. A duplicate of the main photo is skipped. See JewelCloud jewelry listing details. |
| Inventory CSV imports | Spreadsheet imports set the main image. Add gallery files to items after completing the import. |
| AI credit usage | Uploading, linking, and organizing files use no credits. Generate product shots with AI uses about 400 credits for a set of 10. |
JewelCloud does not include gallery files for loose stones. Product type galleries, PDFs, and CAD files are not sent. For jewelry, photos beyond the four-photo allowance remain in Loupe Factory and the listing shows a warning. To choose which product shots a JewelCloud listing shows, drag them to the front of the gallery.
Troubleshooting and FAQ
Why is the Media Gallery option missing on an item?
The Media Gallery is accessible to users with the Admin or Manager role. Team members with the Member role cannot open or edit the gallery. Ask an organization admin to adjust your role if you need gallery access.
Why did my photo upload fail?
Photo uploads are limited to 4 MB per file. The error message shows the size of the attempted file. Resize or re-export the image at a lower quality and try again. Alternatively, upload the photo to your cloud storage and add it as a web link.
Why is my video still processing?
Video files undergo processing to enable in-app streaming. Larger video files require additional processing time after upload completes. You can close the gallery and return later. If a video remains in a processing state for more than an hour, remove the tile and re-upload the file.
Why does a PDF link prompt the recipient to sign in?
The gallery opens the exact URL you pasted. If the file is stored in a private Google Drive, Dropbox, or OneDrive folder, the recipient must have access permissions in that system. Set the file sharing permissions to "Anyone with the link can view" in your cloud storage so team members and buyers can open it.
The gallery says my link is already in the gallery.
Each web address can only be added once per gallery. Locate the existing tile in the list or grid to edit its caption, adjust its position, or replace it.
Why can't I see Generate product shots with AI?
The button appears once the item or product type has a main image. Add one with Update Image, then open the gallery again. On Starter, the button shows a lock and opens the upgrade options.
A product shot changed my product. What should I do?
Remove that shot with the trash icon. Choose Generate 10 more for a new set. A sharper main image, with the product filling more of the frame, gives the AI more detail to copy.
Do gallery photos sync to Shopify?
Yes, for extra photos on an inventory item, including product shots you generate with AI. A push sends them with the lot, and a pull can bring the variant's additional images into that item's gallery. Videos, PDFs, 3D CAD files, and the product type gallery stay in Loupe Factory. See Additional inventory images.
Can I import gallery files through an inventory spreadsheet?
Not at this time. Inventory CSV imports populate item records and the main image. Add gallery media directly on the item or product type after the import completes.
Does the Media Gallery use AI credits?
Only Generate product shots with AI does, about 400 credits for a full set of 10. Uploading, linking, captioning, reordering, and previewing files never use AI credits.
Is there a limit on how many files an item can hold?
No. You can attach as many photos, videos, PDFs, and CAD models to an item or product type as your workflow requires.
Next Steps
- Inventory Management: Learn how to add, edit, and organize inventory items and attribute columns.
- Inventory Item Details: Review complete stock status, costing, and traceability for an individual item.
- AI Inventory Image Editing: Turn the main inventory photo into a clean studio shot.
- Storefront Descriptions: Write the description that product shots with AI read to choose their scenes.
- Products: Understand how product types connect inventory items, orders, and production jobs.
- JewelCloud Integration: See how gallery photos and videos populate JewelCloud listings.
- Shopify Integration: See how the main photo and extra item images sync with your store.