Inventory Management
Loupe Factory tracks inventory at an operational level so teams can manage finished goods, materials, supplies, quality, storage location, and weight with one shared source of truth. This guide walks you through adding, editing, searching, and categorizing inventory items.
Manage All Inventory from the All Products in Inventory Page
The All Products in Inventory page gives your team one place to review, track, and manage inventory across products. You can open this page from Inventory -> All in the navigation bar on the left side of the screen.
This view is useful when you want to understand stock quickly without opening each product one by one. It helps teams see which products hold the most inventory, move between products faster, and take action from one central page.
Inventory visibility depends on role and location settings. Admins can see inventory across the workspace. On Professional, Business, and Enterprise, managers can use inventory from every location when Managers can use inventory from all locations is enabled in Organization Settings > Locations. Members can only see inventory and products from their assigned location.
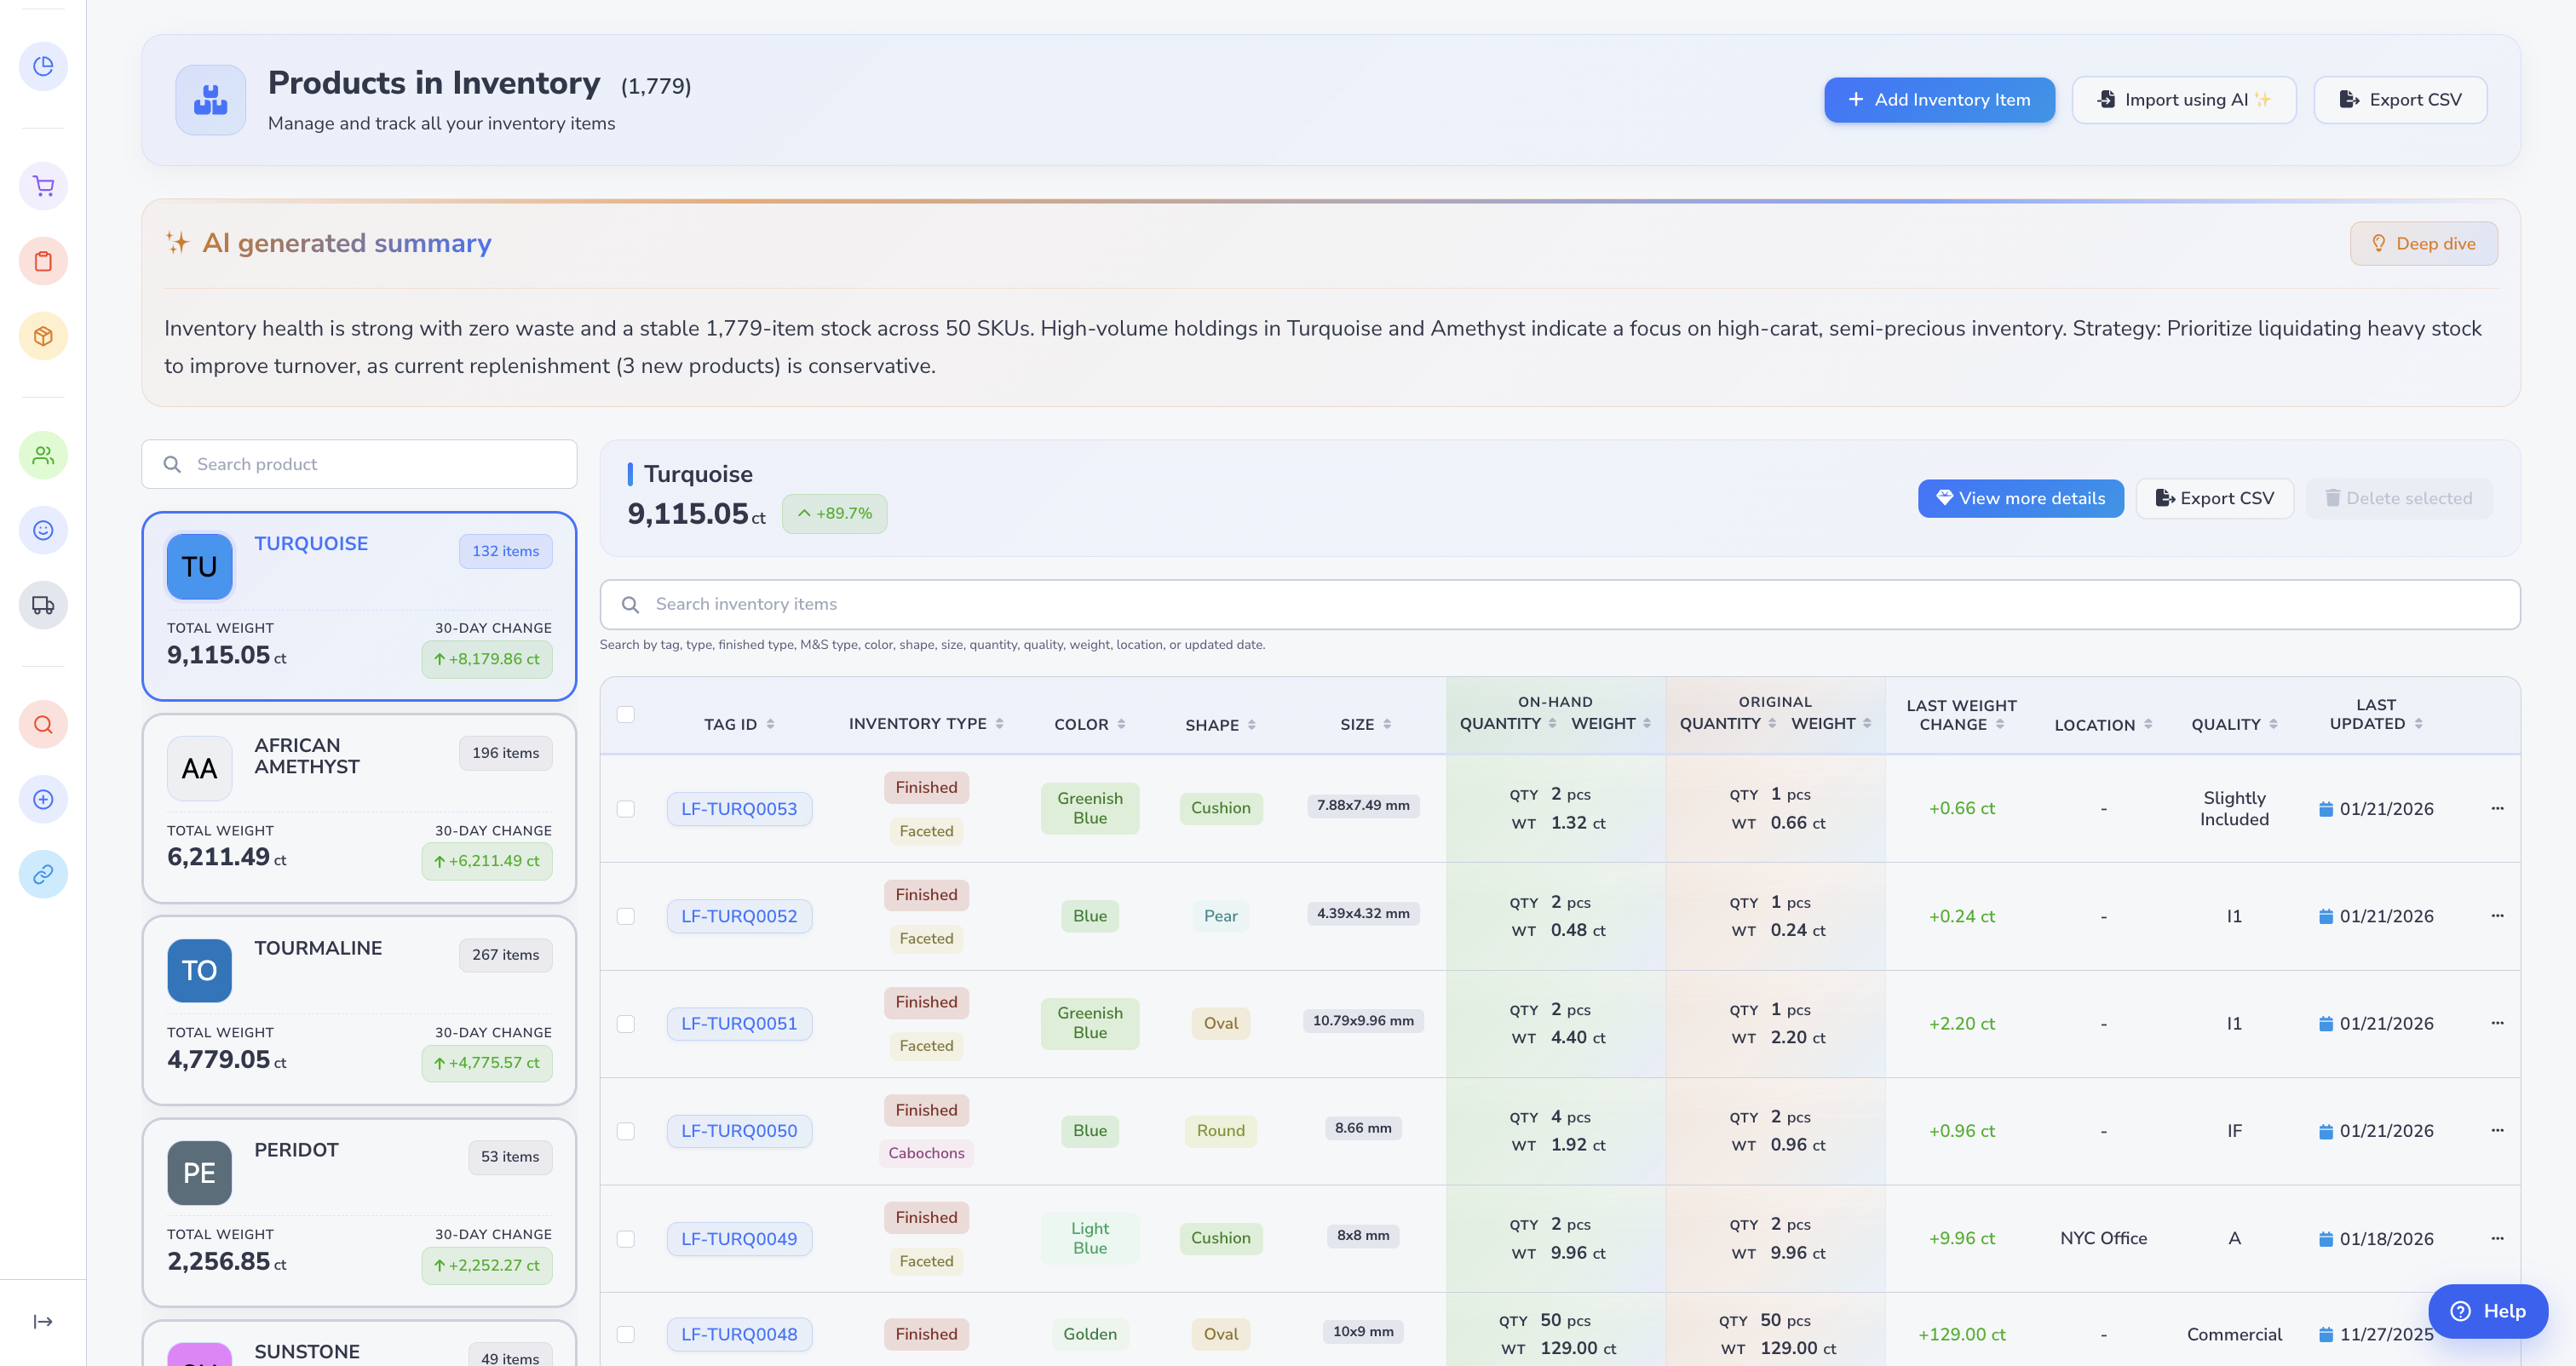
How this page is organized
- On the left, you can see products grouped in tabs, five at a time.
- The list leads with how many items you hold. Your deepest stock comes first. Products holding the same count stay in the same order between visits, so the product that opens today is the one that opened yesterday.
- The All inventory list includes products across inventory types, including materials and finished goods.
- On the right, you can see all inventory items for the product tab that is currently selected.
The dedicated Materials & Supplies page has no product list of this kind. The order controls below apply to All inventory and Finished inventory.
Change the product list order
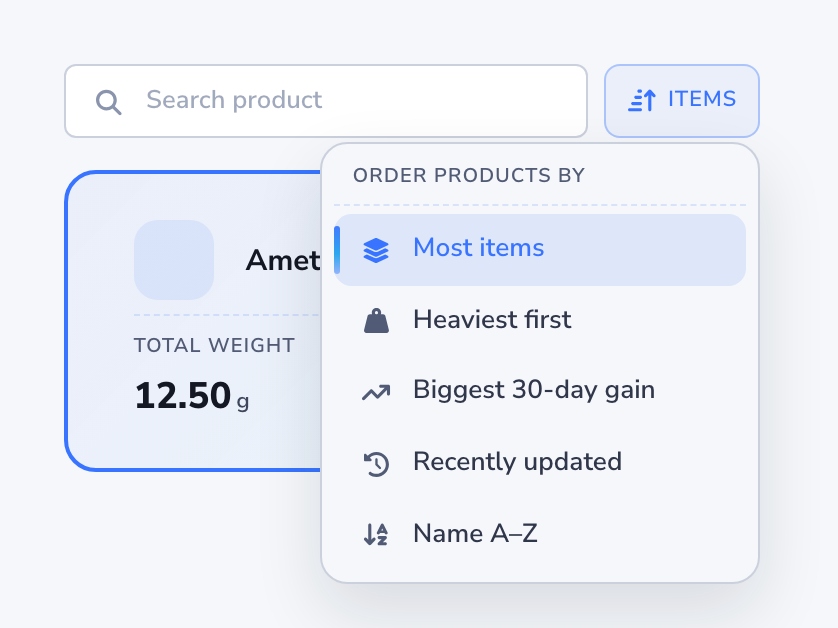
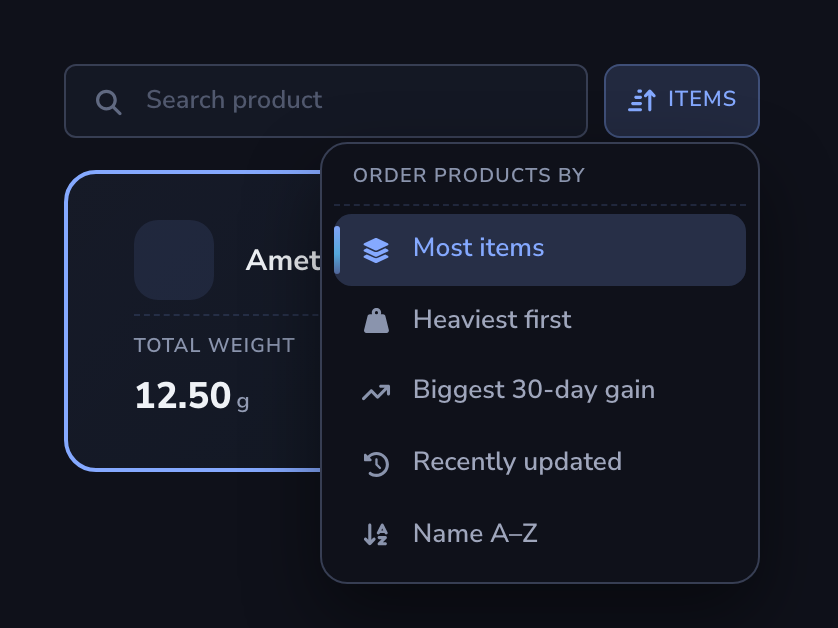
Beside the search box there is a small button showing the order you are in. Open it and you get five:
| Order | What it does |
|---|---|
| Most items | The default. Deepest stock first. |
| Heaviest first | The old weight order, for when weight is what matters. |
| Biggest 30-day gain | What has grown the most this month. |
| Recently updated | What your team has touched most recently. |
| Name A-Z | For when you already know what you want. |
The button says which order you are in. A list that is not in its usual order announces itself rather than looking like stock has gone missing.
Re-order the list and the product you had open stays open, as long as the new order leaves it on the page in front of you. If it moves out of view, the top of the new list opens instead.
The choice is remembered in the browser you made it in, not on your account. The desktop in the office and the tablet on the floor can each sit in the order that suits the work done there. The choice is not cleared when a different person signs in on the same browser.
Search is unchanged. The five-at-a-time paging is unchanged. There is nothing to switch on.
What you can do from this page
- Open the All Products in Inventory page from Inventory -> All.
- Select a product from the left column to view all of its inventory items on the right.
- Click View More Details to open a deeper view of that product and its inventory items.
- If you are an admin, click Export CSV to download the rows currently shown for the selected product, including any active search or filters.
- If you are an admin and need a complete workspace export, click Export All CSV in the page header.
- Click an inventory item Tag ID to quickly view the tag. Downloading or printing inventory item tags is available on the Professional, Business, and Enterprise plans.
- Click View Details on a specific inventory item when you need a deeper view of that individual item. See Inventory Item Details for traceability, production, pricing, order, shipment, and AI-assisted item context.
Search and filter inventory faster
This page includes separate search bars for each side of the layout, so users can narrow results quickly.
- The search bar in the left column filters the product list.
- The search bar in the right column filters the selected product's inventory items table.
- Search standard details such as size, shape, color, inventory type, Tag ID, product name, weight, pieces, and location.
- Search also checks filled item attribute values, such as
Unheated,GIA, or18K, even when the attribute columns are closed.
Tip
Use this page when you want a fast operational view of inventory across products. It is especially helpful for stock review, daily tracking, quick exports, and moving from product-level review to item-level detail without leaving the same workspace.
Exporting Inventory to CSV
Workspace admins can download inventory records as a CSV spreadsheet for offline review, reconciliation, or analysis. Use Export CSV when you want the list you are currently reviewing. Use Export All CSV when you need a complete snapshot of inventory across the workspace.
Both export options require a one-time code sent to your admin email address. This extra check helps prevent pricing and stock data from leaving Loupe Factory through an unattended signed-in session.
Viewing Retail Price does not grant CSV export access. Export CSV and Export All CSV remain admin-only.
Export CSV vs. Export All CSV
| Behavior | Export CSV | Export All CSV |
|---|---|---|
| What it exports | The rows currently loaded in the list, in the order shown. Choose View all first when you need full coverage of the filtered list. | Every inventory record in your workspace, ordered newest first. |
| Affected by filters or search | Yes. The CSV reflects the active tab, filters, and search. | No. The CSV ignores the active tab, filters, and search. |
| Where to find it | All Inventory, Finished Inventory, each inventory tab on a Product Details page, and Materials & Supplies with the column exception described below. | The All Inventory page header. |
| Row limit | Up to 5,000 rows per export. | No selection limit. |
| Who can use it | Admins only. | Admins only. |
Screenshot space
Inventory export controls
Add a screenshot showing Export CSV beside the current inventory list and Export All CSV in the All Inventory page header.
What is included in the CSV
Each row mirrors the inventory table and includes the details your team needs to identify, count, value, and locate an item.
| Column group | Columns included |
|---|---|
| Identity and classification | Tag ID, Product Label/SKU, Product Type, Inventory Type, Color, Shape, and Size |
| Quantity and weight | On-hand Quantity, Original Quantity, On-hand Weight, Original Weight, and Weight Change |
| Pricing | Cost Price, Sell Price, Retail Price, and Estimated Unit Cost |
| Storage and status | Location, Rack, Quality, and Last Updated |
| Workspace-specific details | Industry Attributes, such as wattage or glass type for lighting fixtures |
| Additional export fields | Storefront Description, an item details page link, and Image URL |
The Product Type column contains the item's catalog product name and is left blank when no catalog product is set. The Storefront Description column contains your shopper-facing product copy, exported as plain text. See Storefront Descriptions for how that copy is written. The item details page link provides a direct link to the item's details page in Loupe Factory. The Storefront Description and item details page link columns do not appear in the on-screen inventory table.
The Image URL column provides a direct CDN link to the item's uploaded photo.
Retail Price is the item's optional MSRP, shown with its currency and price basis. It is a unit price, not the total retail value of the stock on that row. An unset Retail Price exports as -; a saved zero exports as a price.
Loupe Factory makes every cell Excel-safe. If your data resembles a spreadsheet formula, it cannot run as a formula when someone opens the CSV.
Materials & Supplies exports
Export CSV on the Materials & Supplies page downloads the visible table columns as shown on screen. It does not include the Storefront Description column.
Verify and download an export
- Click Export CSV or Export All CSV. A verification dialog opens on the same page, and you remain signed in.
- Check your admin email for a one-time six-digit code. The code expires after ten minutes.
- Enter the code in the dialog. The CSV downloads immediately to your browser. The code approves that export only and cannot be reused.
Screenshot space
Email verification dialog
Add a screenshot showing the six-digit verification code field, the ten-minute expiration message, and the action that confirms the export.
Security receipt after an export
After every export, Loupe Factory emails a security receipt to the admin who exported the file and the workspace's billing contact. The receipt identifies the export type, record count, exporting admin, and export time.
The CSV and its inventory data are never attached to the email. The file downloads only to the admin's browser, while the receipt provides a record that the export occurred.
Add an Inventory Item
You can add items from Inventory > All, Finished, or Materials & Supplies. The pricing inputs on all three pages appear only for admins.
To create inventory manually from All:
- Go to Inventory > All Products.
- Click Add Inventory Item.
-
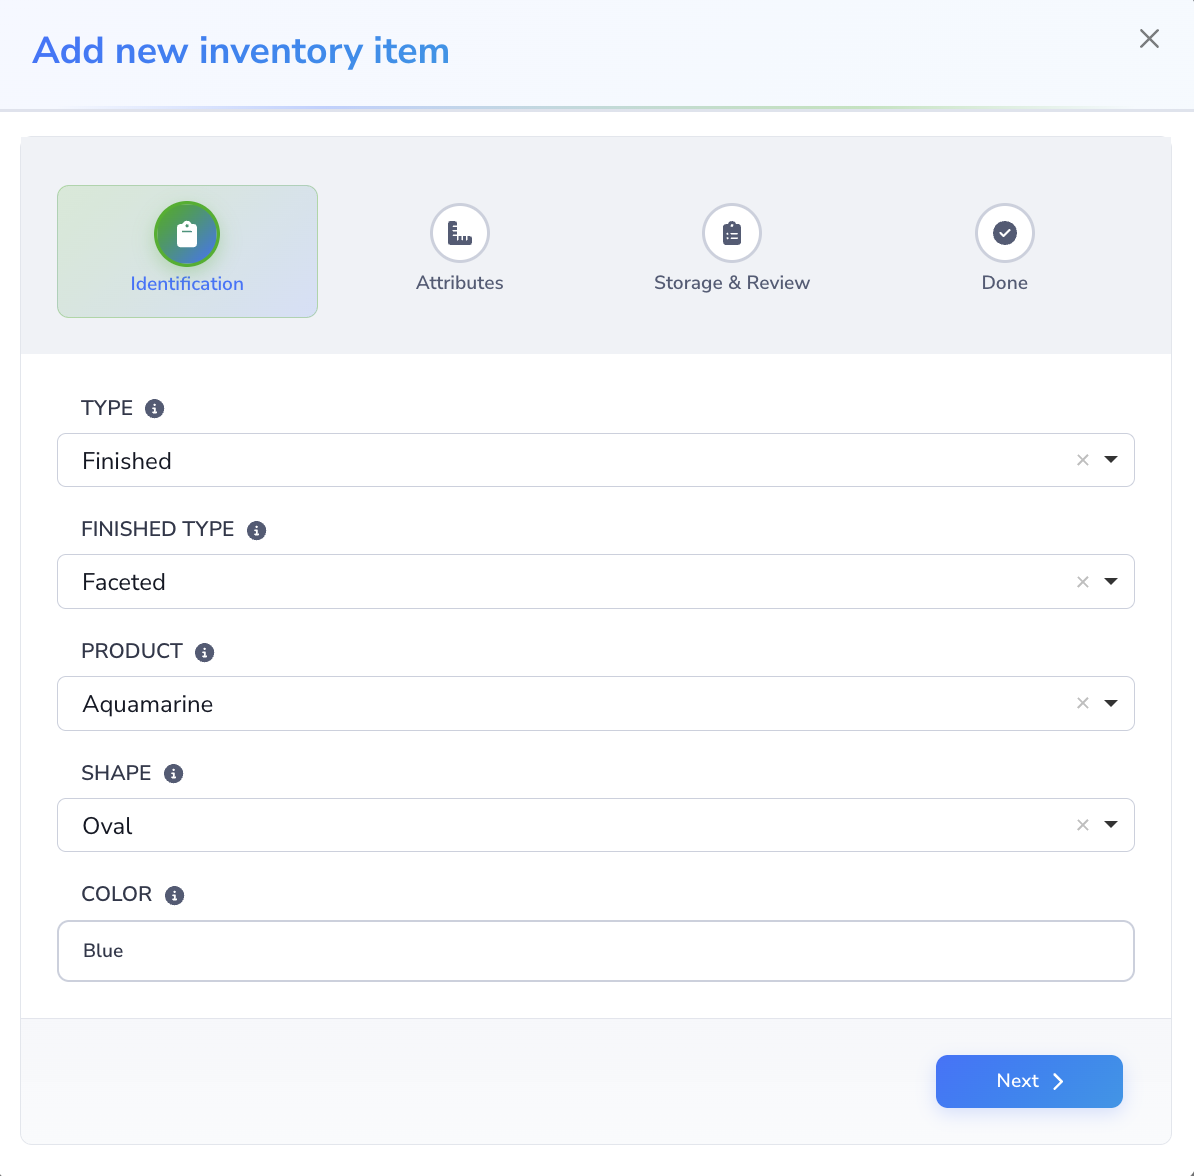
On Identification, choose the inventory type and then complete the relevant classification fields:
- Finished Type when the item is a finished item
- Materials & Supplies Type when the item belongs to materials or supplies
- Product
- Shape
- Color, picked from your workspace's color list. See Item Colors.
-
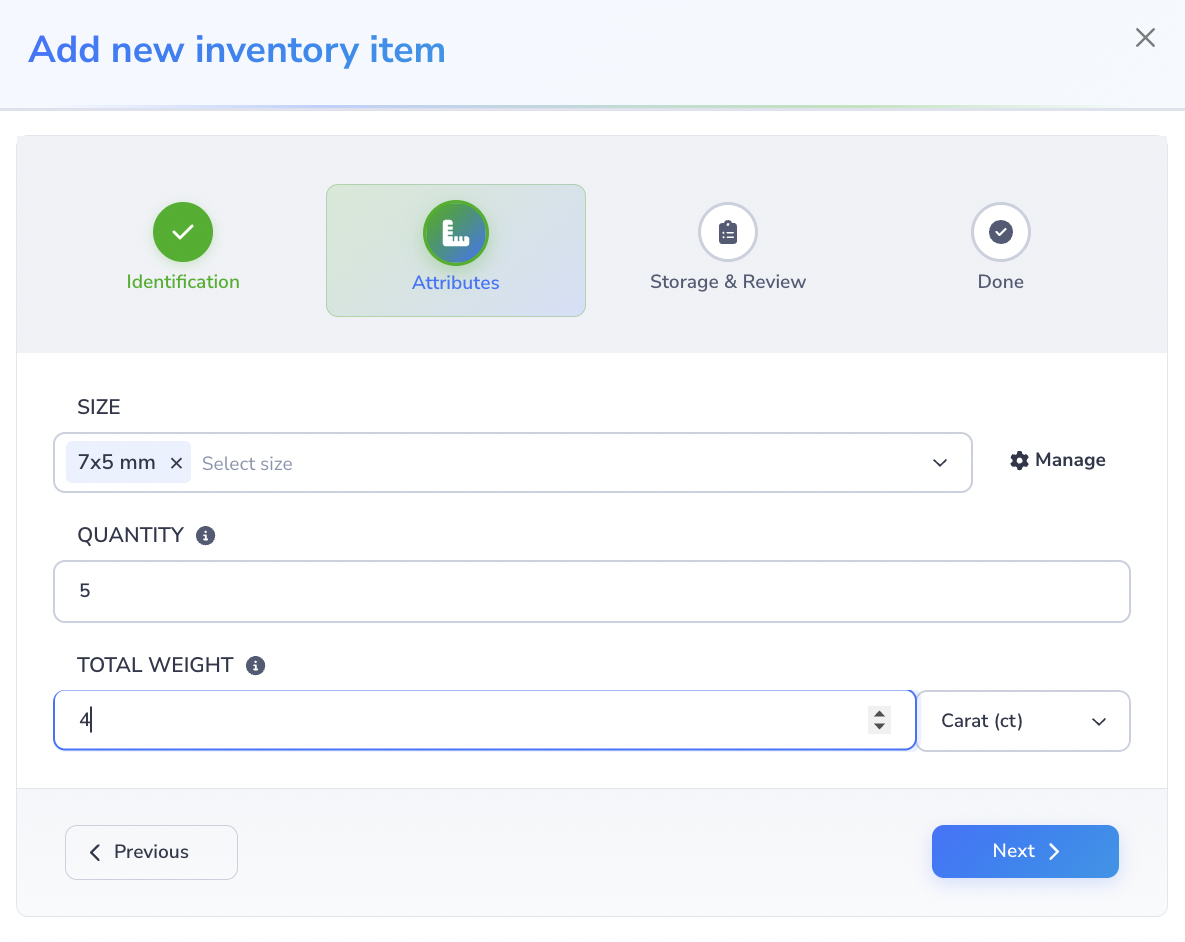
On Attributes, enter the item's size, quantity, weight, and weight unit.
-
On Storage & Review, review the summary and complete the operational details:
- quality
- auto-merge preference
- location
- rack / bin if rack tracking is enabled for your organization
- created date
- optional notes
- optional image
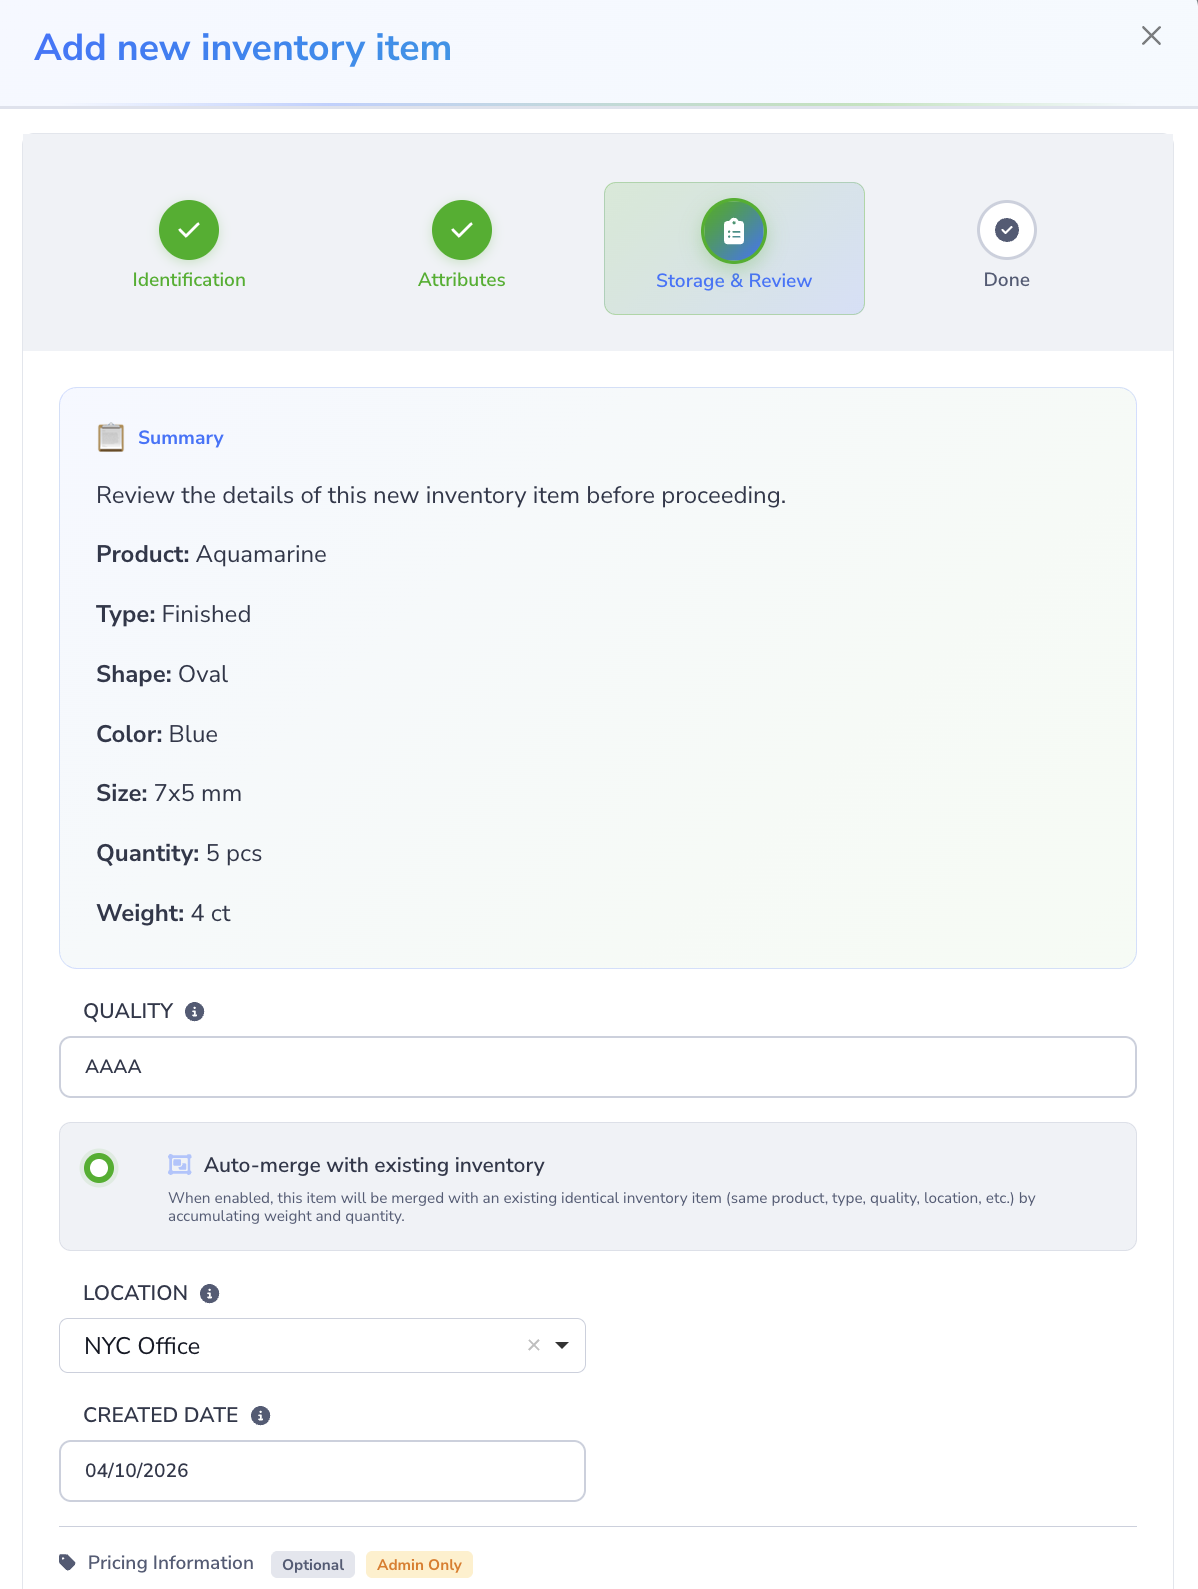
If Auto-merge with existing inventory is turned on, Loupe Factory checks for an existing matching inventory record and adds the new weight and quantity to that record instead of creating a separate duplicate. This is useful when the item should increase an existing stock position for the same product, type, quality, location, and other matching details.
-
If you are an admin, enter optional Cost Price, Sell Price, and Retail Price on Storage & Review. All three use the item's Currency and Price Basis, such as per piece or per gram. Retail Price stores the manufacturer's suggested retail price (MSRP). Leave a price blank when it is unset; zero is valid. Manual prices accept up to two decimal places. See Inventory Pricing.
- Accept the terms and privacy confirmation, then continue.
-
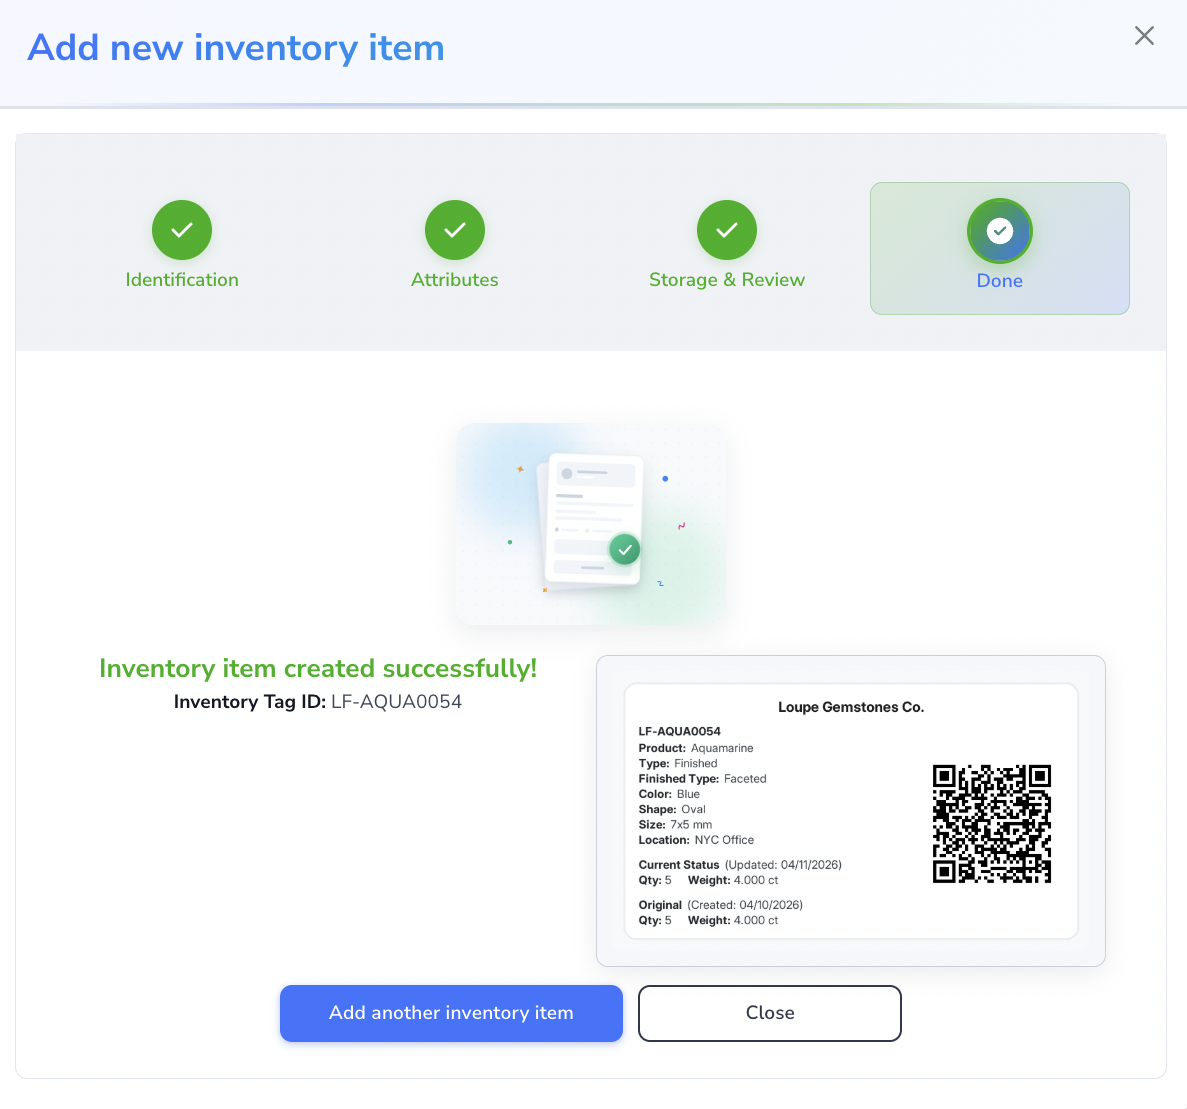
On the Done step, review the result and choose to add another inventory item, fix errors, or close the window.
The wizard also shows item attribute rows, which are the key and value pairs your industry uses for spec-sheet and lot details. See Item Attributes below.
What Auto-Merge Does
The auto-merge option helps keep inventory cleaner by combining matching inventory records instead of creating unnecessary duplicates.
This is especially useful when your team regularly receives or creates items that should accumulate into one stock position for the same product, type, quality, and storage profile.
Use auto-merge when a new receipt or inventory addition should increase an existing stock position. Leave it off when you want the new item to remain as a separate record, such as for batch-level traceability, separate quality review, or location-specific handling.
How Retail Price affects a match
These rules apply when adding inventory manually or importing it with AI:
- If you supply a Retail Price, the incoming Currency and Price Basis must match the existing record.
- If the matching record's Retail Price is blank, the supplied price fills it. Zero is valid and can fill a blank too.
- If the record already has a Retail Price, the incoming price must be identical. A conflicting Retail Price, currency, or price basis creates a separate record instead of merging into that record.
- If the incoming Retail Price is blank, the stored Retail Price is kept.
For example, you import an item with a Retail Price of USD 120 per piece. An otherwise matching record must use USD per piece and have a blank Retail Price or the same price of 120. A stored Retail Price of 125 keeps the records separate.
To do this in bulk from a spreadsheet, see Update Existing Items from an Exported CSV.
Item Colors
Every workspace has one list of colors and finishes, and items pick from it. Color used to be a box you typed into, so Rose Gold, Rosegold, and RG could end up as three different colors on three different items. With one list, the color you pick is the color everyone else sees, searches, and filters by.
Your list starts with your industry's presets, for example 69 colors for gemstones and 32 for jewelry. Admins add, edit, switch off, and remove colors in Product Settings. Switching a color off or removing it never changes the items already recorded with it. See Default Colors by Industry for the list behind each industry.
Pick a color instead of typing one
On the add and edit item forms in All Inventory, Finished Inventory, and Materials & Supplies, the Color field opens the list. Each color shows a dot in its shade beside its name, and a catalog code when the color has one, such as Matte Black (MK). Start typing to narrow the list, then pick the match.
Admins can also type a color that is not on the list. Loupe Factory saves it on that item only, so it does not appear in the picker for anyone else. To make a color available to the whole team, add it in Admin Settings > Product Settings > Colors.
See the color at a glance
The same dot appears in the inventory table, on the item details page, and on the item rows of an order. Colors with no single hue, such as Bi-Color or Two-Tone, show as a labeled badge without a dot.
Color and Shopify
A Products and stock push can update a lot's Shopify Color option when its Color matches a catalog color with a saved Shopify mapping. Check the Shopify Color column under Product Settings > Colors, where you can also set or change the mapping on the catalog color.
Shopify Color pulls continue to update the lot's Color. They do not change saved category or color mappings, or the lot's Finished Type. Hex swatches do not transfer automatically. See Shopify color mappings before adding Color to existing Shopify variants.
Item Attributes
Some important details do not fit a standard field. A certificate number, batch code, wattage rating, or vehicle year range can determine whether an item is ready to sell, ship, or install. Each business records a different set of these details.
Item attributes hold those details on the inventory item as key and value pairs. The key is the label, such as Certificate No. The value is what that specific item carries, such as GIA 1234567890.
Attributes sit alongside standard fields such as type, product, shape, size, color, weight, quality, and location instead of replacing them. Use a standard field whenever one exists, because search, filters, and production screens work from those fields.
Your industry's default attribute keys
Every inventory item starts with the default attribute keys for your organization's Industry, added as empty rows that are ready to fill in. Your team does not have to remember which spec details an item needs, and two people recording the same detail will not end up with two different labels for it. The table lists the keys in the order Loupe Factory displays them. Select an industry to review what each key records, including expected formats and examples.
| Industry | Default attribute keys |
|---|---|
| Auto Parts | OEM Part No, Brand, Vehicle Make, Vehicle Model, Year Range, Fitment Position |
| Cosmetics | Batch No, Mfg Date, Expiry Date, Net Content, Ingredients, Skin Type |
| Furniture | Dimensions, Material, Upholstery, Wood Finish, Weight Capacity, Assembly Required |
| Gemstones | Certificate No, Lab, Origin, Treatment, Clarity, Creation Method |
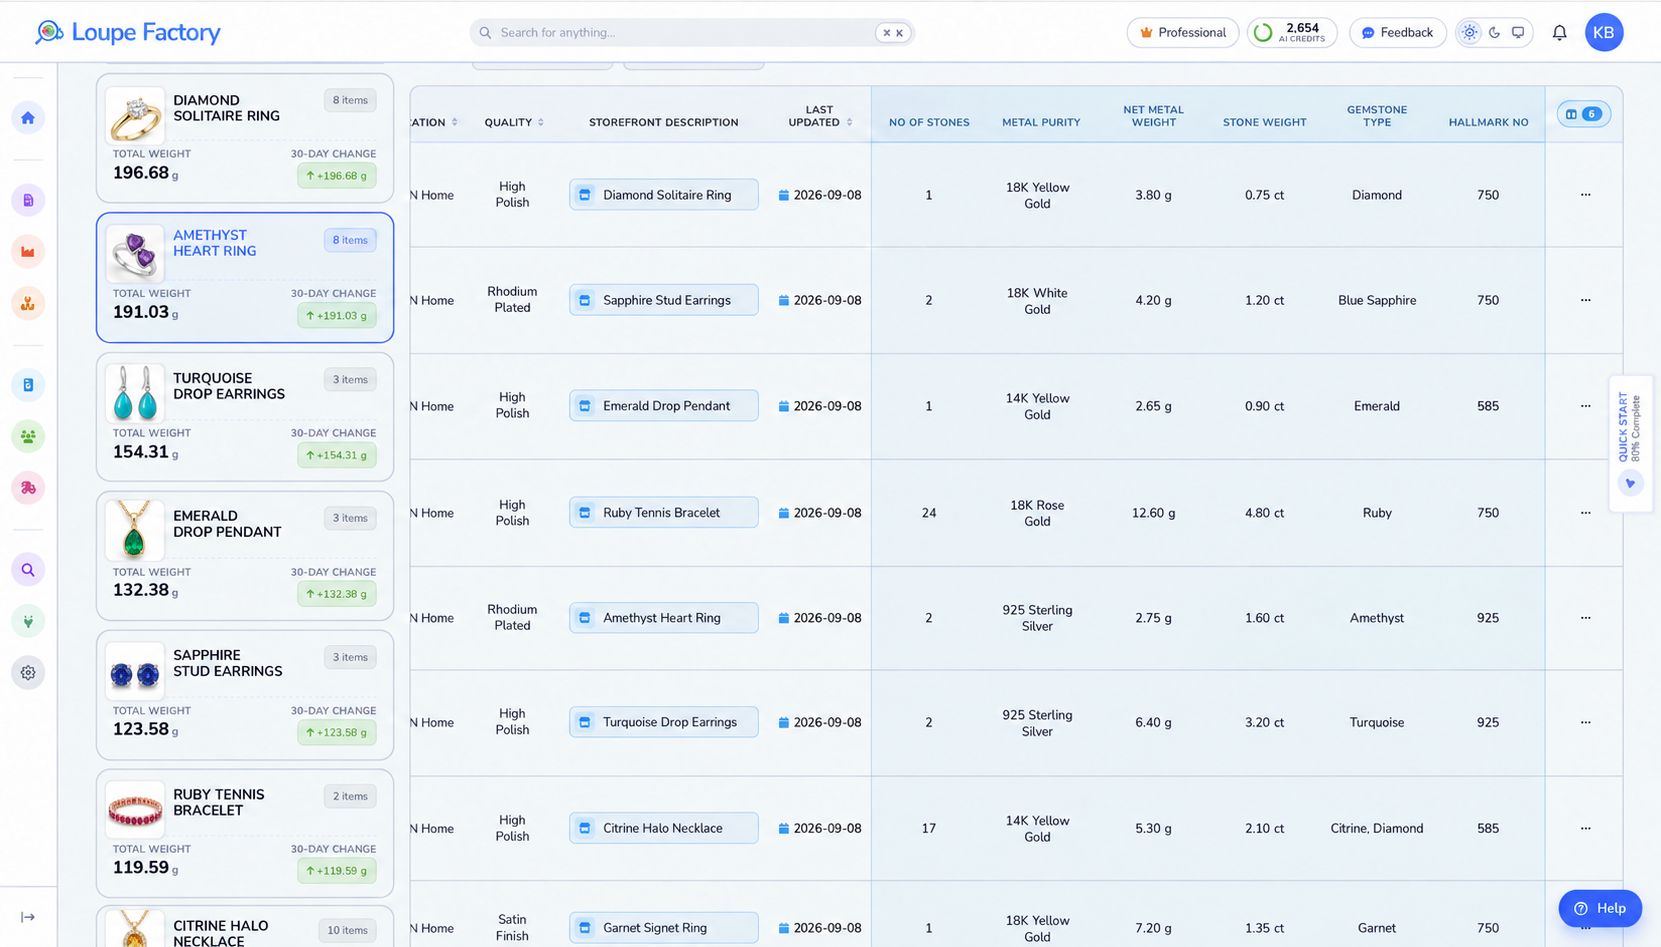
| Jewelry | No of Stones, Metal Purity, Net Metal Weight, Stone Weight, Gemstone Type, Hallmark No |
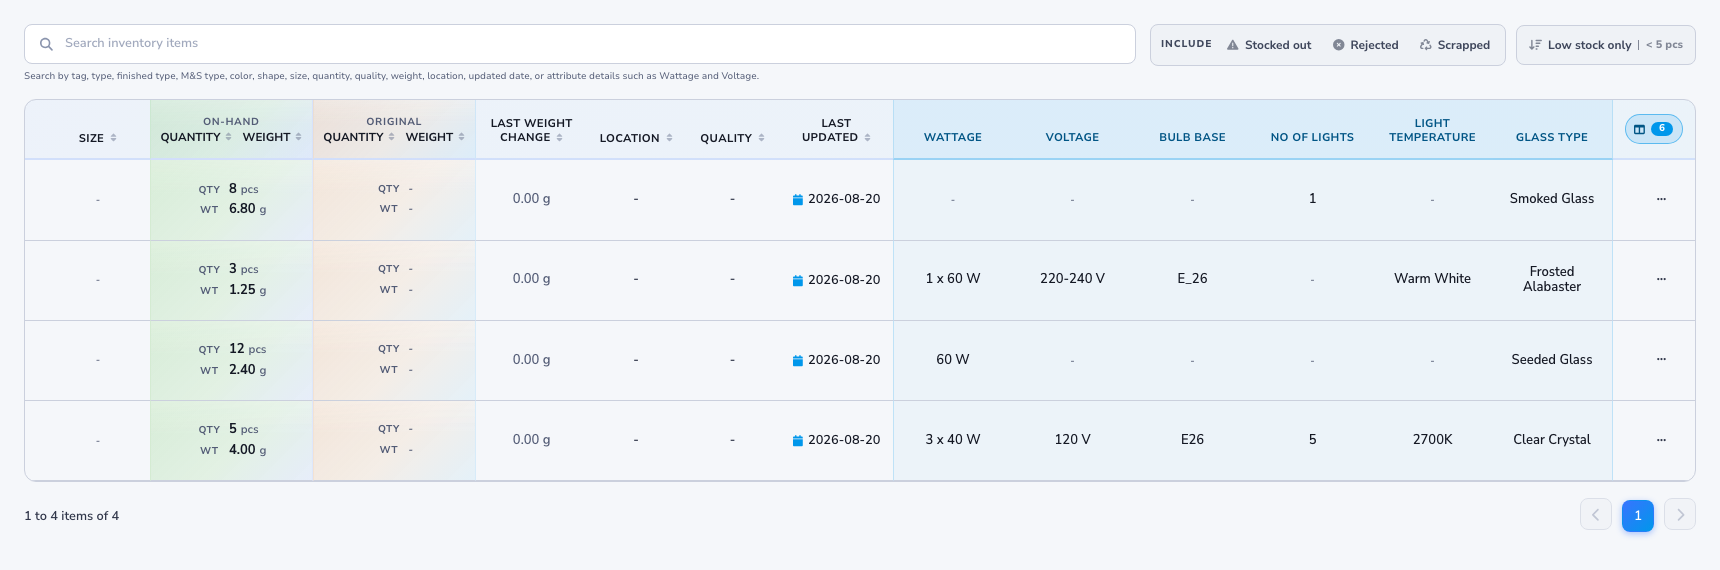
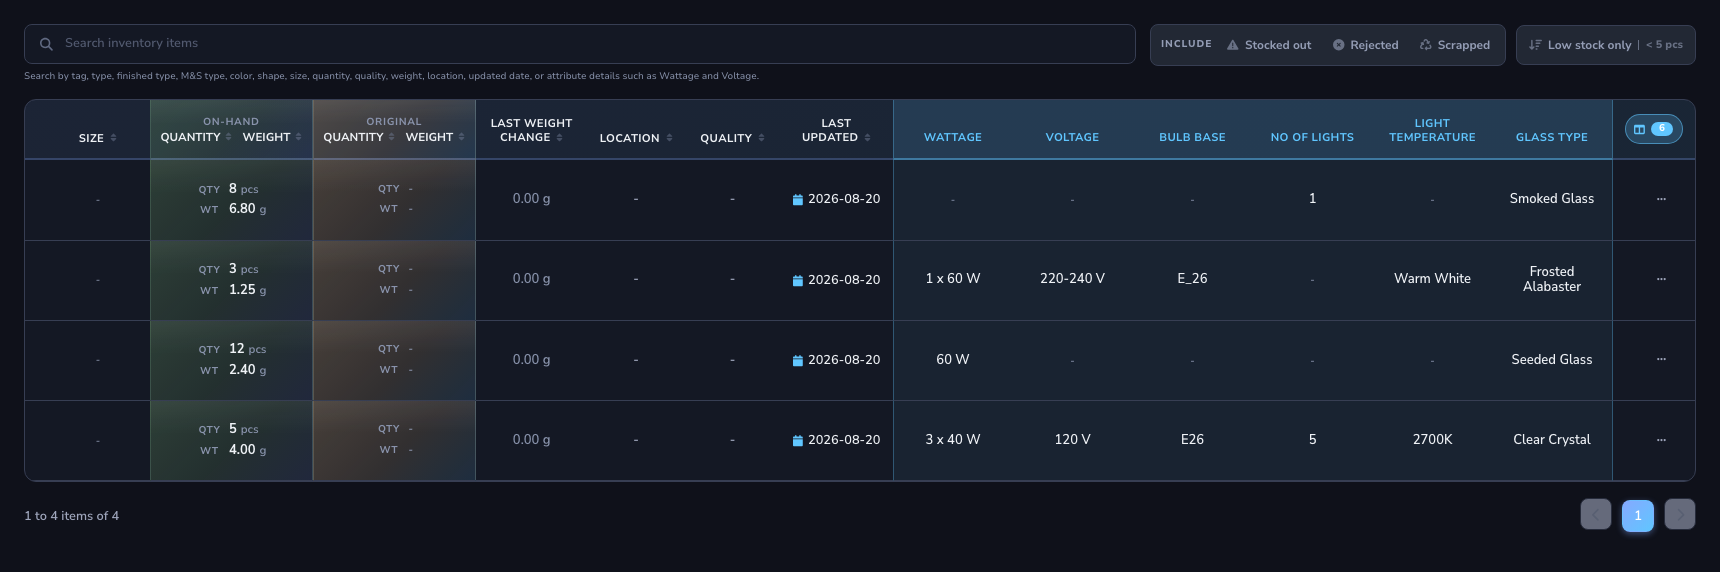
| Lighting Fixtures | Wattage, Voltage, Bulb Base, No of Lights, Light Temperature, Glass Type |
Your industry is set in Organization Settings. See Industry Starting Points for the product, inventory, and production defaults that come with the same selection.
For Shopify field names and supported types, see the Shopify variant metafield reference.
View and search attribute values in inventory tables
Filled attribute values appear on the related Inventory Item Details page. When you need to compare several items at once, you can also show them as columns in these inventory tables:
At the far right of the table header, the Show attributes button has a columns icon. Its count, such as +6, shows how many industry attribute columns are available. Click it once to display the columns.
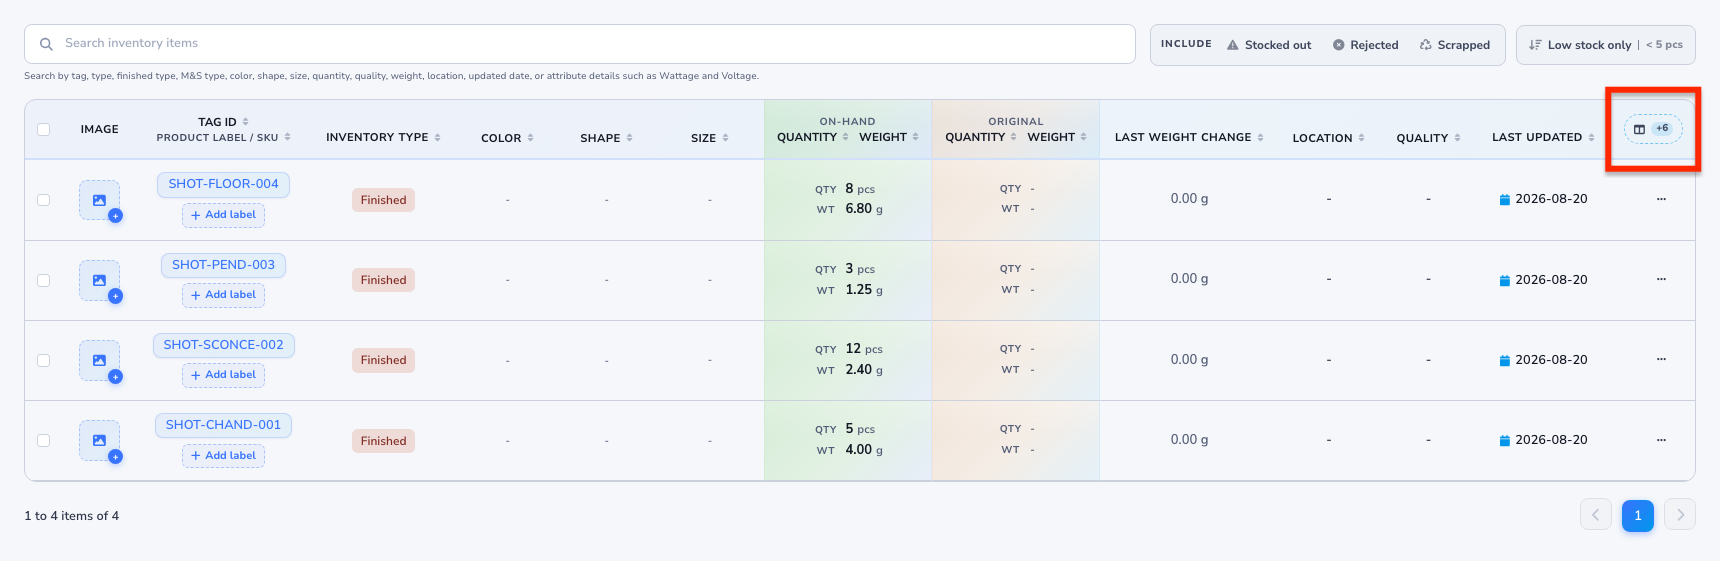
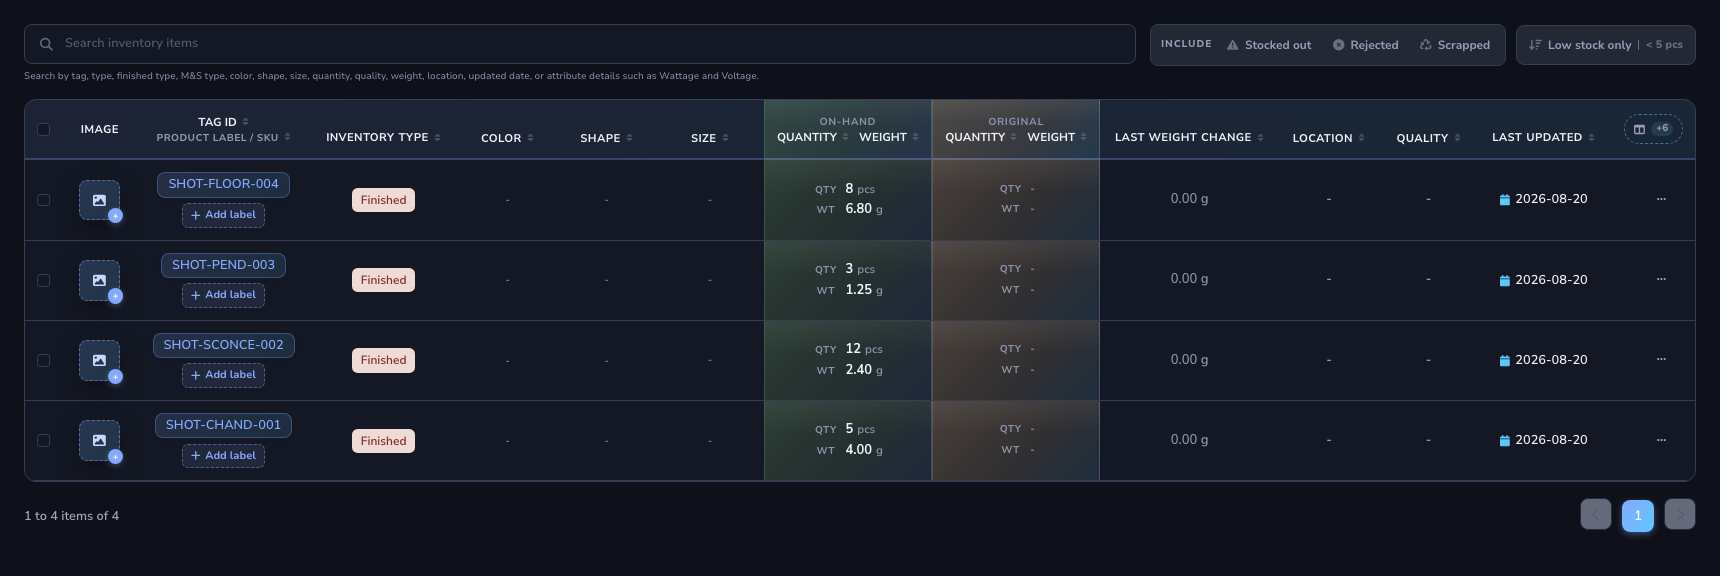
When the columns are open, the table adds the six attribute keys for your industry. Filled values for one item also appear on its details page. Click Show attributes again to close the columns and return to the compact table.
Jewelry inventory shows the jewelry keys in the same place: No of Stones, Metal Purity, Net Metal Weight, Stone Weight, Gemstone Type, and Hallmark No.
- Find specific items faster. The search box checks attribute values whether the columns are open or closed. For example, search
Unheated,GIA, or18Kto surface matching items. - Keep your preferred view. Loupe Factory remembers whether the columns are open across product tabs and when you return on a later visit.
- Available to every role. Everyone who can view the table sees the same attribute columns. No setting, setup step, or plan upgrade is required.
How attributes behave
- Every item gets the default keys, however it was created. That includes the add item wizard, AI import, production receipt, rejection and scrap, order returns, purchase receipt, and the Shopify and QuickBooks syncs. An item created by a night-shift production entry carries the same attribute rows as one added by hand.
- Values you enter are never overwritten. Defaults only fill gaps.
- Capitalization does not create duplicates. If an item already carries
wattage, that row is kept as it is. You will not end up with a separateWattagerow holding half the answer. - You can add any other key you need. Defaults are a starting vocabulary, not a limit.
- Empty attributes are hidden on the item details page. Unfilled defaults never read as clutter to the next person who opens the item.
- A default key cannot be permanently deleted from an item. Deleting the row clears the value, and the key comes back as an empty row the next time someone saves the item. To leave a default blank, clear its value.
- Changing your industry adds keys and never removes them. Items keep the attributes they already carry and pick up the new industry's keys the next time someone saves them.
Tip
Settle on attribute names before your team fills thousands of rows. Renaming a key later leaves the old label on items that already carry it, so the same detail ends up split across two labels in exports and reports.
Bulk-Import Inventory Items Using AI
If you are an admin, you can add inventory in bulk from your own CSV or Excel file. Loupe Factory maps the columns and prepares a preview for you to review before saving.
To add metal, gemstones, labor, or other cost components to items already in Inventory, use Link Cost Components from a Spreadsheet from the Component Rate Center. That workflow matches existing tag IDs and links their cost components.
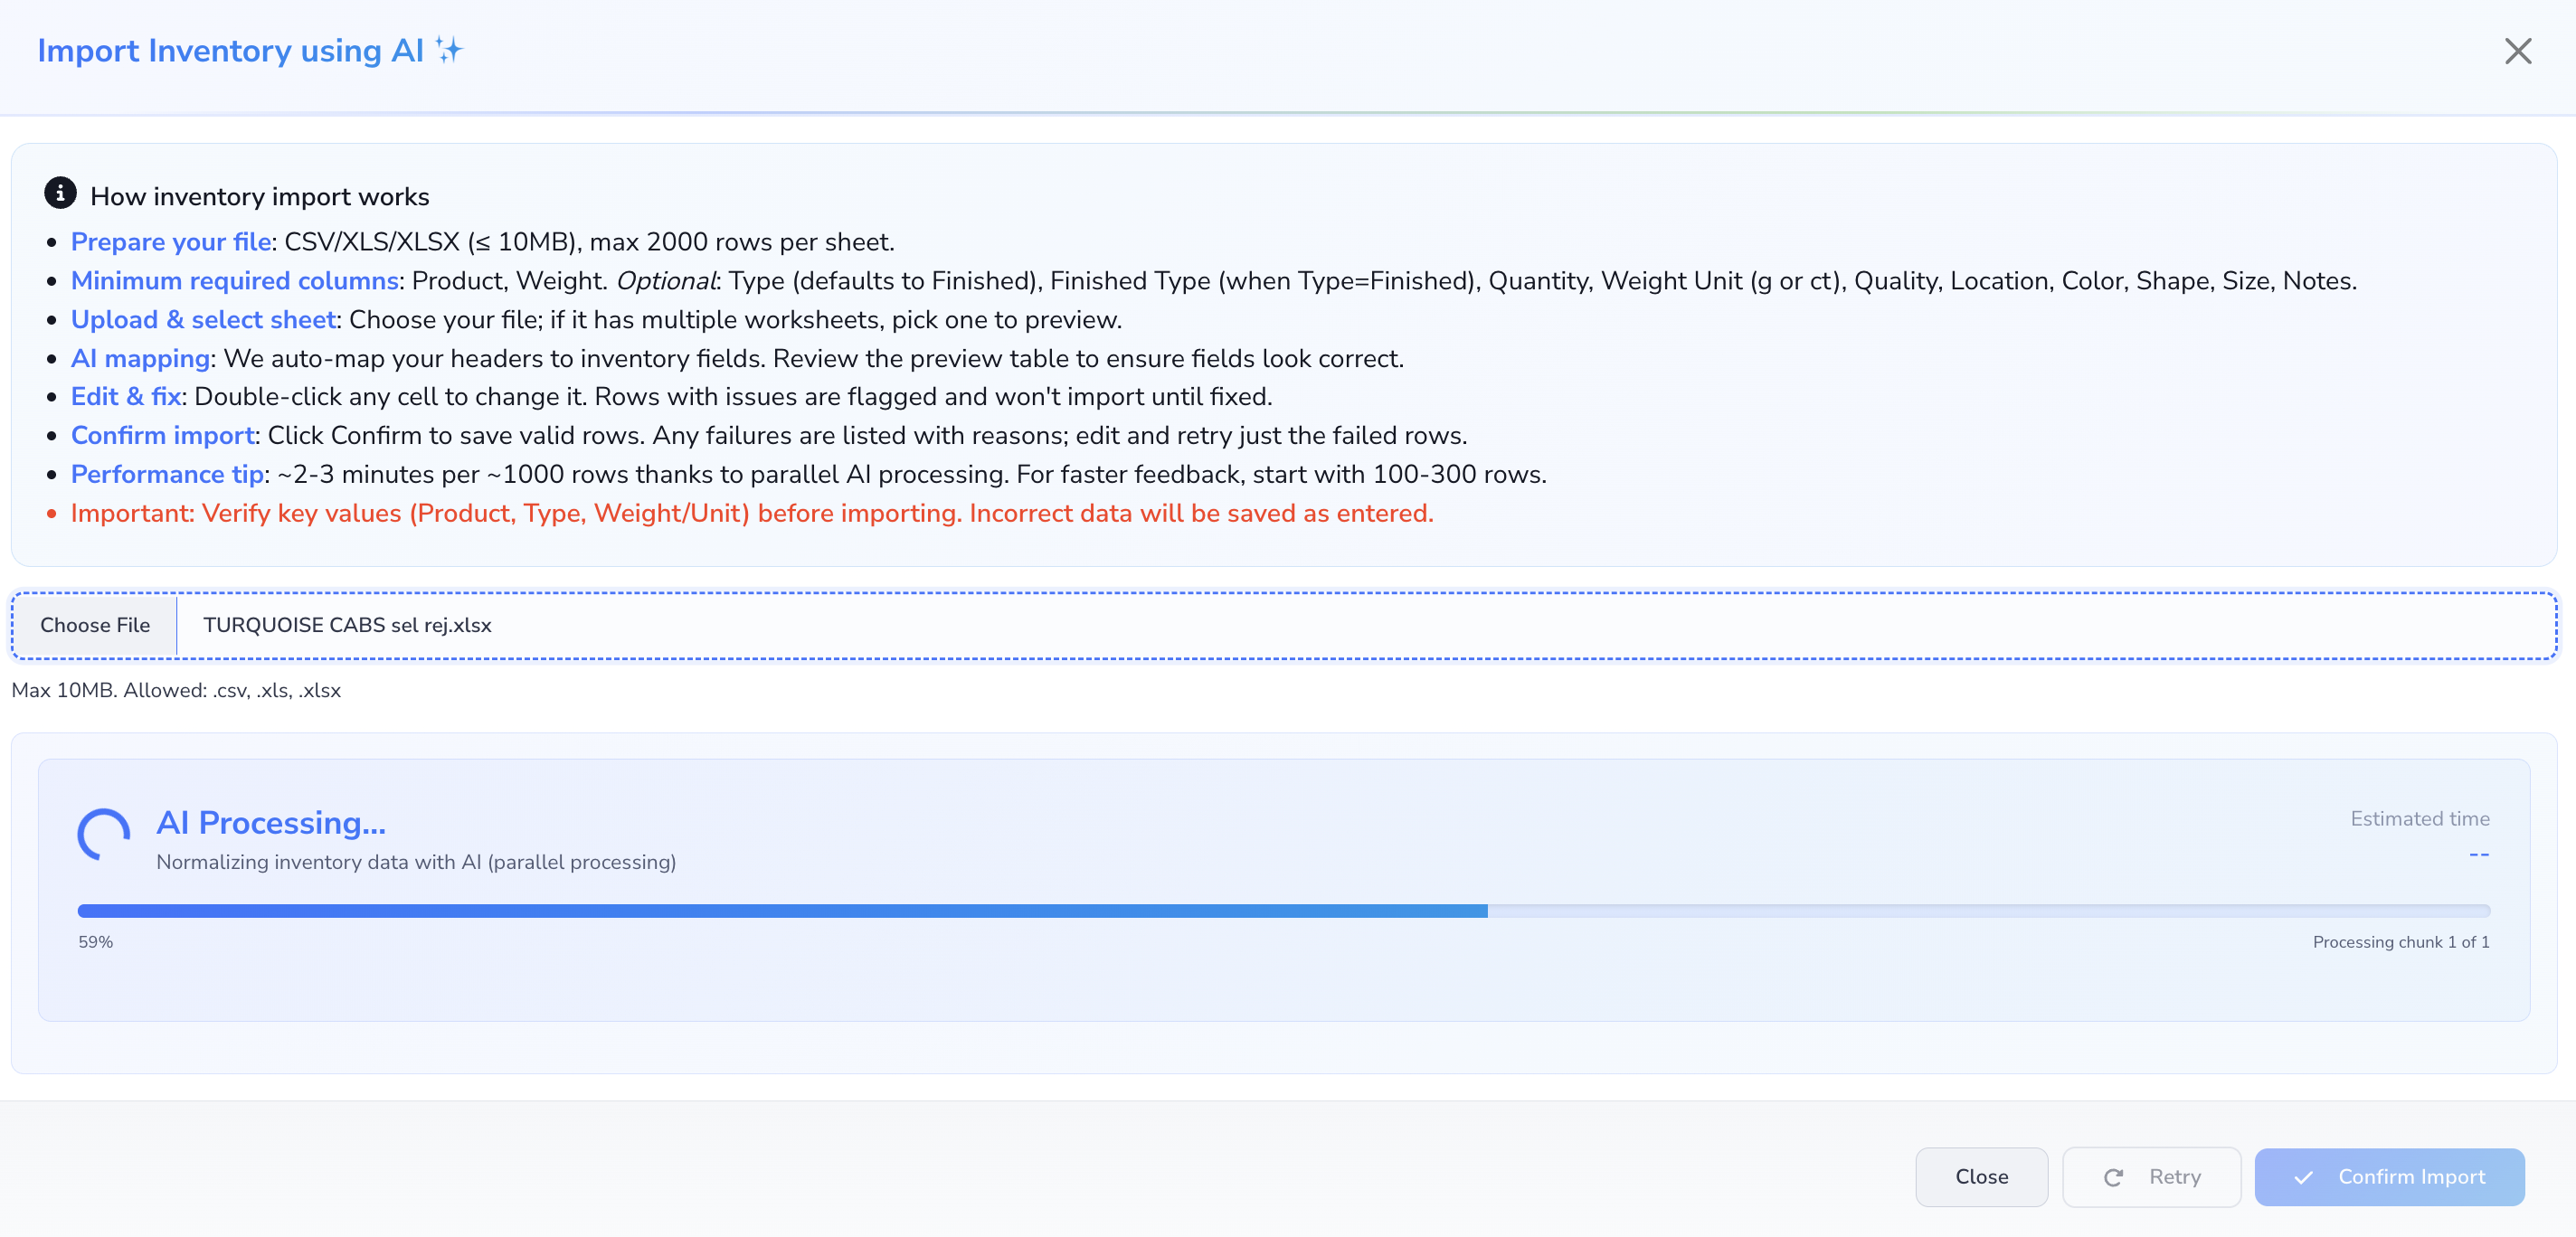
How the AI import flow works
Start from the sample CSV in the dialog, which lists every column for your industry with example rows.
- Go to Inventory > All Products. Click Add Product to Inventory, then choose Import Spreadsheets with AI.
- Open Advanced options if you want to change how much the AI may rewrite. Do this before you pick a file, because choosing a file starts the AI pass at once. See Choose how much the AI changes.
- Upload a CSV, XLS, or XLSX file of up to 10 MB and 2,000 rows per sheet. If the workbook has several sheets, choose the one to import after uploading.
-
Wait for the preview. Expect about 2 to 3 minutes per 1,000 rows, and about twice that when Storefront Description is set to Fill blanks or Revise all. For a quick check, start with 100 to 300 rows.
-
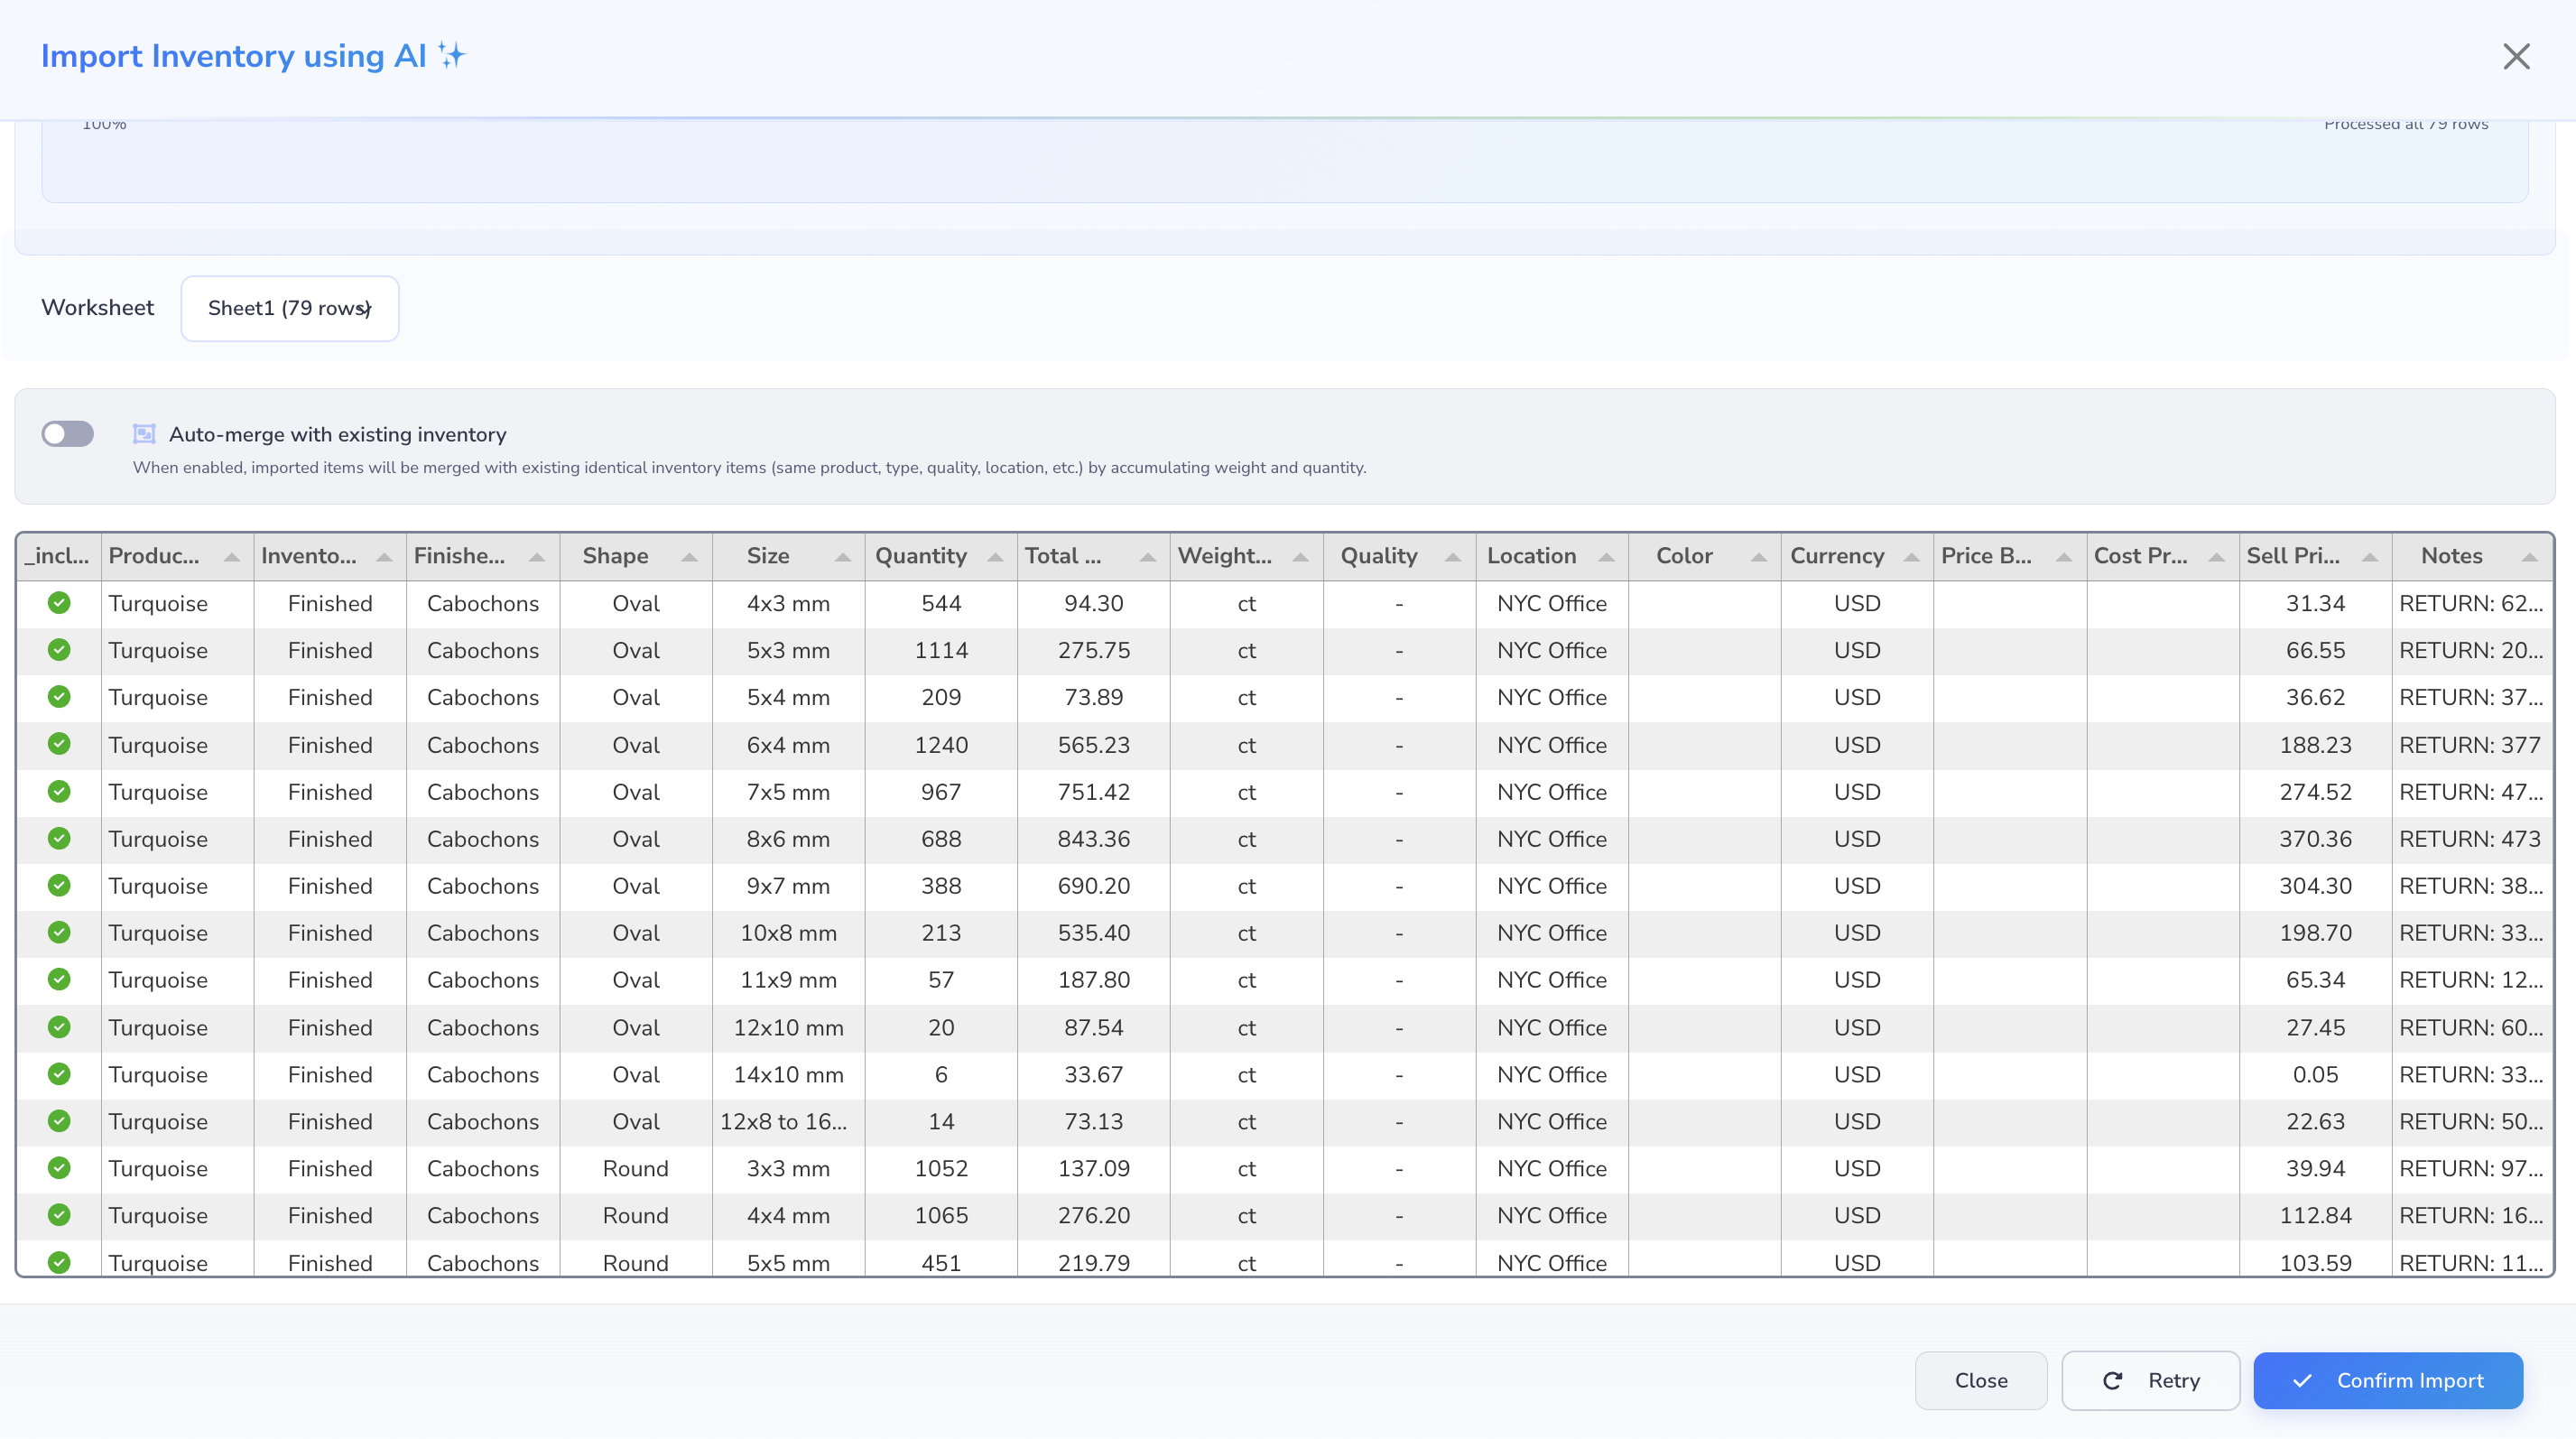
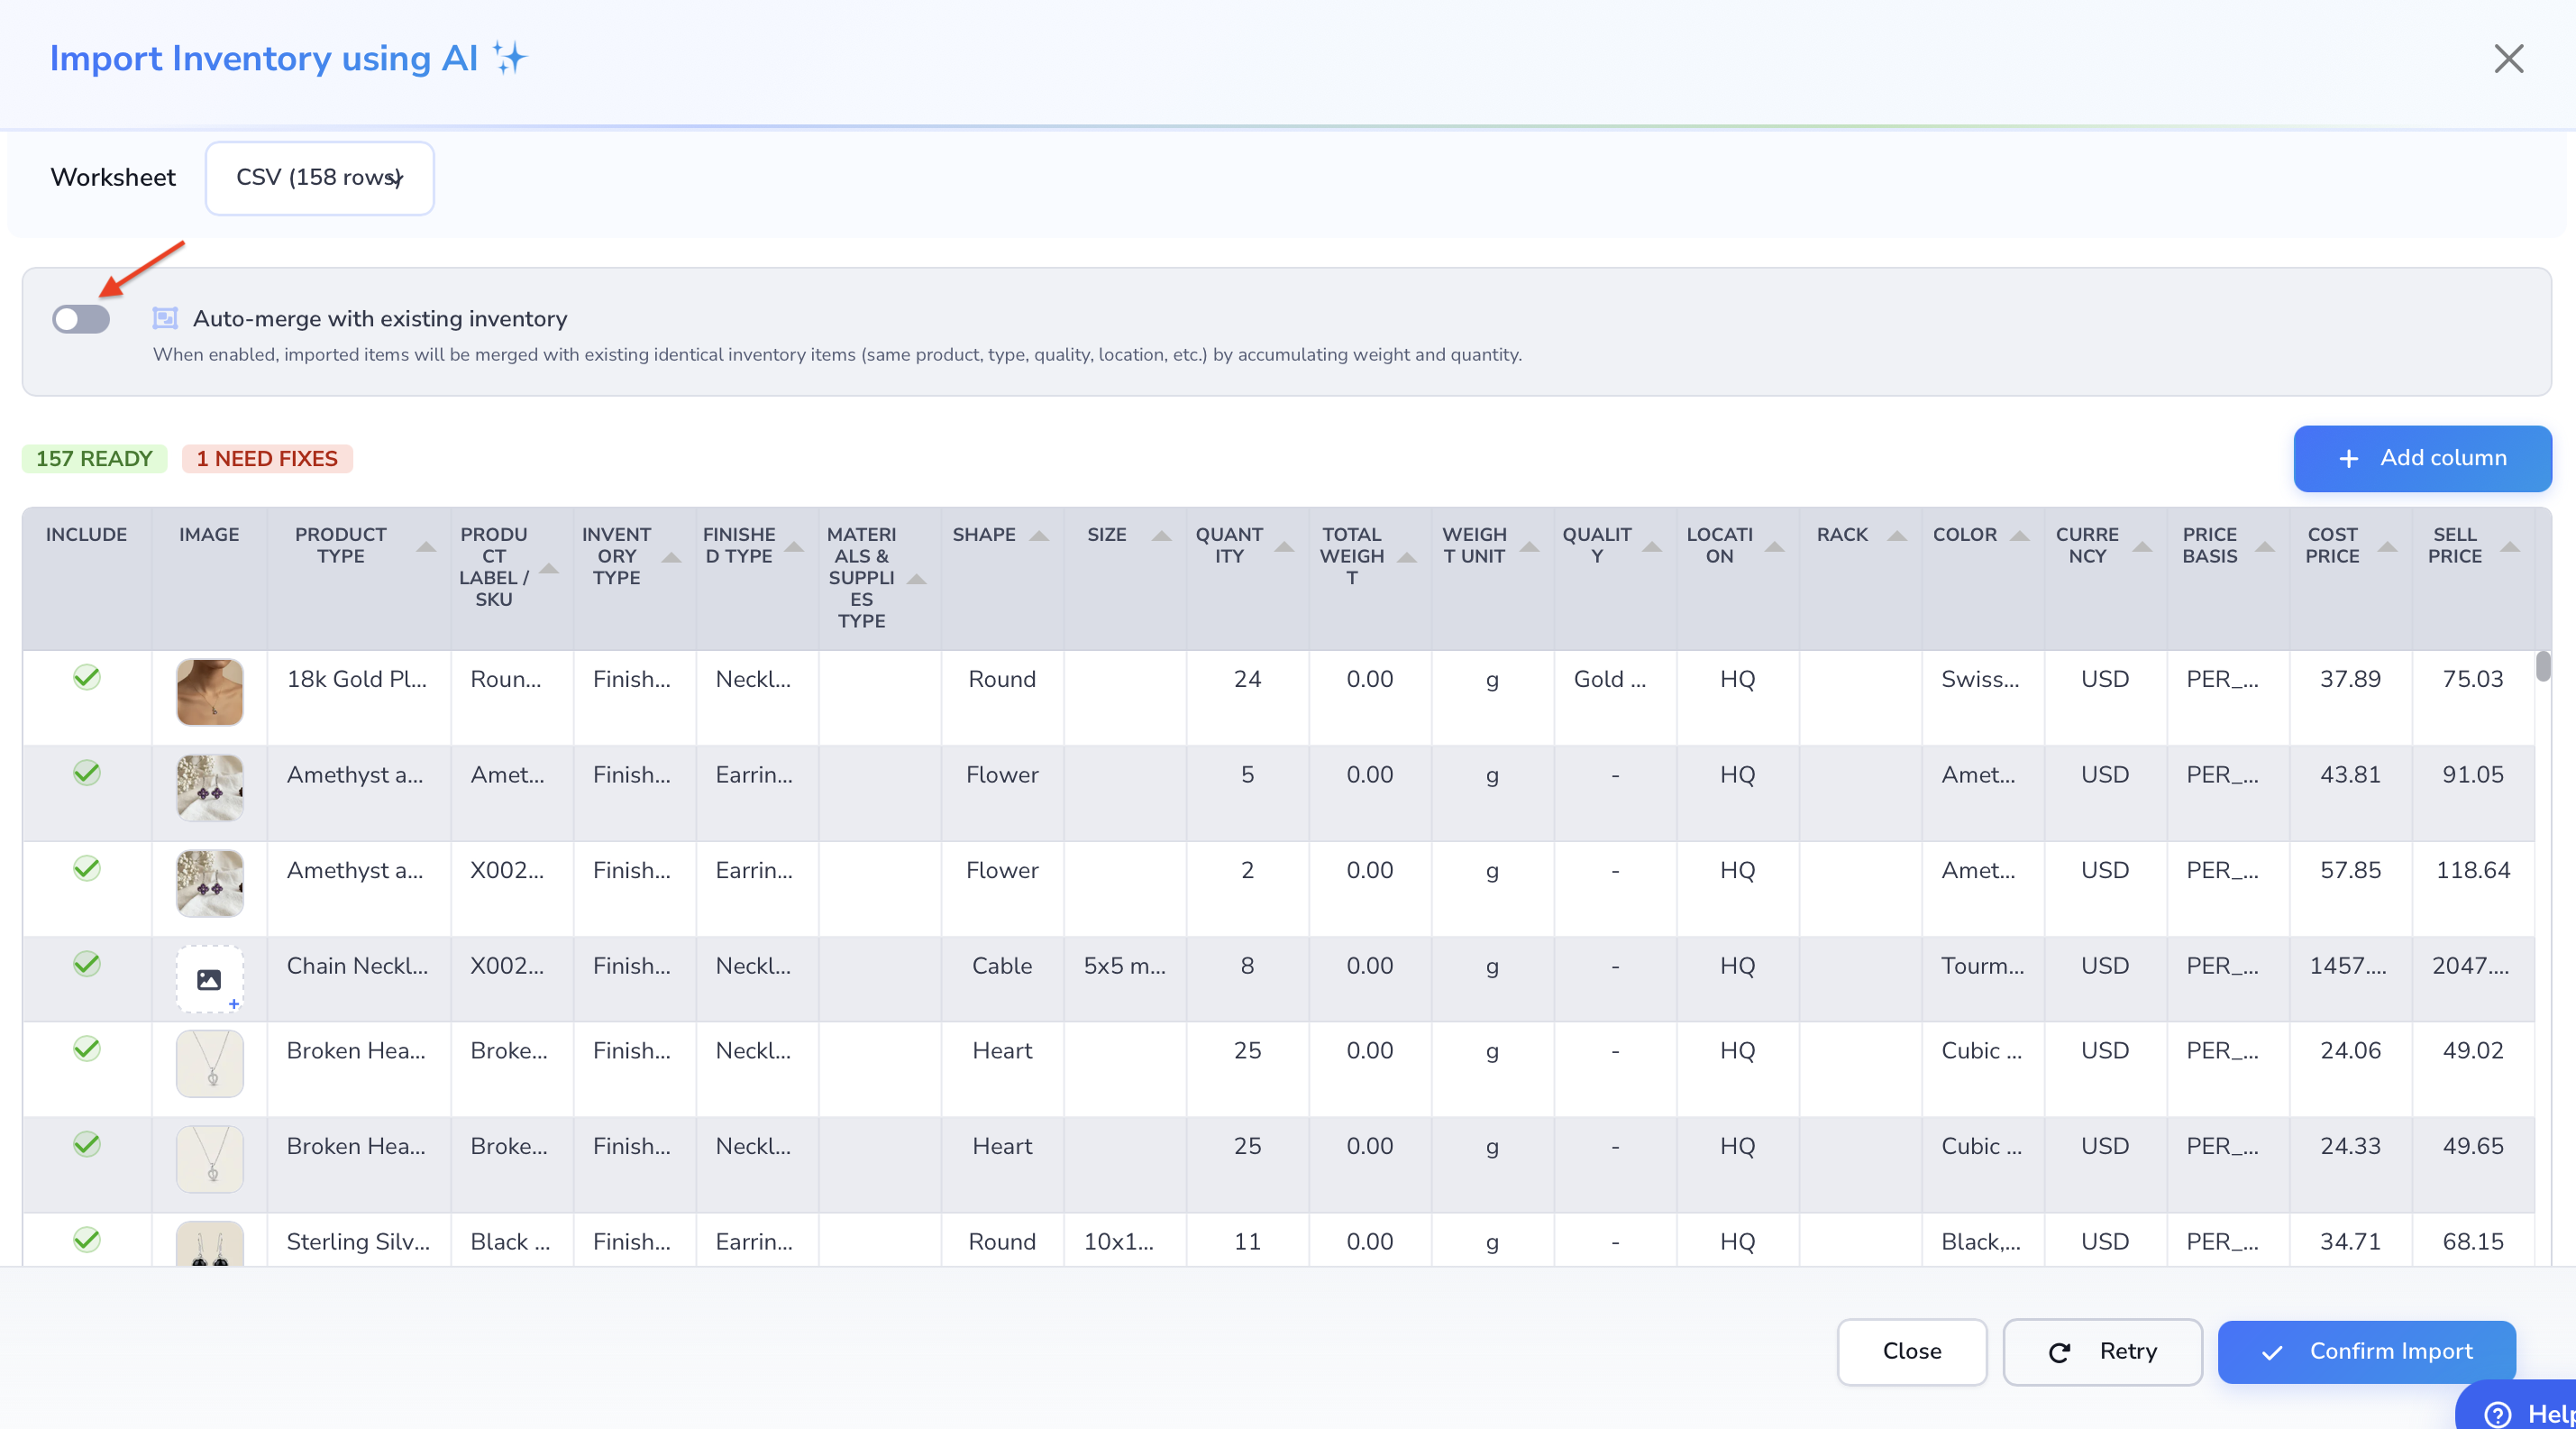
Decide whether to turn on Auto-merge with existing inventory.
- Read the counters above the table. They show how many rows are ready, how many need fixes, how many you excluded, and how many new product types the import adds. Click the needs-fixes counter to see only the problem rows.
- Double-click a cell to correct it. In the Shape cell, pick one or more shapes, or type a new name and press Enter to add it. A weight the preview calculated starts with an
=sign. Hover it to see how it was calculated. Edit one weight, and the preview recalculates the other. Edit the quantity, and the preview recalculates the weight marked with=. Hover a column heading to see what belongs in it, and click the fill icon at the heading's edge to set one value on every visible row. With the needs-fixes filter on, only those filtered rows are filled. Click Add column to add a column of your own. - Fix the flagged rows, include the ones you want, then click Confirm Import. The button shows Saving while the rows save. When every row saves, the dialog closes and the page refreshes with the new items.
When Auto-merge with existing inventory is enabled during import, Loupe Factory merges imported rows into matching inventory records and accumulates the imported weight and quantity instead of creating extra duplicate rows. A supplied Retail Price can also fill a blank price on the matching record. A row that gives a per-piece weight adds its total weight, which is the per-piece weight times the quantity. A row that lists several shapes matches only a record whose Shape lists the same shapes in the same order. See How Retail Price affects a match for the currency, price basis, and price checks.
Leave the toggle off when each imported row should stay as its own inventory record. To top up records you already have from a Loupe Factory export, see Update Existing Items from an Exported CSV.
Choose how much the AI changes
Use Advanced options to choose how much the AI may change the columns below and your industry's default attributes. Other recognized columns are mapped and cleaned as usual.
- Exact copies the cell as written. A product type or color already on your list uses the list's spelling.
- Fill blanks keeps existing values and fills only empty cells.
- Revise all lets the AI rewrite every row.
| Column | Default | What each setting does |
|---|---|---|
| Product Label / SKU | Fill blanks | Fill blanks writes a label for rows without one. Revise all rewrites every label into a consistent, search-friendly name and keeps the SKUs your sheet has. |
| Product Type | Revise all | Fill blanks works out a type from the rest of the row for blank cells. Revise all matches every row to your Product Types list and proposes a new type only when nothing fits. |
| Color | Revise all | Fill blanks takes a color from the item name or description for blank cells. Revise all matches every row to your Colors list, including colors written inside item names. |
| Storefront Description | Exact | Fill blanks drafts a description for rows without one. Revise all drafts one for every row, starting from the sheet's text. Drafts use the Balanced tone from the Storefront Description dialog. Each draft uses extra AI credits. |
| Attributes | Fill blanks | Fill blanks reads a value from the item name, description, or notes when its column is missing or blank. Revise all rewrites every value into the format the column heading describes, reading from anywhere in the row. |
The Attributes row appears only when your organization's industry has default item attribute keys, which are listed under its name. At any level, a value the row does not state stays blank, and columns the import does not recognize are kept as custom attributes as written.
Loupe Factory remembers your settings on this browser. If you change a setting after a file has been processed, a Run again prompt appears. Running again applies the new settings to the same file and discards any edits you made in the preview.
Product types your sheet names that are not yet in Admin Settings > Products Settings > Product Types are added when you confirm. The preview marks them with a New badge and counts them above the table. A shape that is not yet in Admin Settings > Products Settings > Shapes gets a New badge in its cell and is added when you confirm. The confirmation message lists the shapes it added. Colors are never added to your Colors list. A color your list lacks is saved as written on the item.
A yellow note above the table tells you when Exact or Fill blanks could not be applied to some rows. Review those rows before you confirm.
File rules for AI import
- Up to 2,000 rows per sheet and 10 MB per file, as
.csv,.xls, or.xlsx. - Required on every row: Product Type and a weight, either Total Weight or Per-Piece Weight with a Quantity. When a row has both, Loupe Factory uses Total Weight and recalculates the per-piece weight from it.
- Optional columns: Product Label / SKU, Inventory Type, Finished Type, Materials & Supplies Type, Quantity, Per-Piece Weight, Weight Unit, Quality, Location, Rack, Color, Shape, Size, Currency, Price Basis, Cost Price, Sell Price, Retail Price, Image, Storefront Description, and Notes. Inventory Type defaults to Finished when blank. Rack applies when rack tracking is on.
- Your column headers do not need to match these names. The AI maps them for you.
- Weight columns: Loupe Factory reads a heading such as Weight or Wt as the item's total weight. It reads Weight per Piece, Piece Weight, Unit Weight, Wt/Pc, and Avg Weight as the weight of one piece. The preview fills in the other weight from the Quantity and marks it with an
=sign. A per-piece weight without a quantity is flagged, because the total cannot be calculated. - Retail Price also accepts headings such as MSRP, Suggested Retail Price, Recommended Retail Price, and RRP. It uses the row's Currency and Price Basis. The import keeps it separate from Cost Price and Sell Price and does not infer it from another price or a discount.
- Invalid optional Cost Price, Sell Price, or Retail Price values become blank without rejecting an otherwise valid row. For example, a negative price or text that is not a number becomes blank. Other valid prices on that row are kept, and zero is valid.
- Shape: a cell can hold several shapes separated by commas, such as
Round, Oval. A shape already on your Shapes list keeps that list's spelling. A shape the list lacks is marked New in the preview and added to Admin Settings > Products Settings > Shapes when you confirm. Any new sizes on the row are added to every shape in the cell. - For JewelCloud jewelry listings, fill in Product Label / SKU even though it is optional for importing inventory. JewelCloud needs it as the style number; a Tag ID cannot replace a blank label. The jewelry feed also includes the first five nonblank shapes from Shape, in the order recorded. Additional shapes are left out and produce a warning. See JewelCloud jewelry listing details.
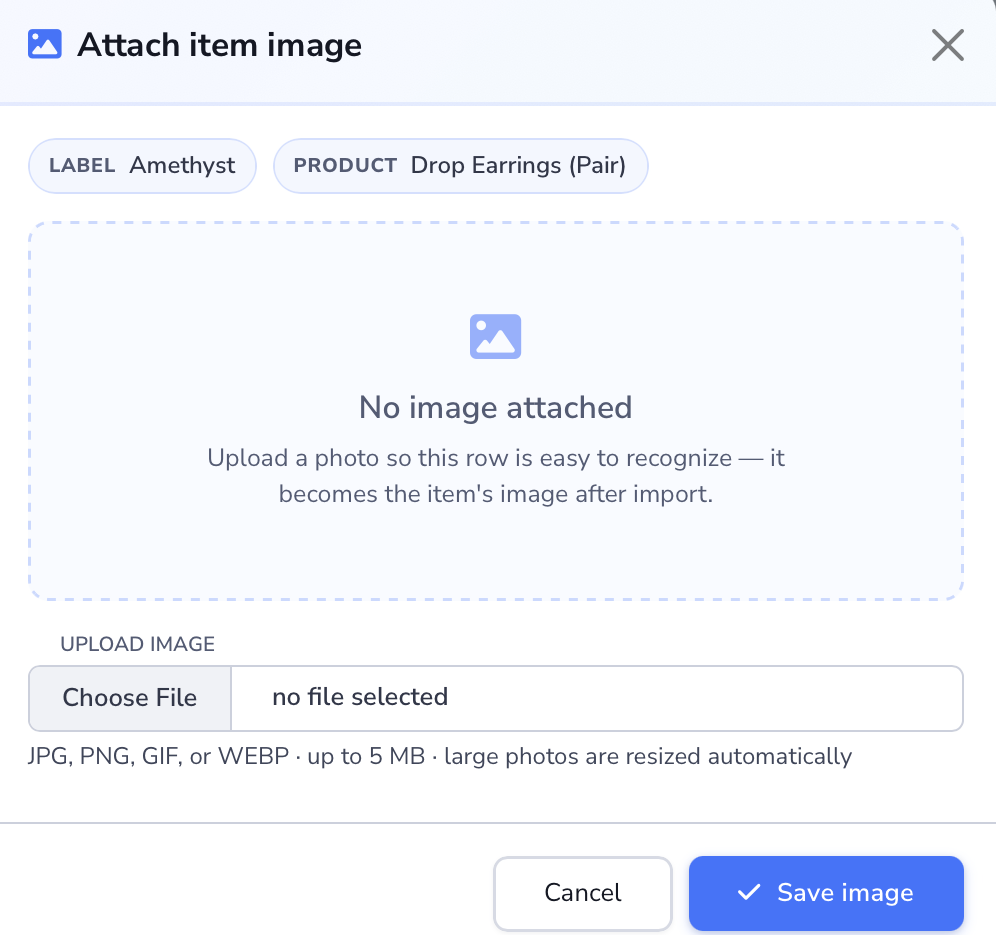
- Image: a public link to a photo shows as a thumbnail in the preview and becomes the item's image on import. Google Drive links work too. Paste the link Drive gives you when you click Share, and share the file with Anyone with the link. Loupe Factory saves its own copy of the photo, up to 2048 pixels wide. A link to a private file, or to something that is not a photo, leaves the row without an image and does not block the import. Click the thumbnail to upload or replace the photo. Loupe Factory reads headings such as Image, Image URL, Photo, and Picture as this column.
- Storefront Description is the shopper-facing copy for your listings. Notes go to each item's history and are not shown in the preview.
- Rows without a location get your default location, set in Settings > Organization. Without one, a hint above the table counts the rows that still need a location.
- Your industry's attribute columns always appear in the preview, whether or not your file has them. The AI fills them when a row states the value, in its own column or inside a description, and leaves them blank otherwise. The Attributes setting under Advanced options changes how far the AI reads into them.
- Any other column is kept as an item attribute on the imported rows. Review those columns in the preview before you confirm.
With Color set to Revise all, the import matches values to your Colors list. It fixes spelling and capitalization and expands color codes from your Colors list to their names, such as MK to Matte Black. It chooses the closest match only when the match is clear. A color it does not recognize is kept exactly as written. When a cell holds several colors separated by commas, each one is matched on its own.
Import review tips
- Check Product Type, Inventory Type, and both weight columns first. What you see in the preview is what gets saved.
- Look at every New badge in the Shape column before you confirm. A misspelled shape in the sheet becomes a new entry on your Shapes list. Fix the cell if that name should already be on the list.
- Share Google Drive photos with Anyone with the link before you import. Otherwise those rows import without their photos.
- Review Retail Price in its own preview column. Double-click a cell to edit it independently of Cost Price and Sell Price. Check the row's Currency and Price Basis, and fill any price that was left blank before confirming if you need it recorded.
- Set a default location in Settings > Organization so blank location cells fill themselves.
- Turn on Auto-merge with existing inventory when imported stock should add to matching records instead of creating duplicates.
- Ask an admin to add missing colors in Admin Settings > Products Settings > Colors before you import, so rows land on the list's names instead of the spreadsheet's spellings.
- Start with a smaller file for a quick validation pass.
What stays saved if something goes wrong
- Each sheet keeps your edits while the import is open, even when you switch sheets.
- A row you fix rejoins the import on its own. A row you excluded by hand stays excluded, through fixes and fill-downs, until you include it again.
- If some rows save and others fail, the failed rows come back for editing with the reason on each row. The saved rows leave the table and cannot be saved twice. Fix the failed rows and click Confirm Import again.
- If the connection drops mid-save, click Confirm Import again. The import continues where it stopped, and rows that already saved are not created again.
- Retry clears the dialog so you can start over with a new file.
Importing is available to admins.
Update Existing Items from an Exported CSV
When stock arrives against records you already have, you do not have to open each item. Export what is in Loupe Factory today, edit the file offline, then re-import it with Auto-merge with existing inventory turned on. Every row that matches an existing record adds its weight and quantity to that record instead of creating a duplicate.
Use this workflow to add stock and fill blank fields on matching records. A merged row keeps values already stored, including any existing Retail Price.
| Column | What a merge does to it |
|---|---|
| Quantity and Total Weight | Added to the figures already on the record. These are the only values that always change. A per-piece weight is multiplied by the quantity first, and that total is what gets added. |
| Product Label/SKU, Storefront Description, and the item photo | Filled only when the record's own field is empty. A label, description, or photo already recorded is kept, even when the spreadsheet holds something different. |
| Your own extra columns | Fill item attribute keys that have no value yet, and add keys the record does not carry. A key that already holds a value, such as Origin = Burma, is never overwritten. |
| Currency and Price Basis | Kept on the existing record. When a Retail Price is supplied, both must match before the row can merge. |
| Cost Price and Sell Price | Kept on the existing record. Imported values do not replace or fill these prices during a merge. |
| Retail Price | A supplied price fills a blank only when currency and price basis match. An existing Retail Price must be identical; a conflicting price creates a separate record. A blank incoming price preserves the stored value. Zero is valid. |
| Notes | Not copied. Loupe Factory appends its own CSV/XLS Inventory Import (merged) entry instead, recording the weight and quantity that were added. |
Any cost components on the record are rescaled to the new weight and quantity, so a merged receipt does not leave its costing behind. Cost Price and Sell Price stay as recorded; a blank Retail Price can be filled under the rules above.
A row that matches nothing is treated as a new item, and then the whole spreadsheet lands, including notes and pricing. To change a stored price, use Edit Inventory Pricing. To replace a label or photo, see Editing Inventory Items and Upload or Replace an Inventory Item Image.
How the round trip works
-
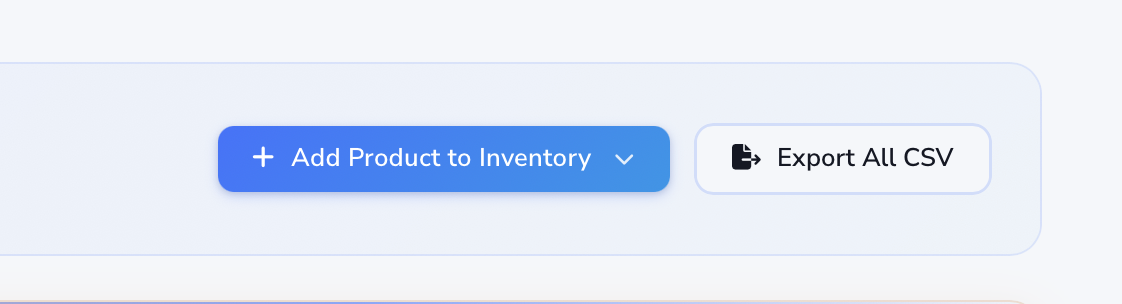
Open the All Products in Inventory page and click Export All CSV in the page header. Only admins see this button, and a six-digit code emailed to you releases the download. See Exporting Inventory to CSV.
-
In the exported file, put the amount you are adding in On-hand Quantity and On-hand Weight. Auto-merge adds those figures to what the record already holds, so re-uploading the exported on-hand values doubles the stock. Enter
0in both when a row should fill a blank without moving stock. -
Leave the columns the match is keyed on exactly as they were exported: Product Type, Inventory Type, Finished Type, Materials & Supplies Type, Quality, Color, Shape, Size, Weight Unit, Location, and Rack. Change one of them and the row stops matching, so it creates a new record rather than updating the old one. A Shape value with several shapes matches only when the record lists those same shapes in the same order.
When supplying Retail Price, also check that Currency and Price Basis match the stored record. Its Retail Price must be blank or identical to the incoming price. Leave the incoming price blank to keep a stored value.
-
Delete the export-only columns, which the import form has no field for: Tag ID, Original Quantity, Original Weight, Weight Change, Estimated Unit Cost, Last Updated, and the item details page link. Left in the file, they arrive on every row as item attributes. Keep Retail Price, Storefront Description, and Image URL, which map to item fields, along with any column of your own that should land as an attribute.
-
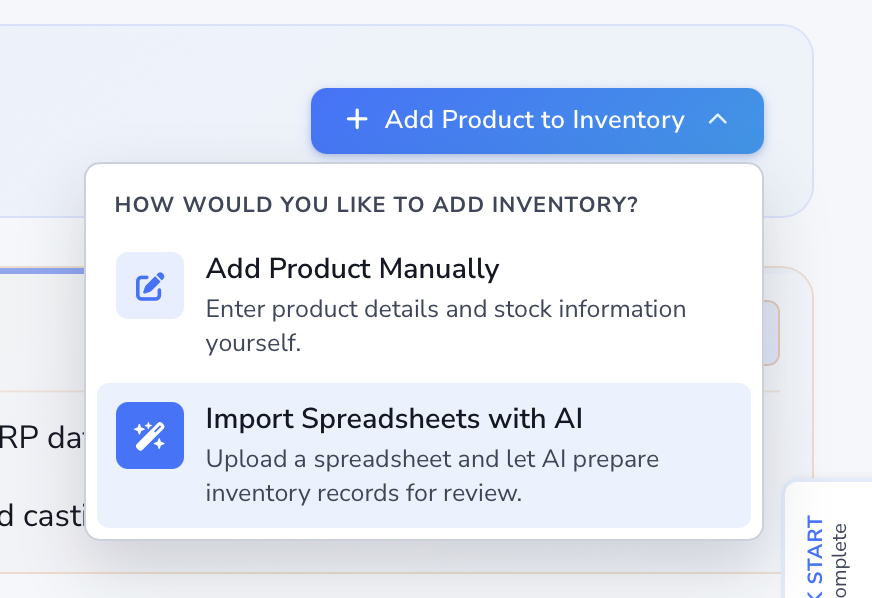
Back on the inventory page, click Add Product to Inventory, then choose Import Spreadsheets with AI. Before uploading the edited file, open Advanced options and set Product Type and Color to Exact. These columns are used to match existing records, and Exact keeps the exported spelling. Then upload the file.
-
In the preview, turn on Auto-merge with existing inventory before you do anything else. Check that your columns mapped to QUANTITY and TOTAL WEIGHT. Review Retail Price separately, including its currency and price basis, then work through the ready and needs-fixes counts above the table.
-
Click a row's Image cell to attach a photo to that row. Upload a JPG, PNG, GIF, or WEBP of up to 4 MB, and Loupe Factory resizes anything larger. On a merged row the photo lands only when the record has no photo yet, so use More Actions > Update Image on the item to replace one. A photo Loupe Factory cannot read is skipped, and the rest of the row still imports.
-
Fix the flagged rows, then click Confirm Import.
Enter what you are adding, not the new total
Auto-merge accumulates. A row carrying the on-hand figures straight from the export doubles the stock on the record it matches. Enter the amount that arrived, or 0 when the row should not move stock at all.
A row that matches nothing becomes a new item
The fields used to match records must line up. A supplied Retail Price must also pass the price, currency, and price basis checks. If any of these conflict, or the toggle is off, the row creates a separate inventory record. A row with zero quantity and weight then creates a record holding no stock. Read the preview before you confirm.
Delete All Inventory Items
A test import or a bad spreadsheet load can leave your inventory full of rows nobody wants. Instead of removing them one at a time, an admin can clear every inventory item in one step from Admin Settings > Inventory Settings, in the Reset section under Inventory Records. The card shows how many items you have on hand, and the button is disabled when your inventory is already empty.
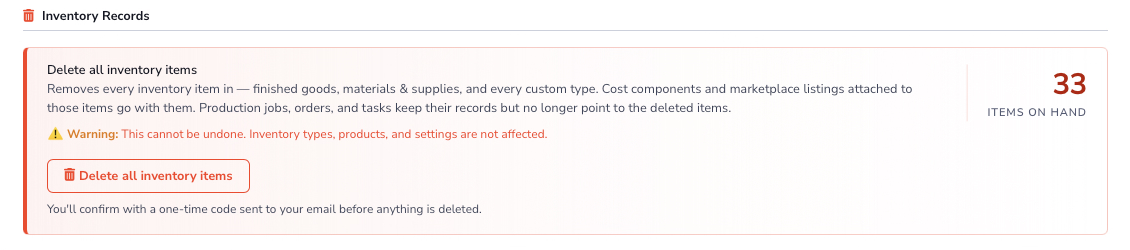
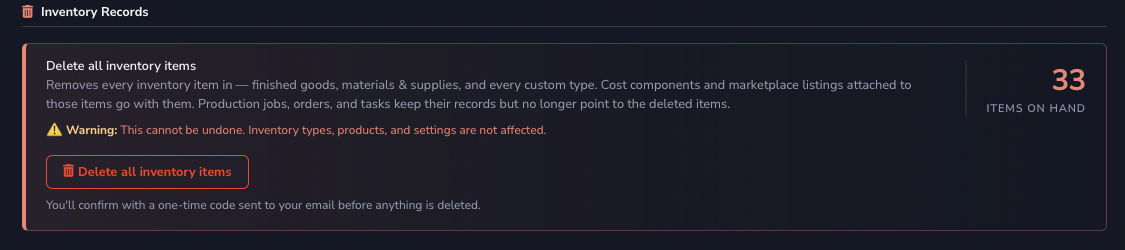
The deletion removes every inventory item of every type, whether finished goods, materials & supplies, or a custom type, along with the cost components and marketplace listings attached to those items. Inventory types, products, and your settings stay as they are. Production jobs, orders, and tasks keep their records but no longer point to the deleted items.
This cannot be undone
If you might need the records later, download them first with Export All CSV in the All Inventory page header. See Exporting Inventory to CSV.
Loupe Factory verifies the deletion the same way as an export:
- Click Delete all inventory items, then Send verification code in the dialog. Loupe Factory emails you a six-digit code that applies only to this deletion and expires in ten minutes. You stay signed in.
- Enter the code and click Verify and delete.
- Read the confirmation. The dialog and your notification bell show how many items were deleted and what was removed with them.
Afterward, you and your workspace's billing contact receive a security receipt by email. It records how many items were deleted, what was removed with them, who did it, and when. If you did not authorize a deletion, contact your workspace administrator right away or reply to that email.
For the full walkthrough, see Deleting All Inventory Items.
Editing Inventory Items
You can edit items from All, Finished, or Materials & Supplies. Only admins see pricing inputs in the add and edit wizards.
To update an existing item:
- Find the item using the search bar or by browsing the inventory list.
- Click the item name to open its detail view.
-
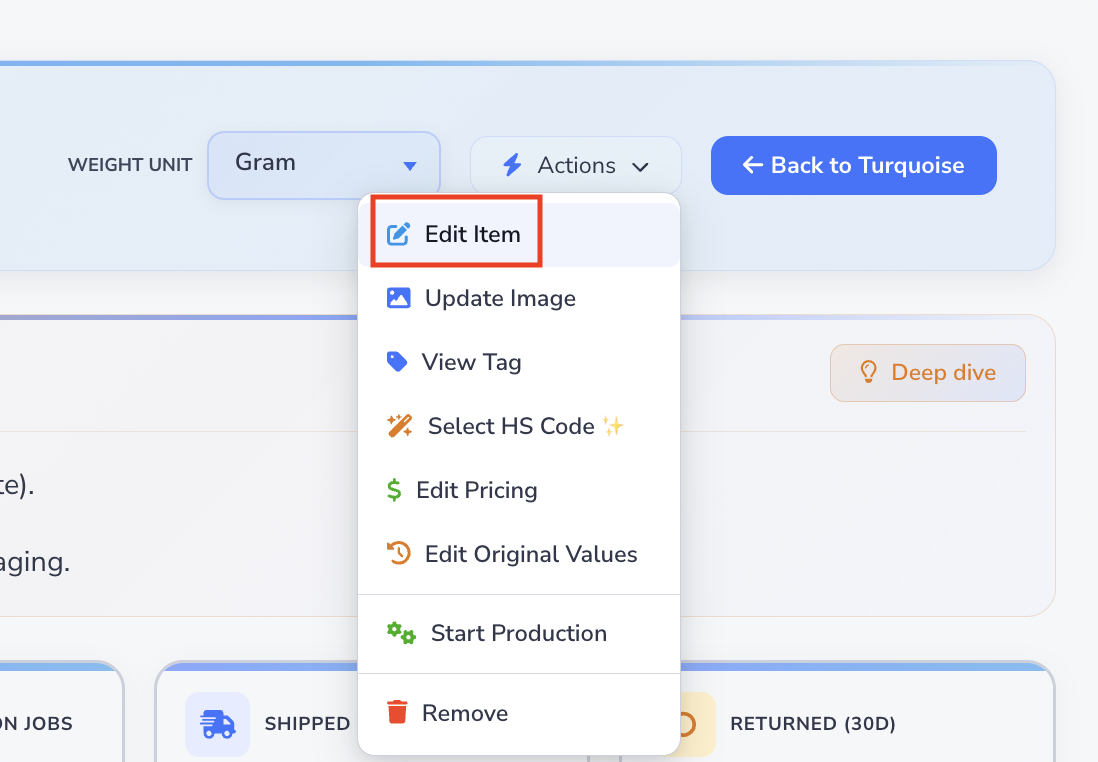
Click More Actions and then select Edit Item to open the edit wizard.
-
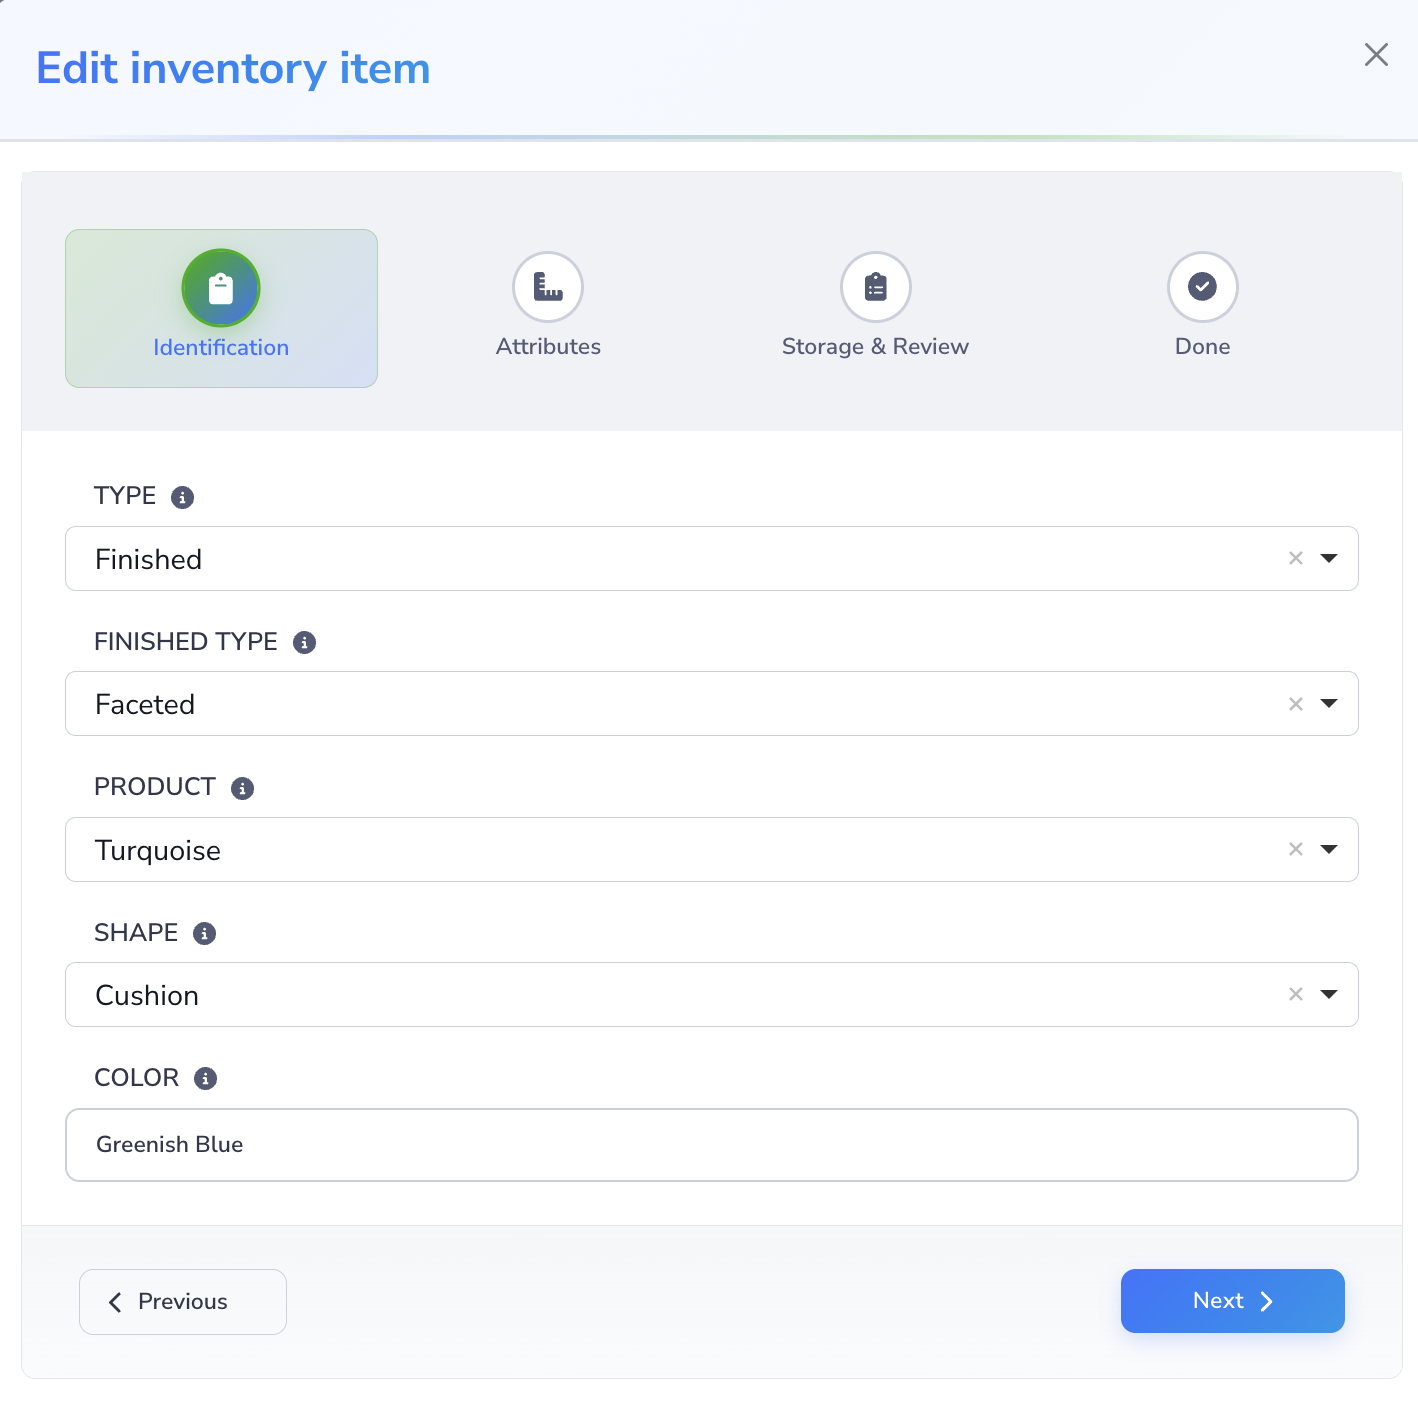
On Identification, update fields such as type, finished type or materials and supplies type, product, shape, and color as needed.
- On Attributes, update the item's size, quantity, weight, and weight unit.
- On Storage & Review, review the summary and update operational details such as quality, auto-merge, location, rack if enabled, created date, notes, and the item image.
- If you are an admin, review or update Currency, Price Basis, Cost Price, Sell Price, and Retail Price on Storage & Review. Existing prices are filled in for you. Use Edit Inventory Pricing when you only need to change pricing.
- Accept the terms and privacy confirmation, then continue through the wizard.
- On the Done step, review the result and close the window.
Tip
Changes to stock levels made here are recorded as manual adjustments. For production-related stock changes, use the Production Tracking module to keep your audit trail accurate.
Edit Original Quantity and Weight
Every inventory item carries two sets of numbers, and they are edited in different places.
- On-hand quantity and on-hand weight are what the item holds right now. Change those in the edit wizard above, on the Attributes step.
- Original quantity and original weight are what the item held when it was first created. Loupe Factory uses them to track consumption, calculate yield, and produce accurate reports.
Use Edit Original Values when the creation-time numbers were wrong, such as an intake weight that was mistyped or a lot that was logged with the wrong piece count. Only users with the Admin role can change an item's Original Weight or Original Quantity.
To edit original values:
- Go to Inventory and open the item details page for the inventory item you want to correct.
-
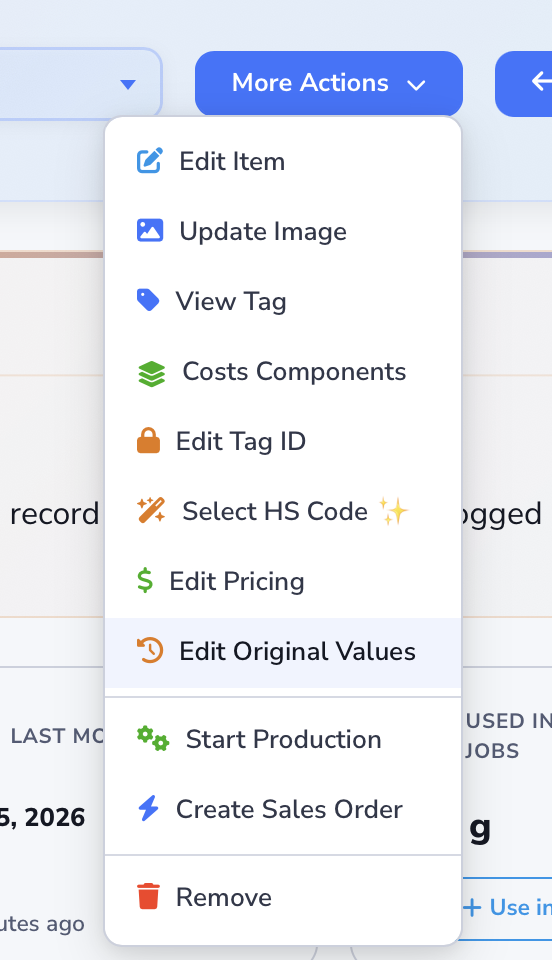
Click More Actions, then select Edit Original Values.
-
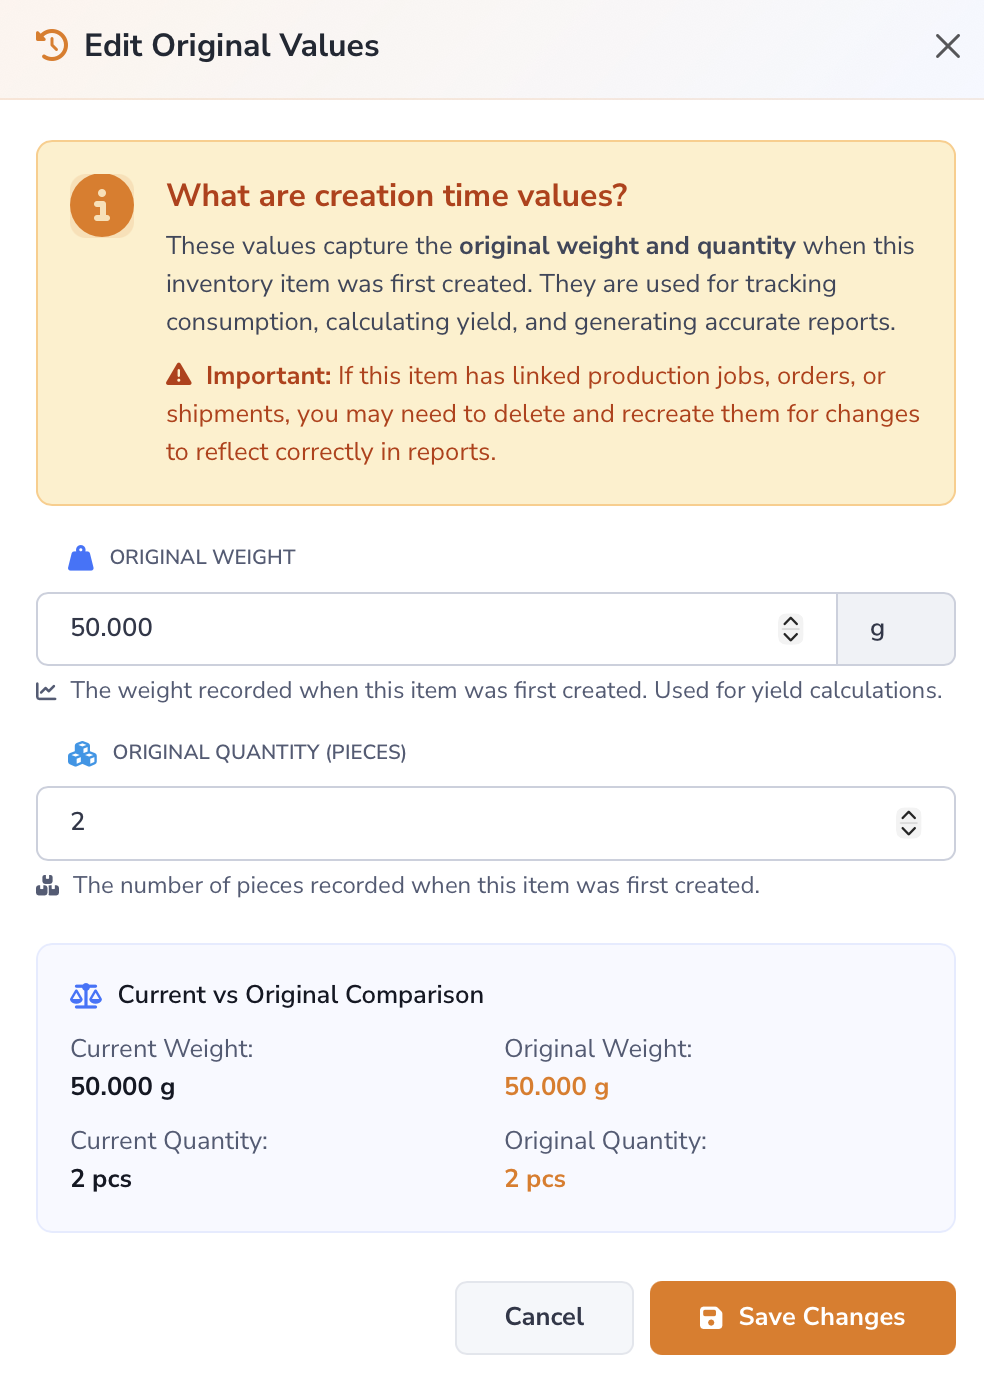
Update Original Weight, Original Quantity (Pieces), or both.
-
Compare the item's current and original figures in Current vs Original Comparison, then click Save Changes.
When Original Weight changes, Loupe Factory shifts the current On-Hand Weight by the same difference. If the original weight increases from 10.000 g to 12.000 g, the on-hand weight increases by 2.000 g as well. If the original weight is reduced, the on-hand weight drops by the same amount, but never below zero.
Original Quantity works the same way. Raise the original piece count by 3 and the on-hand piece count rises by 3. Lower it by 3 and the on-hand count falls by 3, again with zero as the floor.
Loupe Factory shifts on-hand values only when both the previous original value and the new original value are present. If the original value was blank before editing, or if you clear it during editing, only the original value changes. The current on-hand weight or quantity stays where it is.
Warning
If the item is already linked to production jobs, orders, or shipments, you may need to delete and recreate those records before the corrected figures show up in reports.
Upload or Replace an Inventory Item Image
If you only need to update an inventory item image, you can do that directly from the item details page.
- Go to Inventory and open the details page for the inventory item whose image you want to update.
-
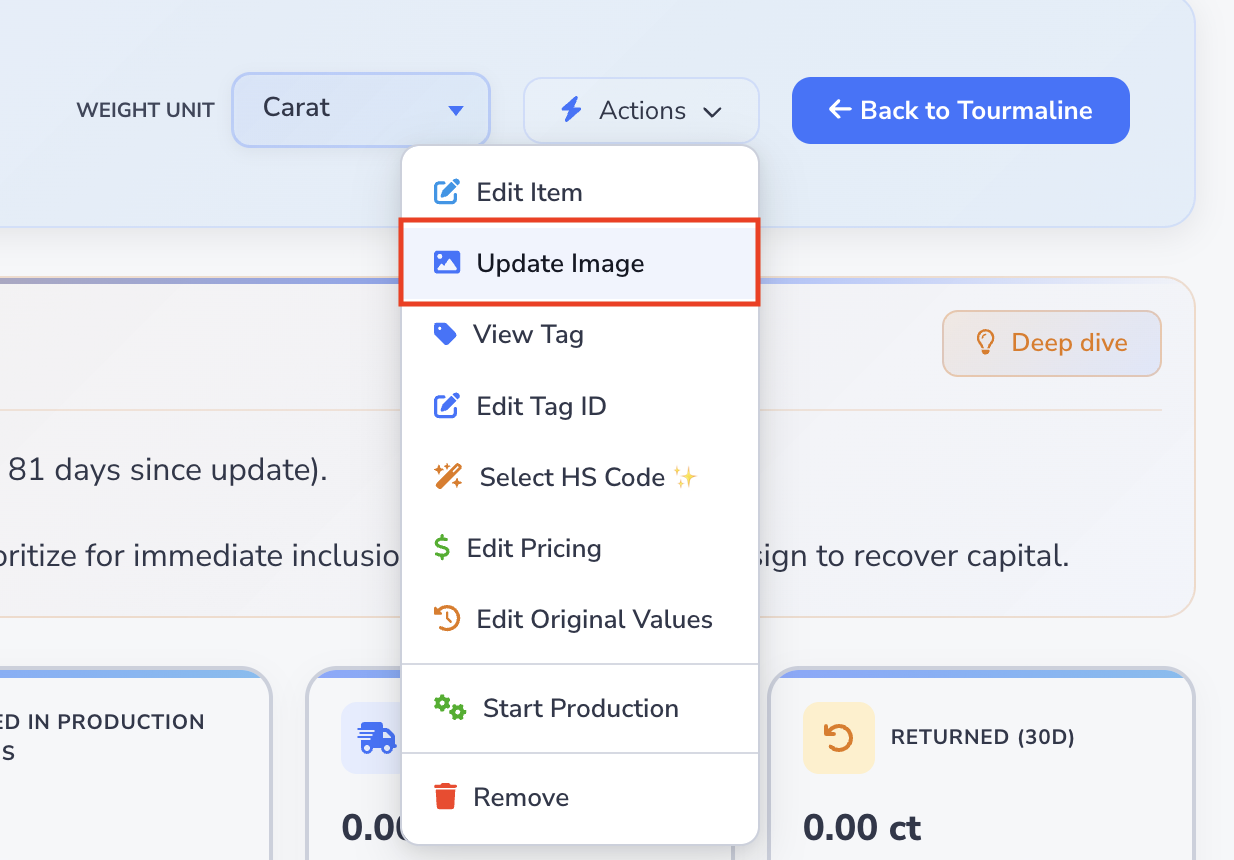
Click More Actions, then select Update Image to open the image update form.
-
In the modal, upload an image in JPG, JPEG, PNG, or GIF format. The file size must be 4 MB or less. Images marked as locked will not be uploaded to the inventory item. Then click Save.
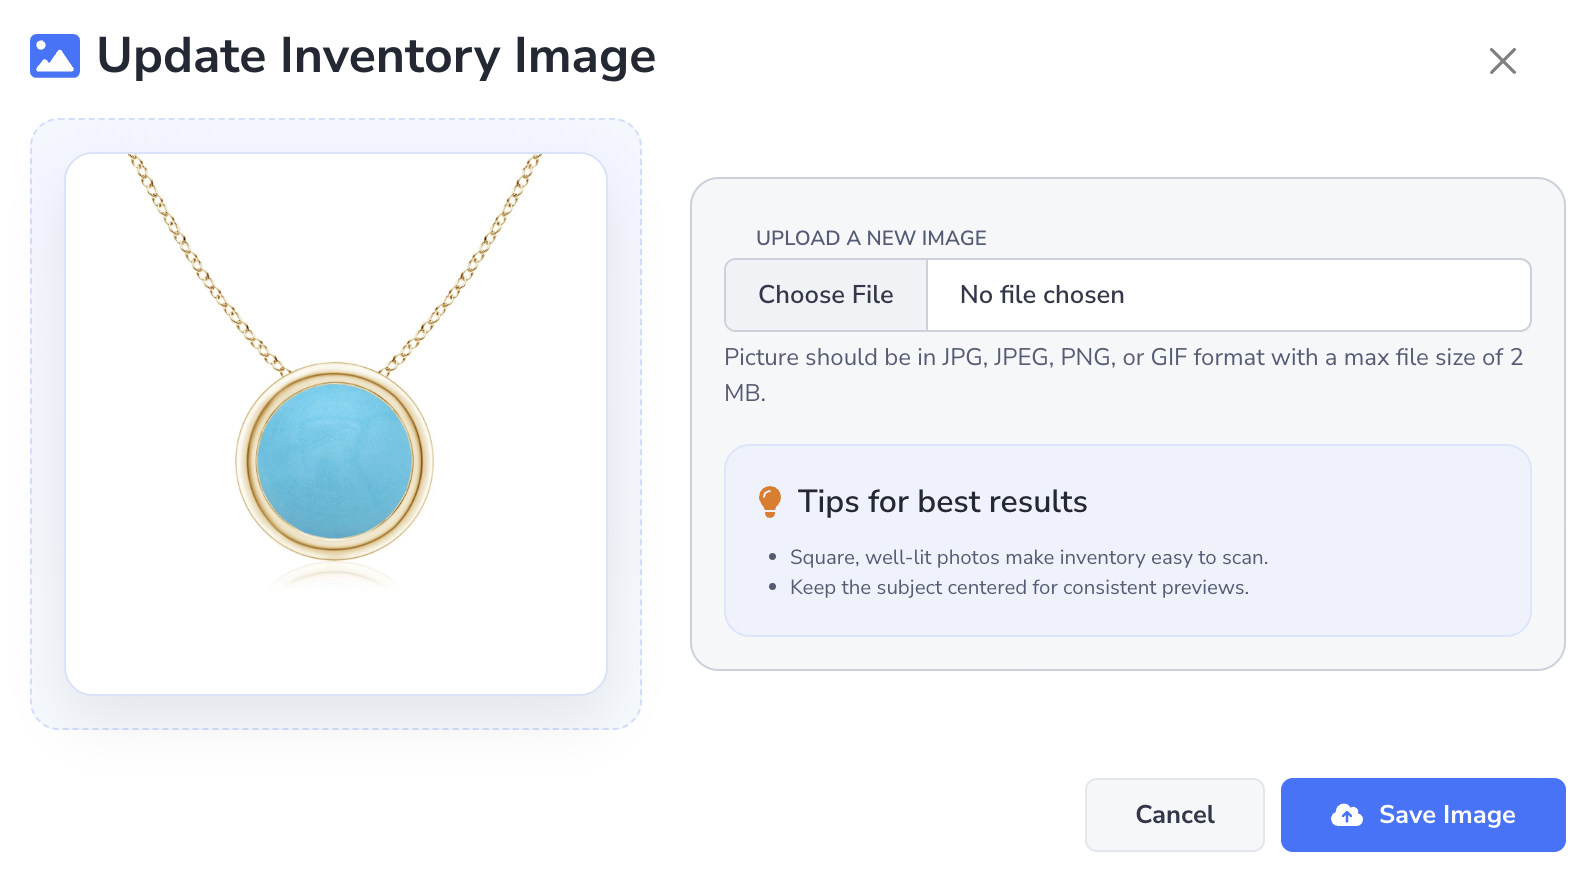
If you want Loupe Factory to create a cleaner, catalog-ready studio version of the inventory image, use the AI image editing options in the same workflow. See AI Inventory Image Editing.
To attach extra photos, bench videos, certificates, spec sheets, or 3D CAD files to the item, use the Media Gallery. The main image updated here remains the primary photo in inventory tables and search results, and it is the Shopify variant image. Extra gallery photos can sync to Shopify with that lot. The gallery holds as many files as you need, and adding files uses no AI credits. On Professional and above, the gallery can also turn the main image into 10 product shots with AI.
If you use the Shopify integration, a manual Products and stock push sends a locally chosen Product photo as the featured image, each Finished lot's photo as that lot's variant image, and extra photos from the lot's Media Gallery as additional images for that variant. A pull can import those additional images back into the gallery. Photos that came from Shopify are not uploaded again. Removing a photo in Loupe Factory does not delete the file in Shopify. A pull fills an empty lot photo from the variant's available image, falling back to the product image. After replacing a lot photo and pushing, check the featured image and gallery order in Shopify.
Write a Storefront Description for an Inventory Item
Each inventory item can carry a Storefront Description, the shopper-facing copy your team publishes on a webshop, marketplace, catalog, or sales sheet. Users with the Admin or Manager role can open an item's details page, click More Actions, then select Storefront Description to type the copy themselves or to use Write with AI, which drafts it from the details already on the record.
The AI writes from shopper-safe fields only. Prices, cost components, internal notes, tag IDs, and HS codes are stripped out before it sees the item, and the copy never mentions price, availability, discounts, or shipping. Descriptions are saved on the item record.
A Shopify product push uses the product type's description first. If it is blank, the newest Finished inventory item on that Product with a saved description supplies the Shopify product copy.
Each lot's description can also sync both ways through loupe_factory.variant_description. A push with a populated lot description creates the Shopify definition when it is missing. A supported, populated value from that metafield updates the lot on pull; blank descriptions do not clear copy in either direction. See How Descriptions Reach Shopify for the setup and the separate Product description rules. Your team chooses which other channels each description reaches.
For the tone options, the credit cost, and what to check before saving, see Storefront Descriptions.
Inventory Pricing
Each inventory item can store three optional unit prices:
- Cost Price: your internal cost for the item.
- Sell Price: the selling price your team records for the item.
- Retail Price (MSRP): the manufacturer's suggested retail price, kept as a reference alongside your cost and selling prices.
All three use the item's Currency and Price Basis, such as per piece or per gram. Retail Price is a unit amount, not the combined retail value of all stock on the record. Setting it does not change Cost Price, Sell Price, or profit calculations.
View inventory prices
Look for the Retail Price column in inventory tables. On an item's details page, Pricing Details shows it as Unit Retail Price, with the item's currency and price basis. The other prices are labeled Unit Cost Price and Unit Sell Price.
Admins can view all three prices. Managers can view Sell Price and Retail Price. Members can view Retail Price. Existing inventory and location access still applies, so users only see prices on records they can access. Reading Retail Price does not grant CSV export access; both inventory export options remain admin-only. See Security and Access.
Edit inventory pricing
Only admins can change inventory prices, currency, or price basis.
- Find the item in Inventory > All, Finished, or Materials & Supplies, and open its details page.
- Select More Actions > Edit Pricing, or click the edit icon in Pricing Details. You can also open Edit Pricing from the item's action menu in an inventory table.
- Review Currency and Price Basis Per Unit. These apply to all three prices on the item.
- Update Cost Price Per Unit, Selling Price Per Unit, or Retail Price Per Unit as needed. Leave a price blank when it is unset. To clear a stored price, empty its field and save. Zero is valid, and manual prices accept up to two decimal places.
- Click Save Pricing, then check the values in Pricing Details.
To use a saved component estimate as Retail Price, see Set Retail Price from Cost Components.
Clearing Retail Price on a Shopify-linked lot
Once Loupe Factory has sent a Retail Price for that variant, clearing it here clears Shopify's Compare-at price on the next Products and stock push. Before that first price push, a blank leaves Shopify's value alone. Clearing Compare-at price in Shopify also clears the lot's Retail Price on the next pull. See Retail Price: blank, cleared, and zero.
The workflow below edits prices on selected order line items. Use the steps above to edit prices stored on an inventory record.
Updating Pricing for Inventory-Linked Order Line Items
When selected inventory is already linked to order line items, admins can use the Edit Pricing modal to update pricing without re-entering the inventory context manually.
This modal is available only to users with the Admin role.
The modal is opened from the order line items table after one or more line items are selected. It is useful when you want to compare the selected inventory's stored pricing with the selling price you plan to apply to each line item.
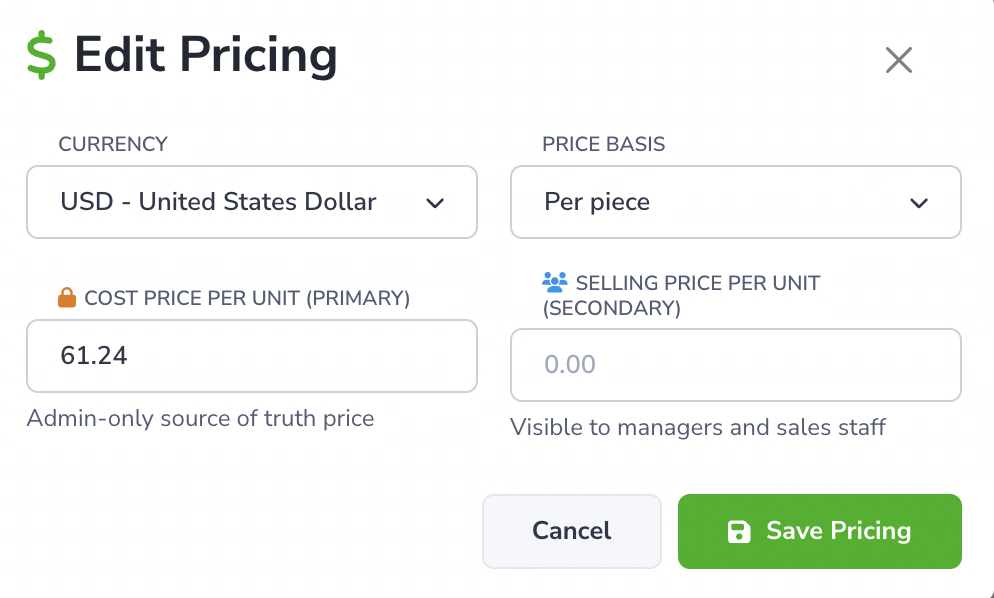
To update pricing in the modal:
- Open the relevant order and select one or more line items.
- Launch Edit Pricing.
- Review each selected line item card. The modal shows key item details such as the product, line number, ordered quantity, and, when available, the selected weight.
- In Currency, choose the currency for that line item.
- In Unit Selling Price, enter the selling price you want to apply.
- In Price Basis, choose how the price should be interpreted, such as per piece or per weight unit.
- If selected inventory is already attached to the line item, review the Selected Inventory section. It can show:
- the inventory tag
- the selected weight and quantity
- stored cost and sell prices from the inventory record, when available
- calculated Net Cost and Net Selling values based on the selected inventory and price basis
- Repeat the review and pricing updates for each selected line item.
- Click Save Changes.
Loupe Factory saves pricing changes for each selected line item individually. If no line items are selected, the modal prompts you to select items from the table before pricing can be edited.
Using AI to Retrieve HS Codes for an Inventory Item
If an inventory item does not already have an HS code, users with the Admin or Manager role can open the item details page and ask Loupe Factory AI for suggested base international 6-digit HS codes. This feature is not available on the Starter plan.
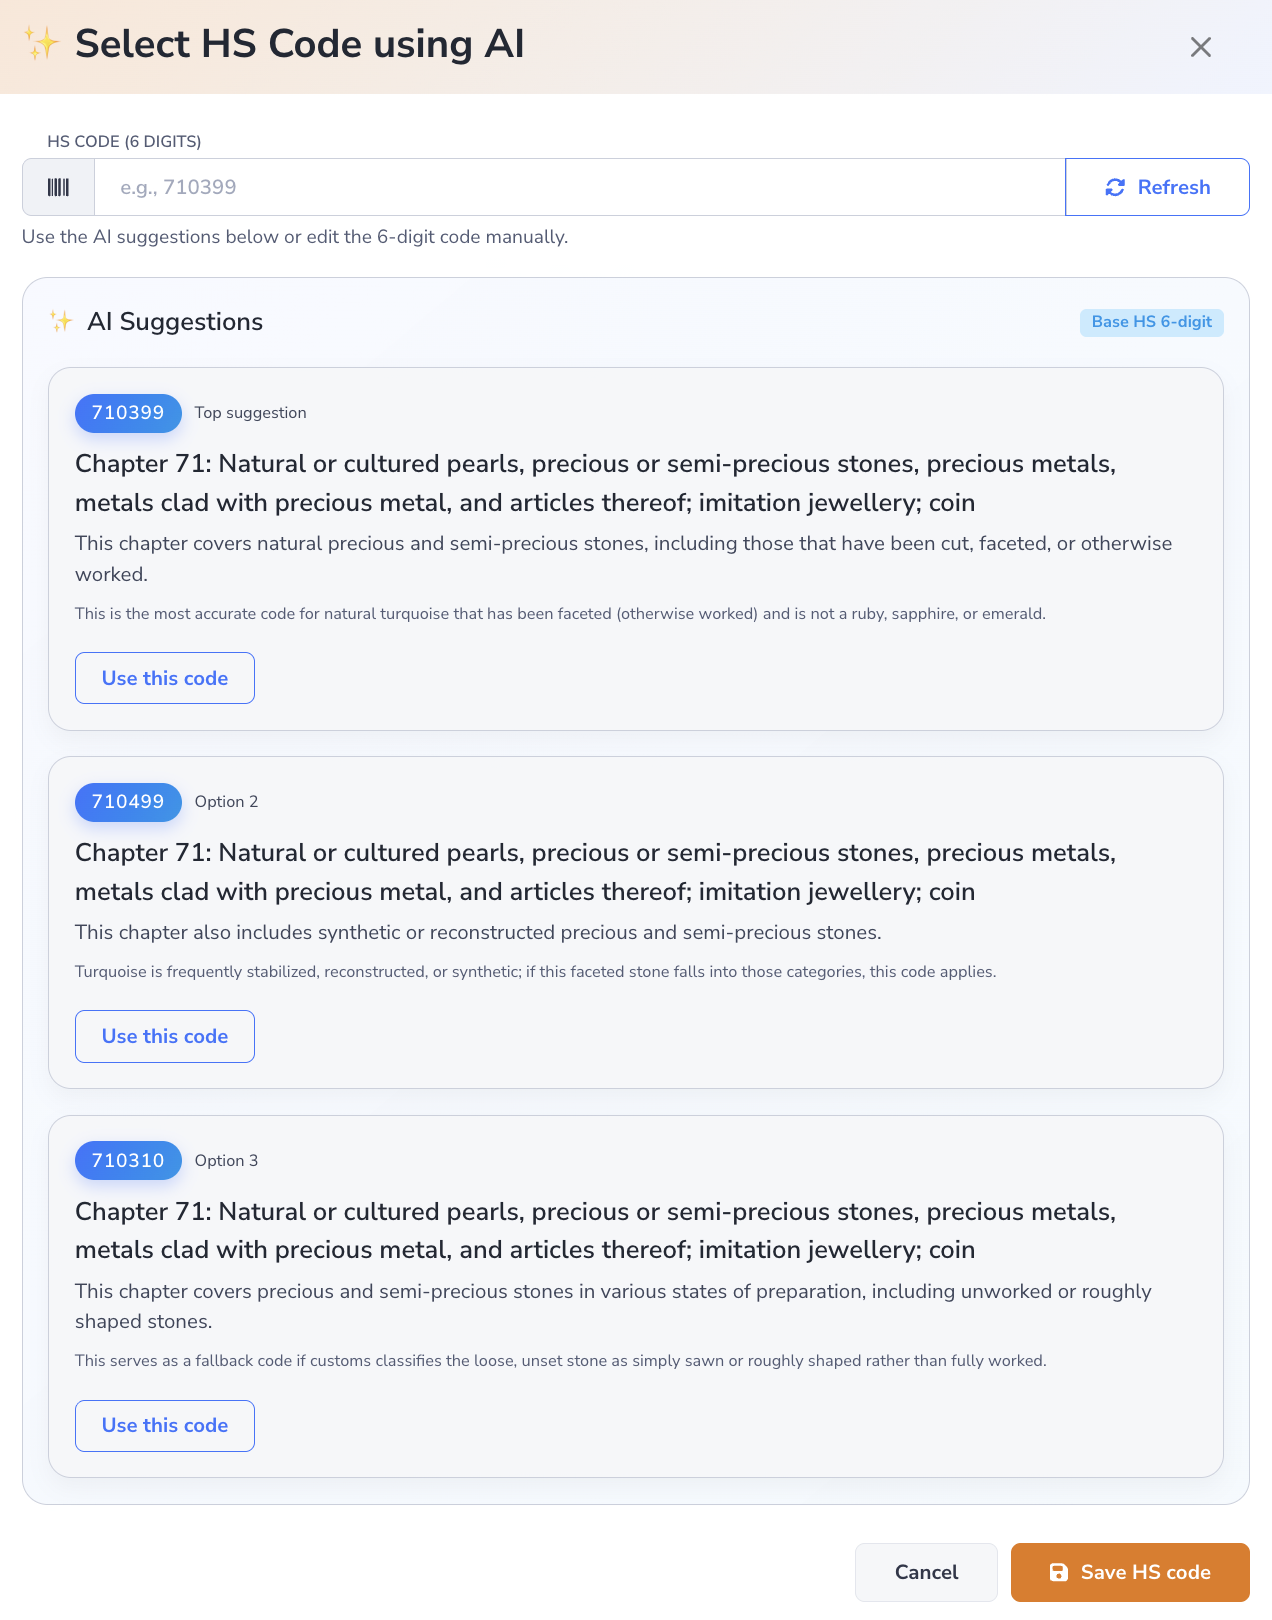
To retrieve and save an HS code:
- Go to Inventory and open the relevant item.
- On the item details page, find the HS Code field.
- If the item does not already have an HS code, click Select HS Code using AI.
- In the modal, review the HS Code (6 digits) field and the AI Suggestions area.
- Wait while Loupe Factory researches suggestions. If needed, click Refresh to request a fresh set of suggestions.
- Review the returned options. Each suggestion includes the 6-digit HS code, the chapter heading, a short chapter explanation, and a short explanation of why the code may fit the item.
- Click Use this code on the best match, or type the 6-digit code manually.
- Click Save HS code.
Note
Using AI to retrieve HS code suggestions consumes AI credits.
Tip
Loupe Factory saves only the base international 6-digit HS code. The saved code must be exactly 6 digits and should not include country-specific extensions. Shopify can also sync a populated HSN code of 6 to 13 digits, with periods where your customs schedule uses them. See Shopify HS codes.
Searching Inventory
You can search for an inventory item at any time in Loupe Factory. This makes it easy to jump directly to the item you need without browsing through product lists first.
There are two simple ways to search:
- Use the search field in the top navigation bar when you want to find an inventory item quickly from anywhere in the platform.
- Open the Find Inventory Item modal by clicking Inventory -> Find Inventory Item in the left navigation menu.
In the Find Inventory Item modal, you can search in a few flexible ways:
- enter the inventory Tag ID
- paste the inventory item's URL
- start typing to search with fuzzy matching
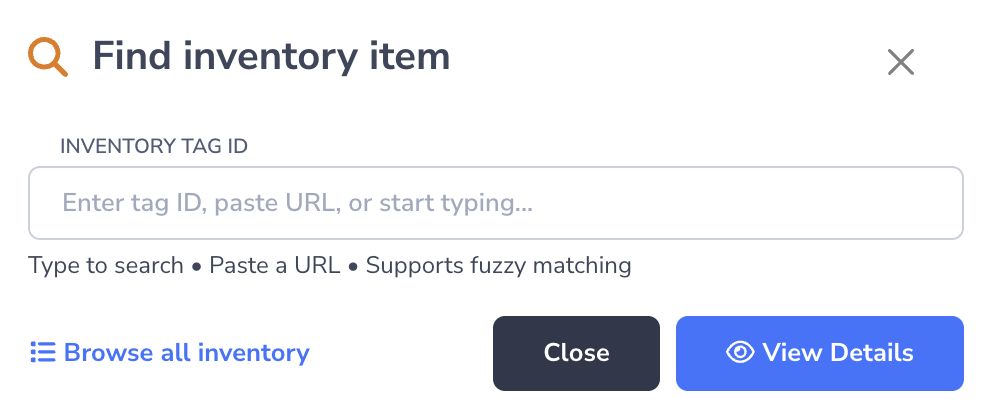
After you find the item you need, click View Details to open that inventory item. If you want to review the full inventory list instead, click Browse all inventory.
Tip
Use the top navigation search when you need the fastest path to an item from anywhere in Loupe Factory. Use the Find Inventory Item modal when you want a dedicated search window with Tag ID, URL paste, and fuzzy matching support.
How Loupe Factory Classifies Inventory
Loupe Factory does more than store a simple item name. Each inventory record can include multiple layers of operational meaning, such as:
- inventory type
- finished type
- materials and supplies type
- product
- shape
- size
- color
- quality
- storage location
- rack or bin
This structure helps global B2B manufacturers and wholesalers track stock more accurately across purchasing, production, warehousing, and fulfilment.
Recommended Data Hygiene
- Use consistent product naming across imports and manual entry.
- Record the correct weight unit so reporting stays reliable.
- Use location and rack fields consistently for faster stock lookup.
- Pick colors from the list. If a color is missing, ask an admin to add it in Admin Settings > Product Settings > Colors instead of typing a new spelling.
- Add notes only when they provide operational value for the next team.
Inventory Types
Loupe Factory classifies inventory through type catalogs in Admin Settings > Inventory Settings. Instead of relying on one general category list, the settings page separates classification into three areas:
- Inventory Types for the top-level inventory class
- Finished Inventory Types for finished-goods subtypes
- Materials & Supplies Inventory Types for raw materials, consumables, and supply subtypes
This structure helps teams keep inventory naming and classification consistent across purchasing, production, warehousing, and reporting.
Managing Inventory Types
Use Inventory Types to control the top-level type users choose when they create or edit an inventory item.
To add or update an inventory type:
- Go to Admin Settings > Inventory Settings.
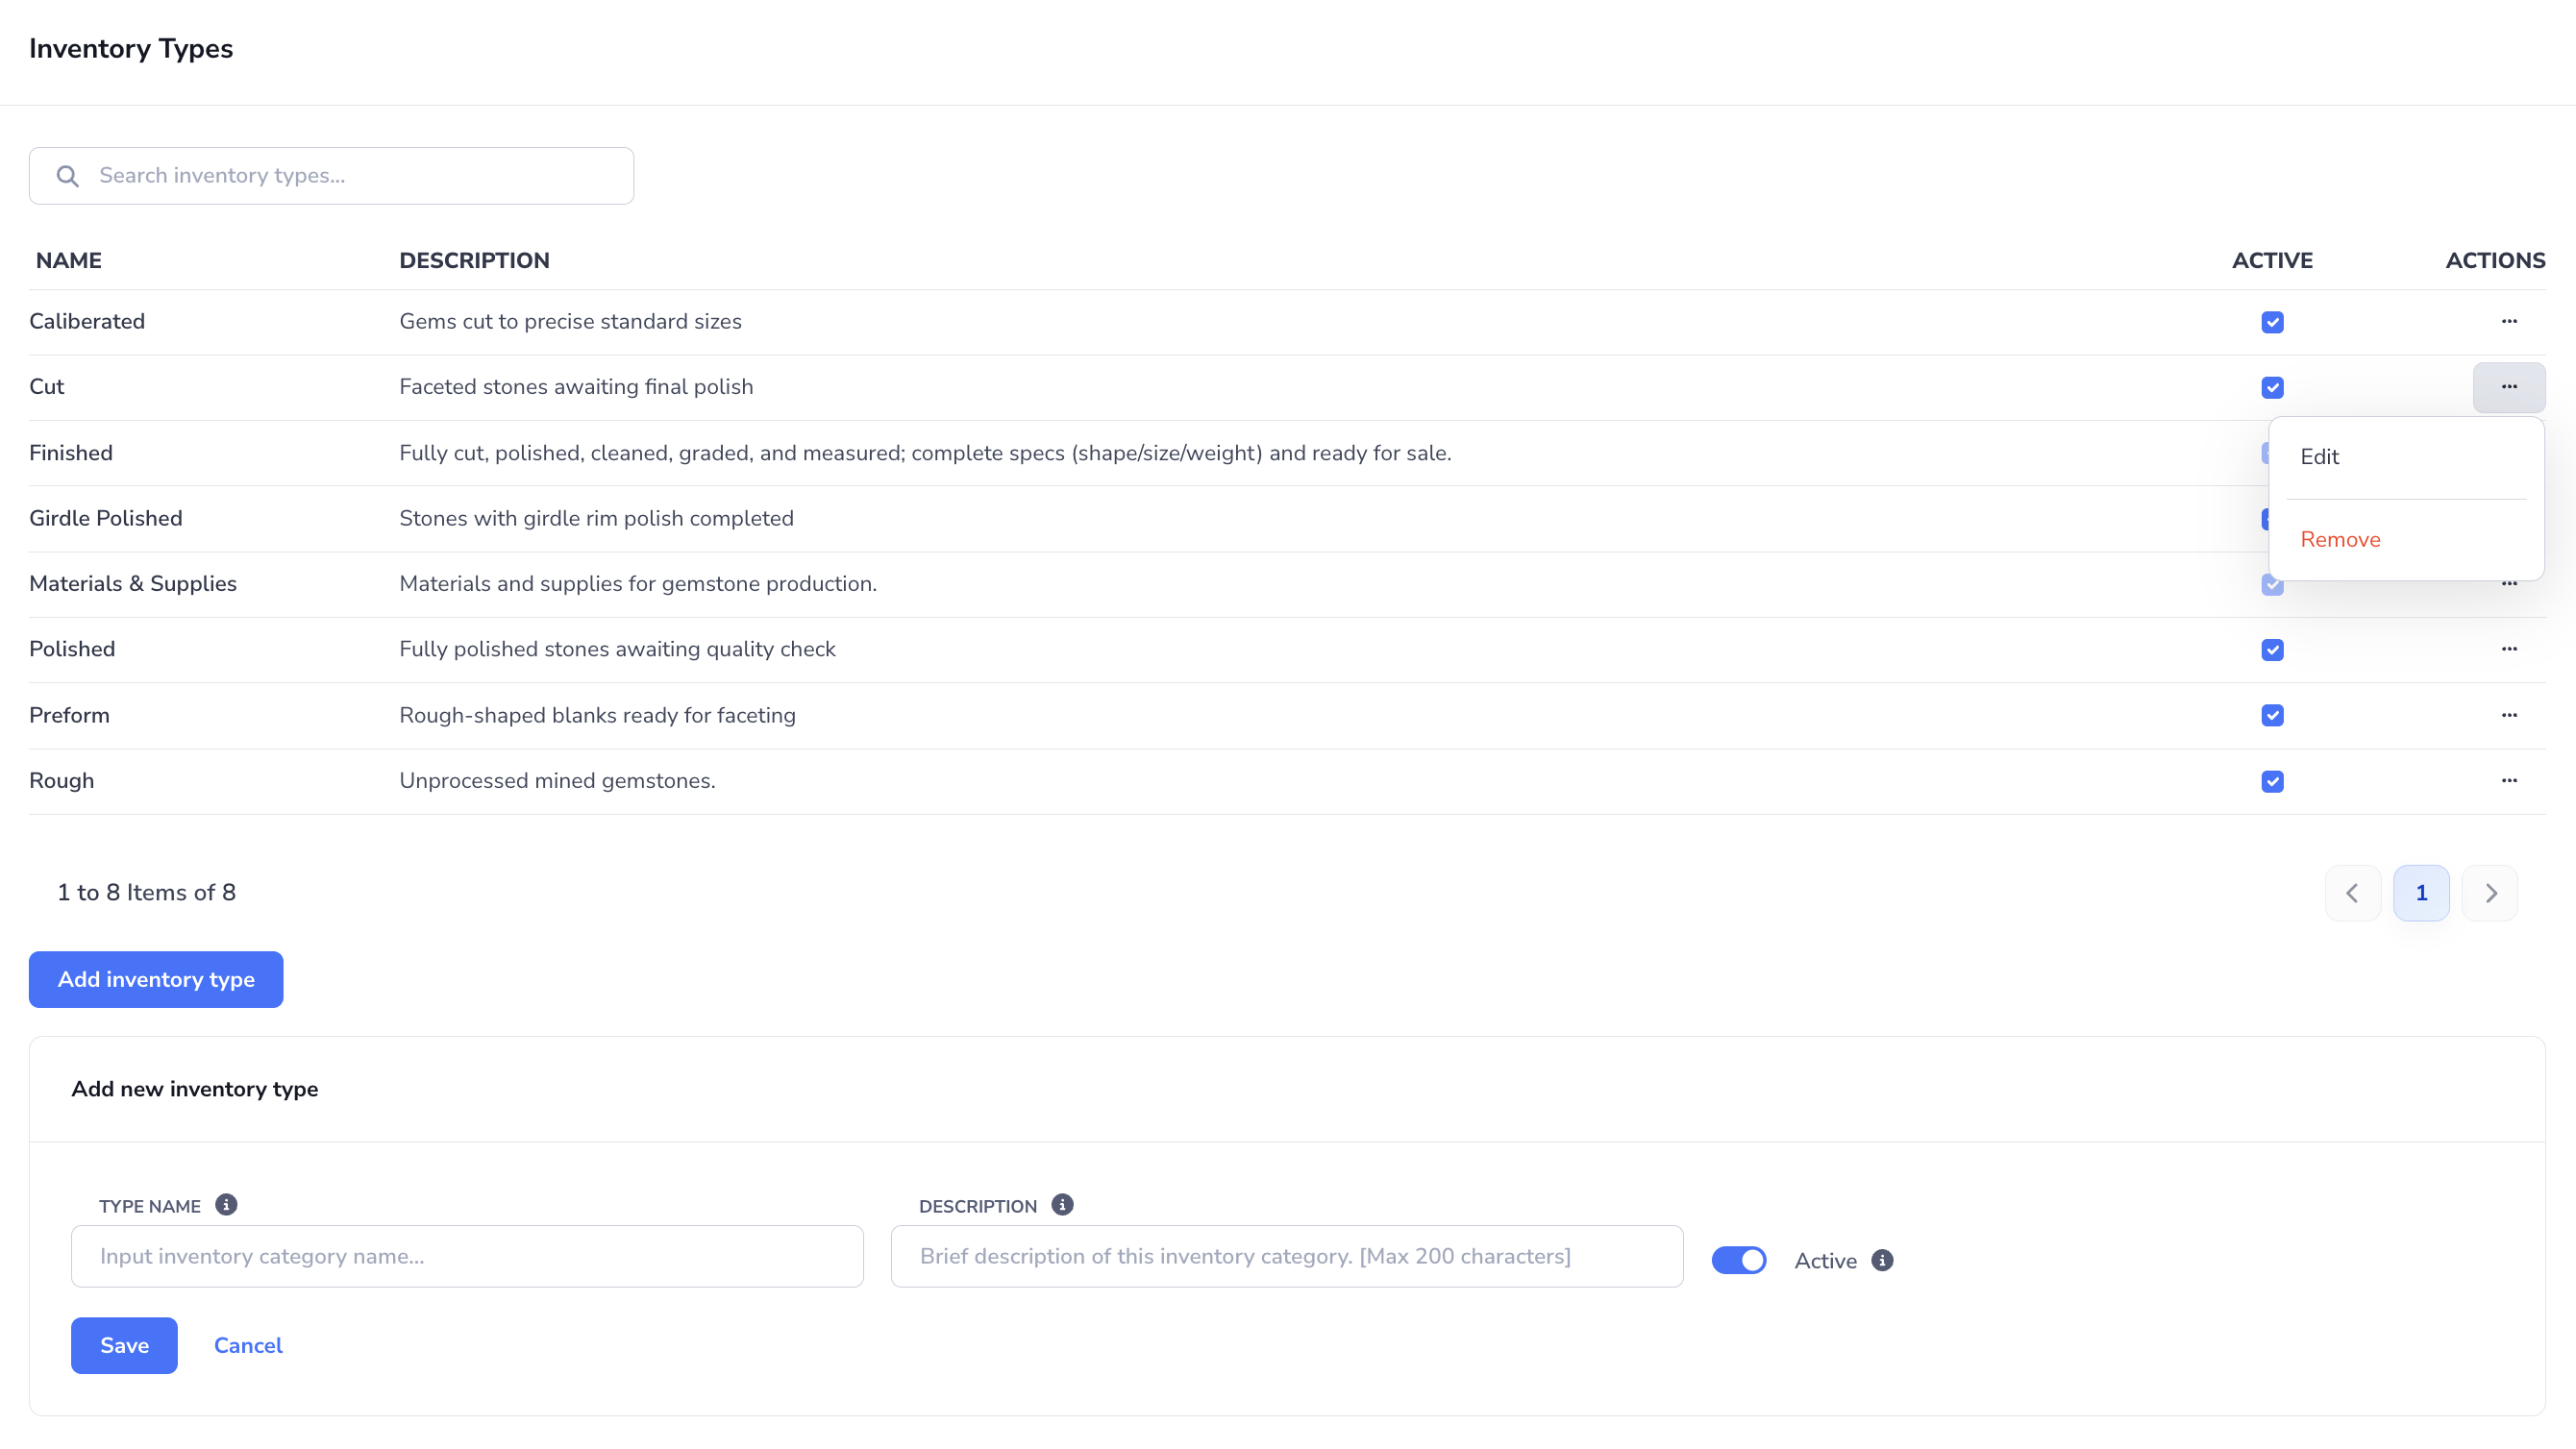
- In the Inventory Types section, review the current list or use the search box to find an existing type.
- Click Add inventory type.
- Enter the Type name.
- Add an optional Description.
- Set Active based on whether the type should be available for new inventory records.
- Click Save.
- To update an existing type, use the row Actions menu and select Edit.
- To control whether a type can still be selected, use the Active toggle in the list when available.
Note
In the current UI, Finished and Materials & Supplies are protected top-level inventory types. They cannot be edited, removed, or deactivated from the Inventory Types section.
Managing Finished Inventory Types
Use Finished Inventory Types to define the subtype choices available when an item's top-level inventory type is Finished.
To add or update a finished inventory type:
- Go to Admin Settings > Inventory Settings.
- Scroll to Finished Inventory Types.
- Review the existing list or use search to find a specific record.
- Click Add finished inventory type.
- Enter the Type name.
- Add an optional Description.
- Set Active based on whether the subtype should remain available for new finished inventory records.
- Click Save.
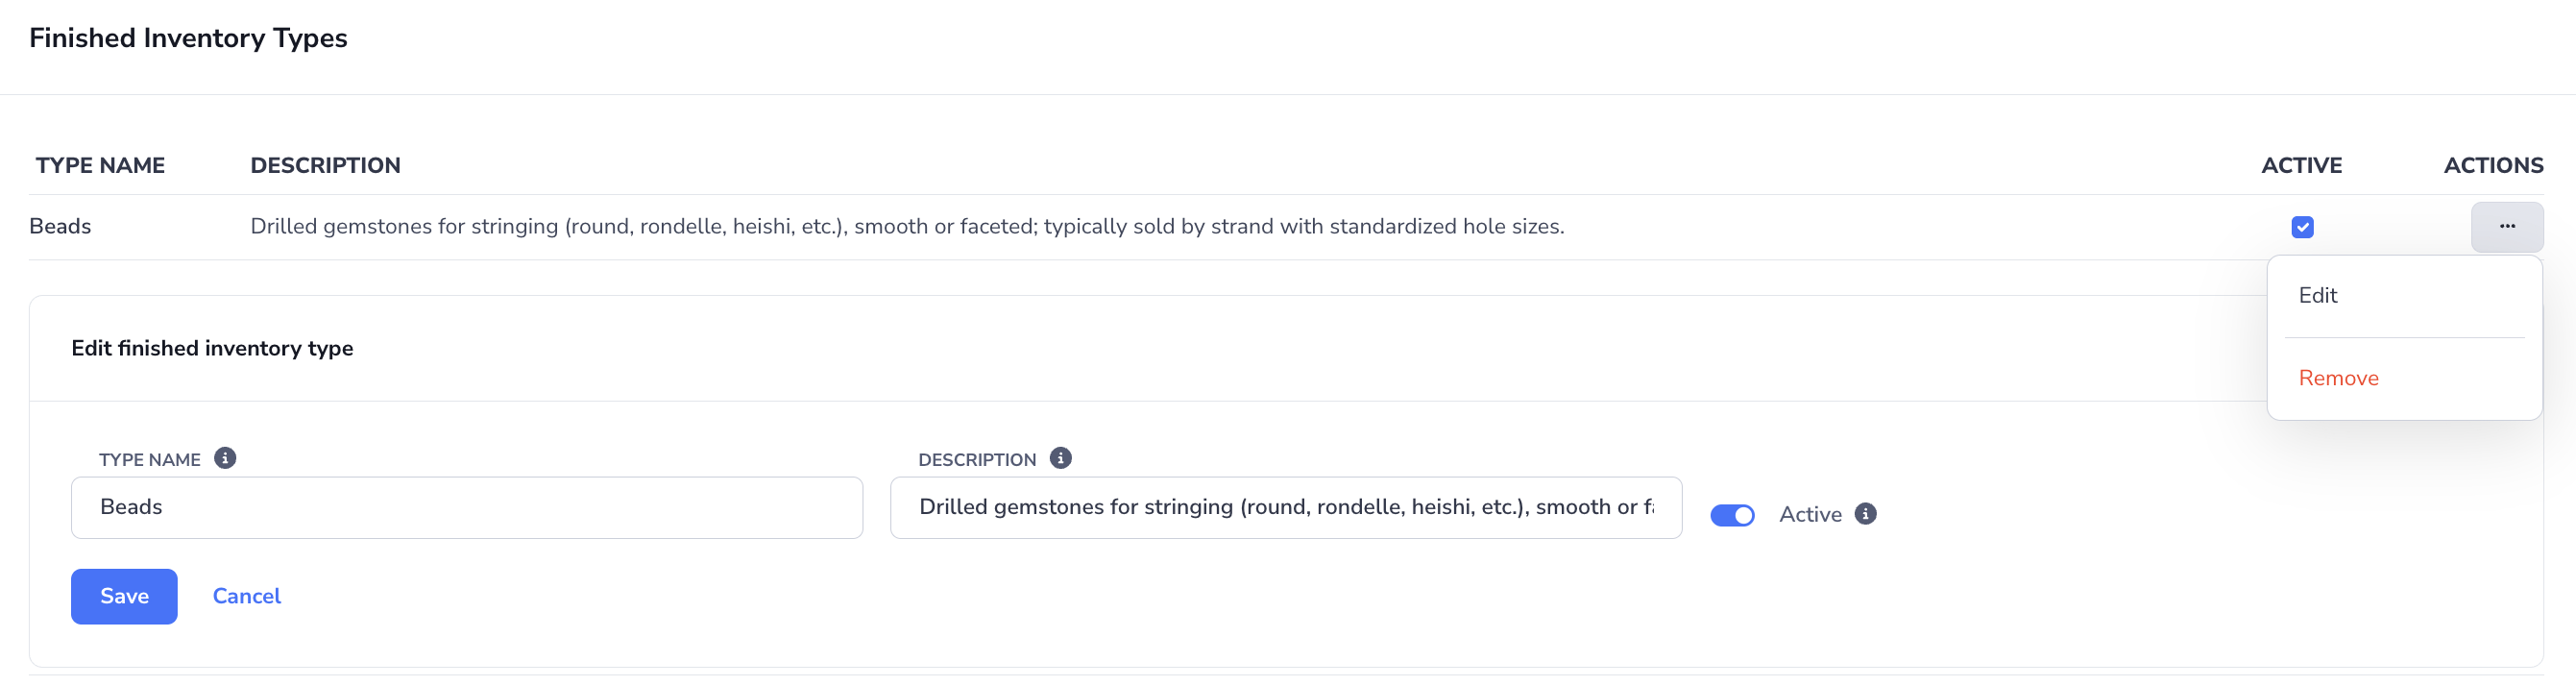
- To update or remove an existing finished inventory type, use the row Actions menu.
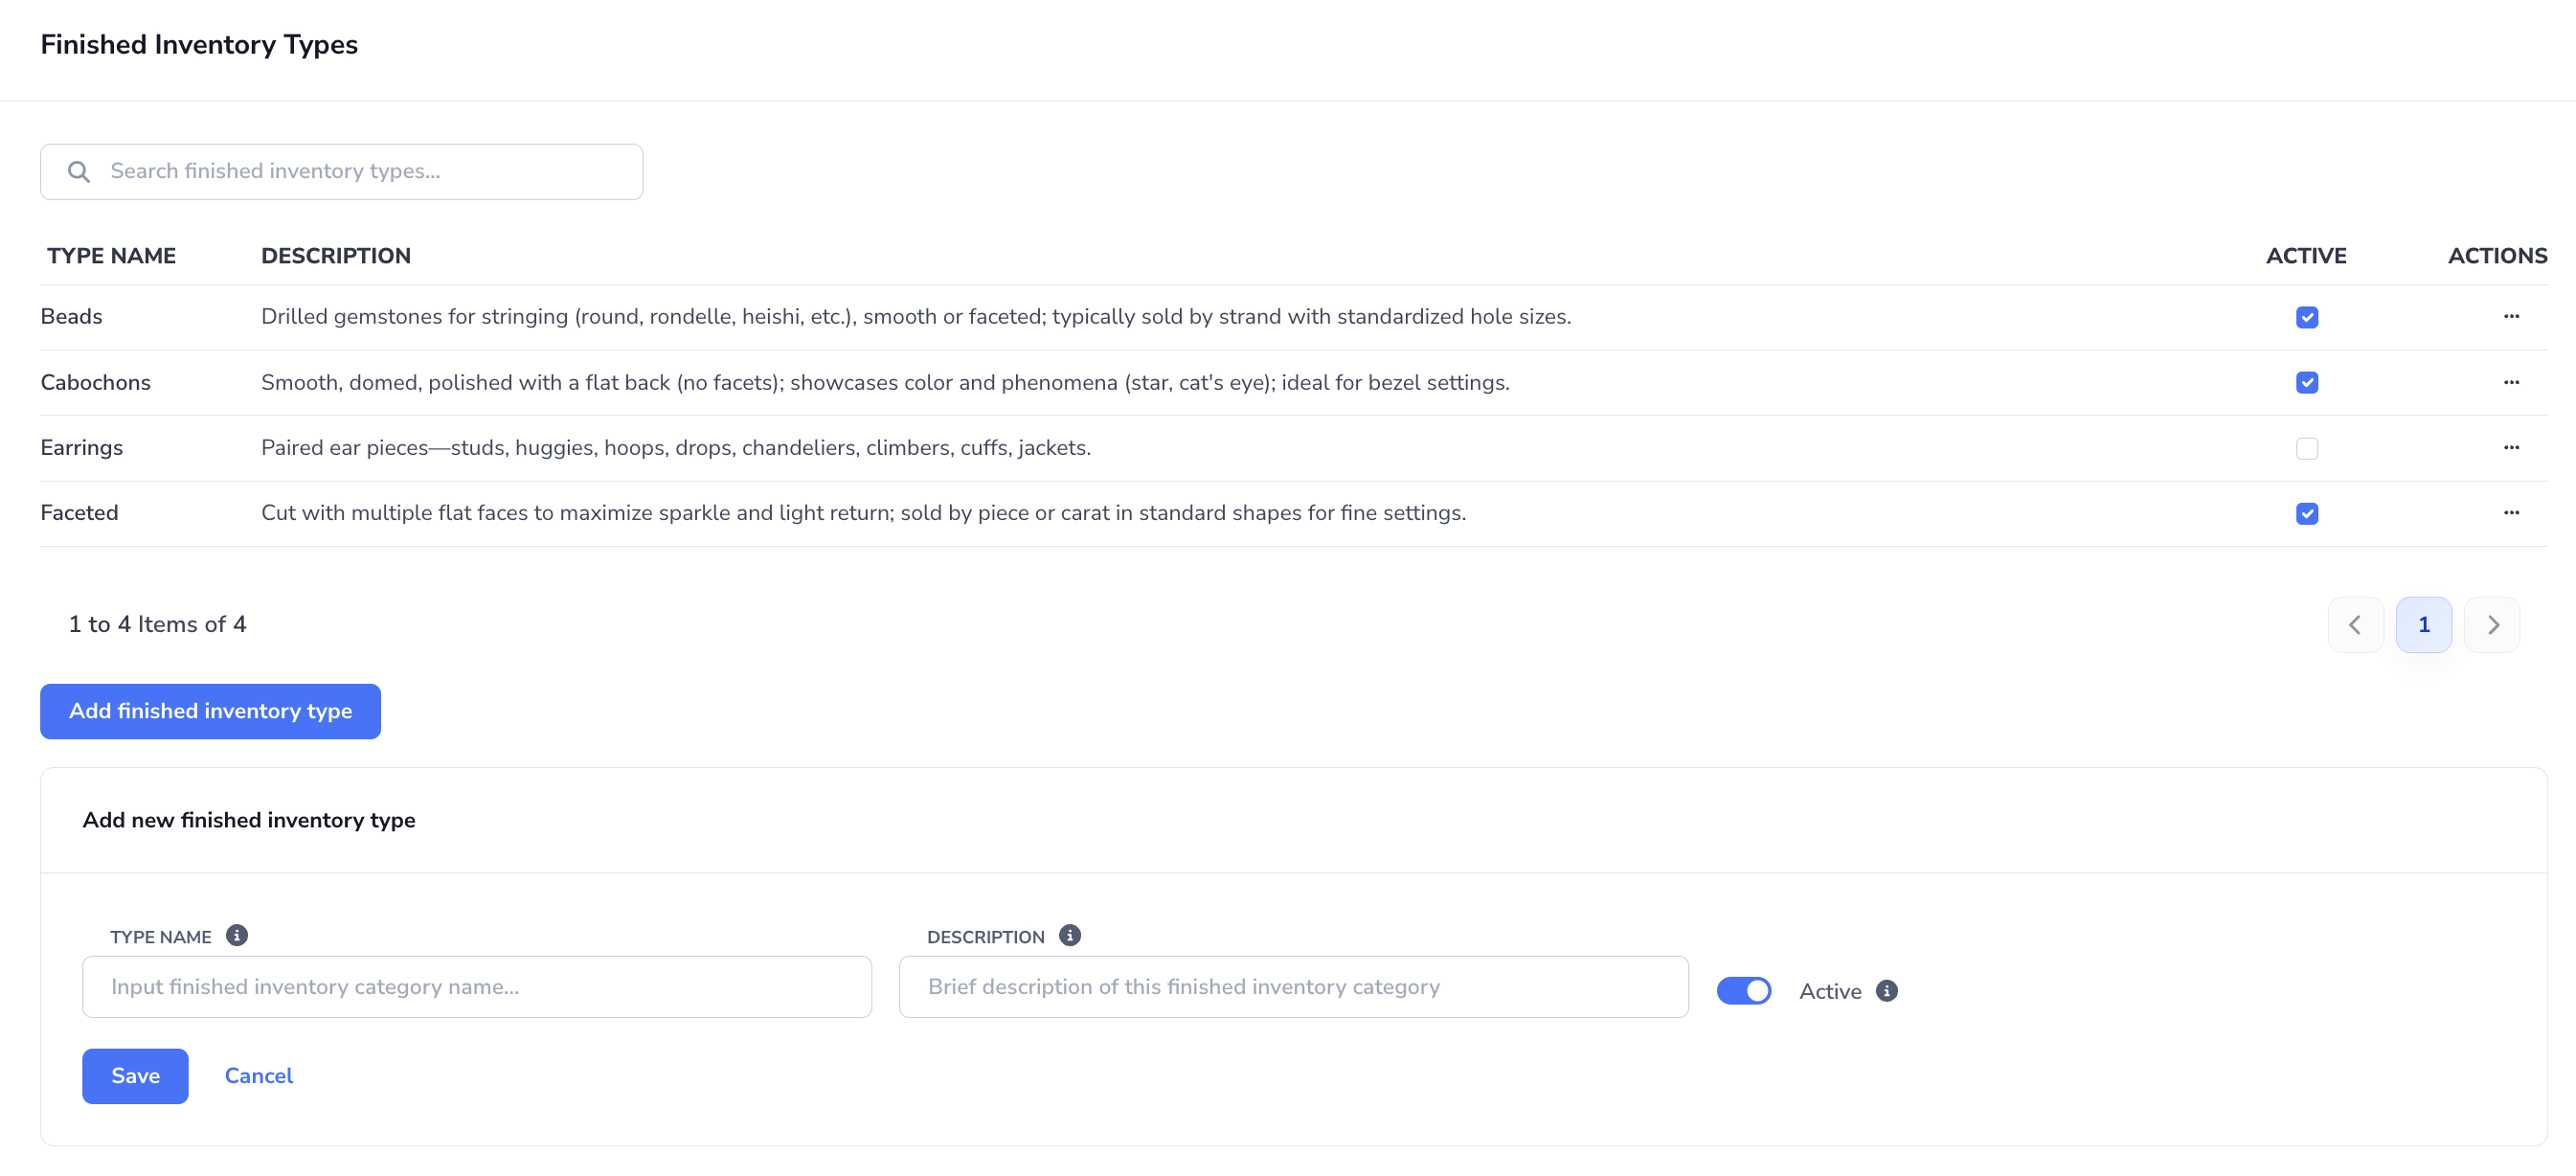
Finished inventory types help teams standardize how completed goods are classified, which keeps reporting and downstream workflows easier to manage.
Note
To edit or remove an existing finished inventory type, open the row Actions menu. If you want to stop new users from selecting that type but still keep historical records easier to understand, turn Active off instead of removing the type completely.
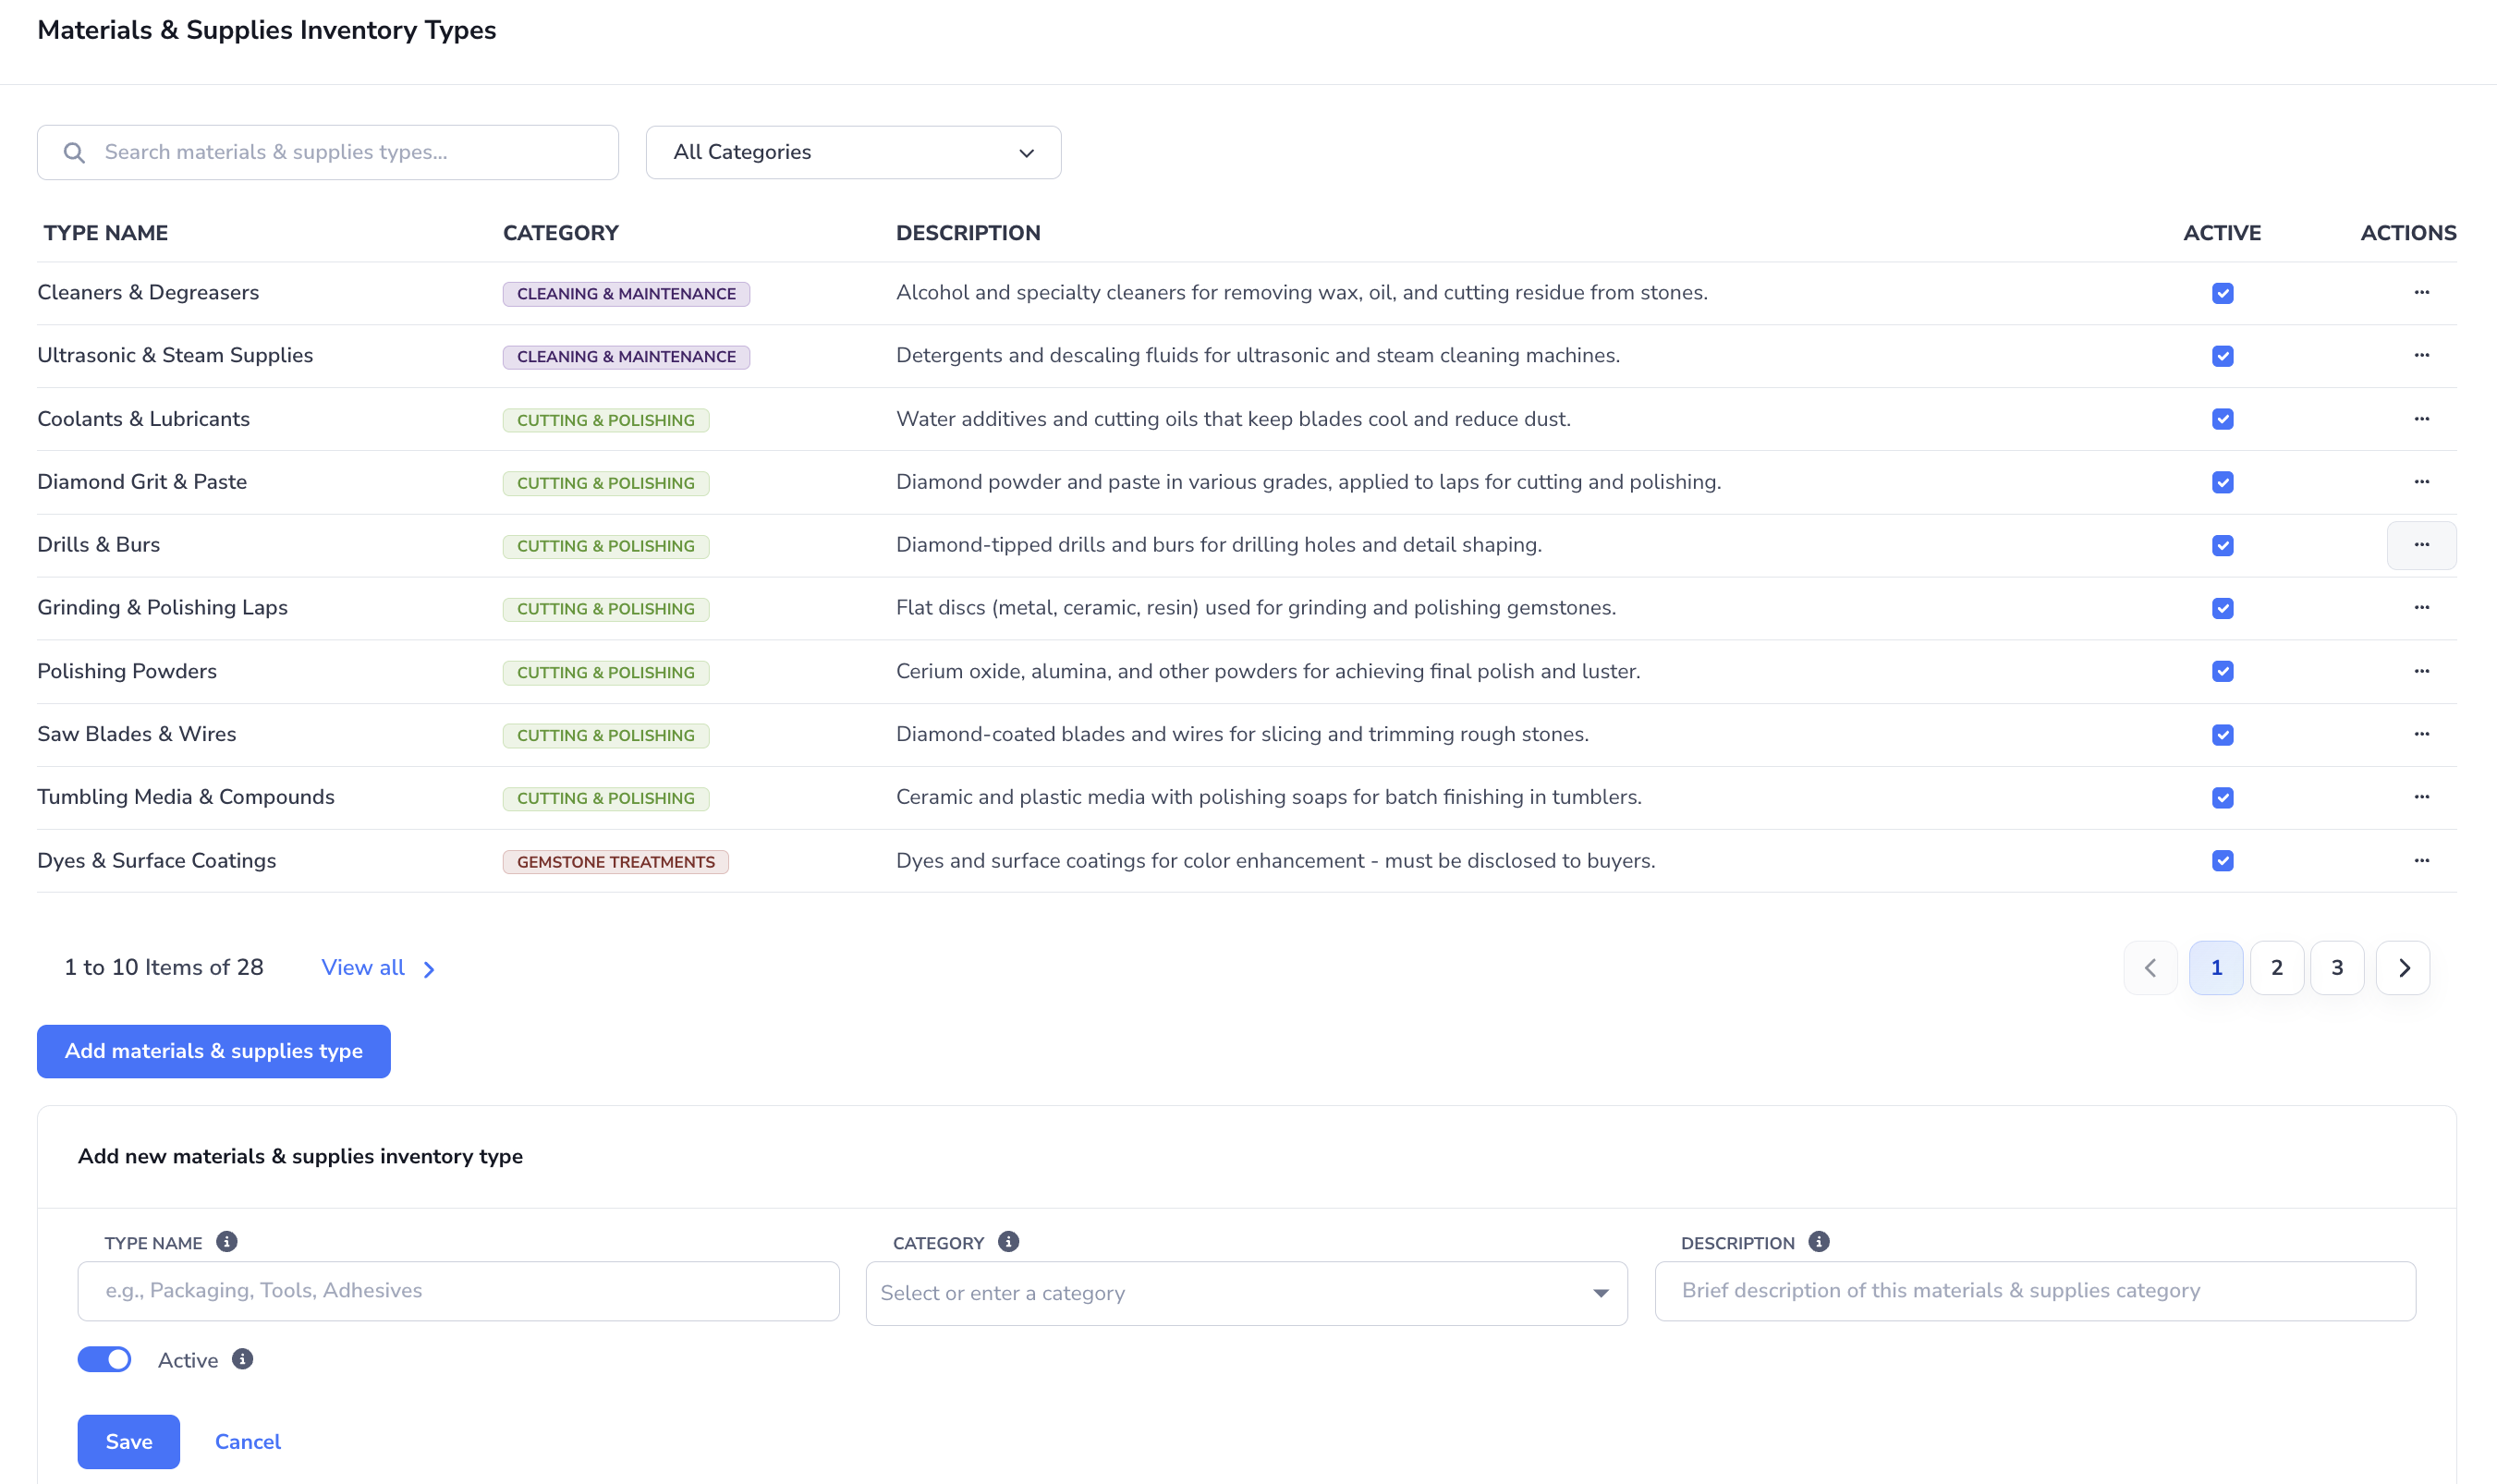
Managing Materials & Supplies Inventory Types
Use Materials & Supplies Inventory Types to define the subtype choices available when an item's top-level inventory type is Materials & Supplies.
To add or update a materials and supplies inventory type:
- Go to Admin Settings > Inventory Settings.
- Scroll to Materials & Supplies Inventory Types.
- Review the existing list. You can use the search box or the Category filter to narrow the table.
- Click Add materials & supplies type.
- Enter the Type name.
- Enter a Category if you want to group similar records together inside the catalog.
- Add an optional Description.
- Set Active based on whether the subtype should remain available for new records.
- Click Save.
-
To update or remove an existing materials and supplies inventory type, use the row Actions menu.
Tip
The Category field in this section is used to organize materials and supplies type records inside inventory settings. It helps admins manage the catalog, but users still classify inventory items by selecting the appropriate top-level type and subtype on the item form.
Next Steps
- Cost Components: Break an inventory item's cost into materials, services, charges, quantities, and linked rate profiles.
- Link Cost Components from a Spreadsheet: Add or update components across existing inventory using Excel or CSV.
- Inventory Item Details: Review one inventory item across current stock, source-to-customer traceability, production yield, orders, shipments, pricing, and AI assists.
- Production Tracking: Issue inventory into production jobs and receive completed output back into stock.
- Order Management: Connect inventory availability with sales and purchase order workflows.
- Customer & Supplier Management: Keep the business contacts behind your stock movements organized.