AI Inventory Image Editing
Loupe Factory can turn regular inventory item photos into cleaner, catalog-ready product images using AI. Use this feature when an item photo shows the correct product, but the background, lighting, or presentation needs to look more consistent across inventory records, product views, and catalog-style workflows.
AI image editing is available from the Update Inventory Image modal. You can upload a new item image or use the existing inventory avatar, choose a studio background, and optionally add a ground shadow or studio lighting. Loupe Factory then shows the original and edited image side by side so you can review the result before saving.
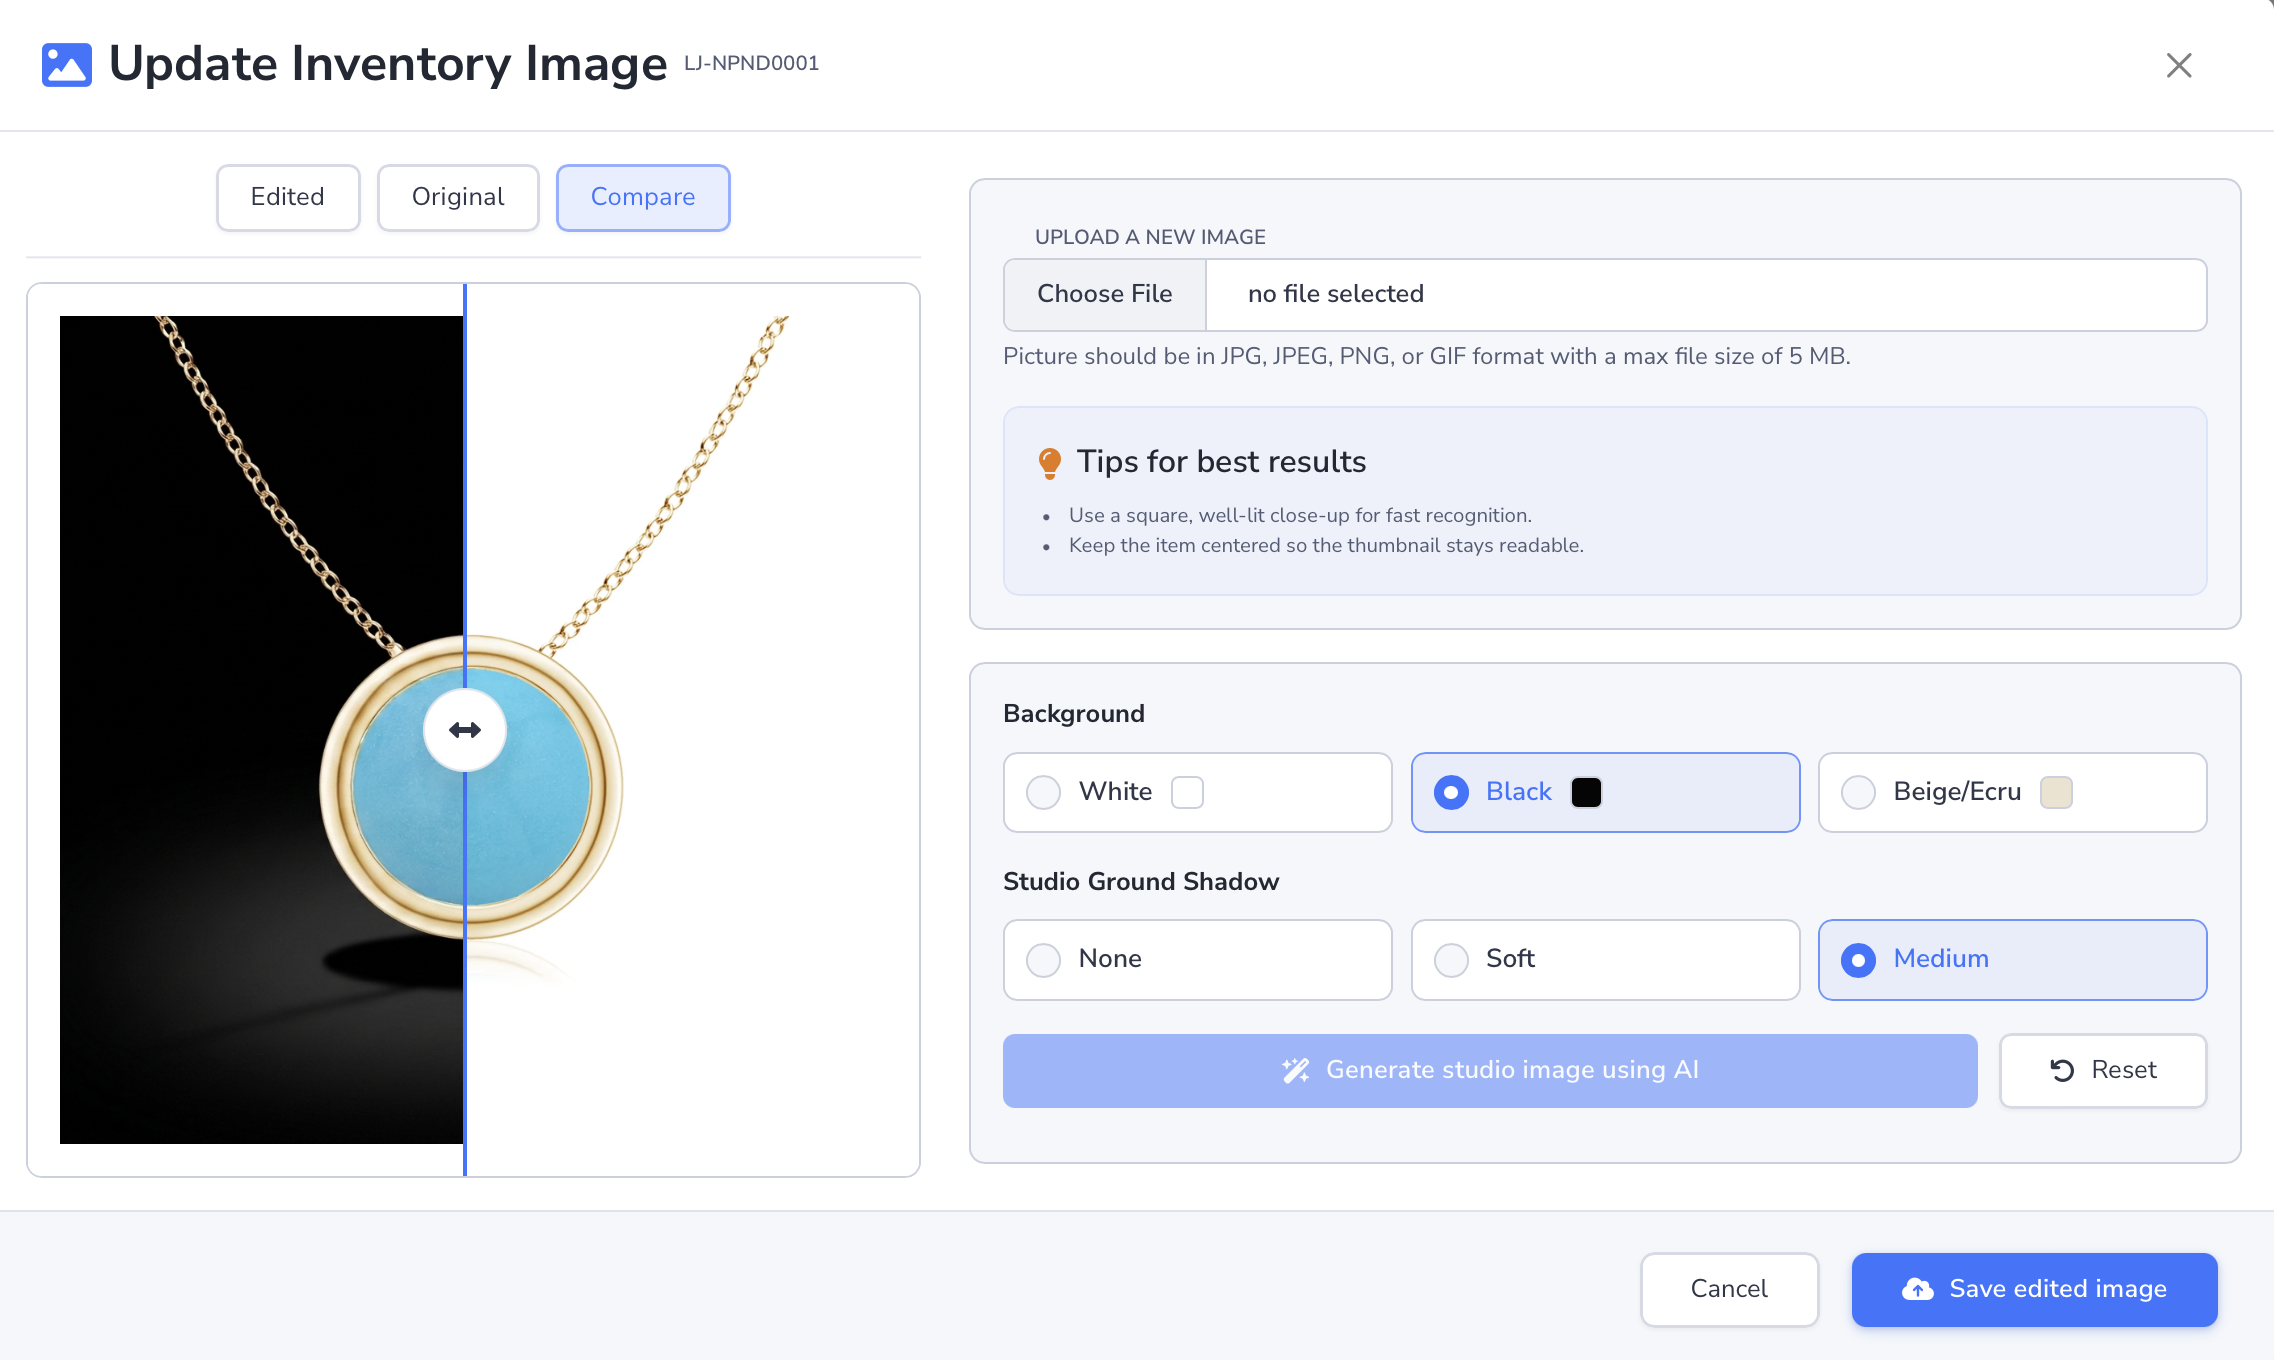
Plan availability matters when choosing studio options. White and Black backgrounds are available on every plan. Professional, Business, and Enterprise add the Beige/Ecru, Off-White, Midnight Blue, and Chocolate Brown backgrounds, the Soft and Medium ground shadows, and Studio Lighting. On Starter, those options show a lock, and choosing one opens the upgrade options.
When to Use AI Image Editing
Use AI image editing when you want to:
- make inventory avatars look more consistent
- remove busy or distracting photo backgrounds
- prepare clearer images for product review, sales, or catalog-style display
- keep similar items easier to compare in inventory tables and item records
Do not use it to change what the item is. The feature is intended to improve the presentation around the product, not to create a different product, quantity, color, material, or finish.
AI image editing changes only the item's single main image. To attach extra photos, videos, certificates, or 3D CAD files to the item, use the Media Gallery. Adding files there uses no AI credits. To turn the main image into 10 photos of the product in different settings, use product shots with AI in the same gallery.
Create an AI-Edited Inventory Image
To create a studio image for an inventory item:
- Go to Inventory and open the inventory item you want to update.
- Click More Actions, then select Update Image.
- In the Update Inventory Image modal, upload a supported image or use the existing inventory avatar when that option is available.
- To crop, zoom in with the slider under the preview, then drag the image to frame the item. You can also double-click the preview, or hold Ctrl (⌘ on a Mac) and scroll. The AI edit and the saved image keep that framing. Zooming out below 100% does not change the saved image.
- Choose a Background:
- White or Black, on every plan
- Beige/Ecru, Off-White, Midnight Blue, or Chocolate Brown, on Professional, Business, and Enterprise
- Set Studio Ground Shadow to None, Soft, or Medium. Soft and Medium are available on Professional, Business, and Enterprise.
- Leave Studio Lighting on No change, or, on Professional, Business, and Enterprise, pick Soft studio, Natural window, Hard contrast, or Dramatic rim.
- Click Make image studio-like using AI.
- Review the comparison view. Loupe Factory shows the original image and the edited image together so you can check the change before saving.
- Save the edited image only when the item still looks accurate.
If you save the edited image, only the AI-generated image is stored as the inventory avatar. The source upload is used to create the edit but is not stored as a separate inventory image.
Choose the Right Studio Options
Hover over an option in the modal to see a short hint about it.
| Background | Plans | Good for |
|---|---|---|
| White | Every plan | Standard catalog and marketplace images, light product pages, and clean inventory tables |
| Black | Every plan | High contrast for light-colored, shiny, and reflective products |
| Beige/Ecru | Professional and above | A warm, light neutral for natural materials and warm tones, where pure white feels too stark |
| Off-White | Professional and above | A softer white that keeps the edges of white and clear products visible |
| Midnight Blue | Professional and above | A deep blue that makes metal, glass, and light colors stand out |
| Chocolate Brown | Professional and above | A dark, warm brown that suits gold, wood, and leather |
| Ground shadow | Plans | Good for |
|---|---|---|
| None | Every plan | Flat, simple previews where only the product should stand out |
| Soft | Professional and above | A natural studio look, with a faint, wide shadow under the product |
| Medium | Professional and above | A clearer shadow that grounds the product and separates it from the background |
| Lighting | Plans | What it does |
|---|---|---|
| No change | Every plan | Keeps the light from your photo |
| Soft studio | Professional and above | Even, diffused light with soft shading |
| Natural window | Professional and above | Soft daylight from one side |
| Hard contrast | Professional and above | Crisp highlights and deeper shading |
| Dramatic rim | Professional and above | Low-key light with bright edges |
For most inventory avatars, start with a White background, None for the shadow, and No change for lighting. This keeps the image easy to scan in square preview areas. On Professional and above, use the Soft shadow when the image needs a more natural studio look, and try Soft studio lighting when the light in the original photo is uneven.
What the AI Changes
The AI is designed to preserve the actual inventory item while cleaning the presentation around it. It attempts to:
- replace the original background with the selected studio background
- preserve the item shape, color, count, texture, finish, and details
- keep fine details such as facets, prongs, chains, stitching, holes, reflective areas, and thin edges intact
- add a soft or medium ground shadow only when selected
- change the lighting only when you choose a lighting style, keeping the product's real colors and finish
- avoid changing the product into a different object
Always review the edited image before saving. If the item shape, count, color, or details look wrong, do not save that result. Try again with a clearer source photo or a simpler studio option.
Supported Image Uploads
Inventory image uploads support:
- JPG
- JPEG
- PNG
- GIF
Maximum upload size: 4 MB
Recommended Product Images
Best results come from clear product photos where the item is easy to see and centered in the frame.
Recommended:
- square or near-square product photo
- item centered in the frame
- good lighting
- product not cropped at the edges
- minimal hands, labels, papers, trays, or background clutter
- product fills around 60% to 85% of the image
Best aspect ratio:
| Aspect ratio | Recommendation |
|---|---|
| 1:1 | Best choice for inventory avatars and catalog-style previews |
| 4:5, 3:4, or 4:3 | Usually acceptable when the product is centered |
| Very wide panoramic images | Avoid when possible |
| Very tall narrow images | Avoid when possible |
| Heavily cropped photos | Avoid when possible |
Loupe Factory displays inventory avatar previews in a square image area, so square photos usually look best in inventory tables, item records, and catalog-style views.
Review Before Saving
Before saving the AI-edited image, check:
- the item count is still correct
- the shape and outline still match the original item
- colors, stones, metal tone, coating, or finish still look accurate
- small details such as prongs, chains, holes, and fine edges are still visible
- the product is not cropped or stretched
- the selected background and shadow do not hide important details
- any new lighting still shows the product's true colors
This review step is important for teams that rely on product images across sales, warehouse, production, and customer communication workflows.
AI Credit Usage
Loupe Factory charges AI image editing through the normal AI Credits system. Image edits are billed at the image rate:
10 AI credits per started 1,000 tokens
That is ten times the rate for text features such as storefront descriptions, so every edit uses at least 10 credits.
Each studio background generation counts as one AI image edit. Studio lighting runs in the same edit as the background, so it adds no second edit. If you also select a Soft or Medium ground shadow, Loupe Factory runs a second AI image edit, so credit usage is usually about twice the background-only amount. Soft and Medium shadows are available on Professional, Business, and Enterprise.
An edit starts only when at least 40 credits are available. With a Soft or Medium shadow, it needs 80 credits, enough for both edits, so the shadow edit never stops halfway.
Approximate planning guide:
| Image type | Background only | Background and shadow |
|---|---|---|
| Small image, under 1 MB, around 800 to 1200 px | 30 to 50 credits | 60 to 100 credits |
| Medium image, 1 to 3 MB, around 1200 to 2400 px | 40 to 80 credits | 80 to 160 credits |
| Large image, 3 to 4 MB, high resolution | 60 to 120+ credits | 120 to 240+ credits |
Actual usage can vary based on image complexity, resolution, and output size. The final charge is recorded in your organization's AI usage logs under Inventory Image Editing.
For cost planning, Loupe Factory's current AI overage rate is $0.01 per AI credit, so a background-only edit of a medium image costs about $0.40 to $0.80. If your organization uses a different billing currency, tax setup, or enterprise contract, your invoice terms may differ.
For the full credit system, see AI Credits & Billing.
Tips for Better Results
- Use a source photo where the real item is already clear.
- Keep the product centered before uploading.
- Avoid photos where fingers, tools, packets, labels, or trays cover the item.
- Leave the ground shadow on None when you want the lowest credit usage. Lighting adds no extra edit.
- On Professional and above, use the Soft shadow when the image needs depth but should still feel neutral.
- Try a square crop when the preview looks too wide or too tall.
- Use a smaller source image when it still shows the product details clearly.
Next Steps
- Inventory Management: Learn how to add, edit, and manage inventory items.
- Media Gallery: Attach supporting photos, videos, PDFs, and 3D CAD files, or turn the main image into 10 product shots with AI.
- Products: Understand how product images and inventory item images support the shared product catalog.
- AI Credits & Billing: Review how AI credits, usage logs, top-ups, and overage work.